Categories
Uncategorized

ATtinyNoisy

ATtinyNoisy

I needed some small boards to put an ATtiny85 on, so I drew up a simple board in Fritzing and had them made up at OSH Park.

ATtinyNoisy

Here’s the breadboard view in Fritzing. Whenever I need “holes” to solder random components into I just use screw terminals. I’m sure there’s another/better way, but I’ve not found it yet, so I keep doing it this way.

ATtinyNoisy

Once the breadboard view is done, I go to the PCB view and move things around, make all the connections, and then export the files in Gerber format. Once you have a folder of Gerber files, you can ZIP it up and then upload to OSH Park for fabrication. (I covered this process in a previous post.)

MCN Gerber Viewer

I did find this Mac OS X application called MCN Gerber Viewer which allows you to view Gerber files. You can view the different “layers” and turn them on and off to check your board before fabrication. OSH Park shows you what your board will look like when you upload it, so you can easily check for issues, but MCN Gerber Viewer is still handy to have around to check files before you upload them.

You can download ATtinyNoisy, which includes the Fritzing file and the Gerber files, or just order it from OSH Park.

Categories
Uncategorized

A New Light

A New Light

I recently acquired this lighted sign that was made by Buchler Instruments. (It’s probably 30 years old since Labconco acquired Buchler Instruments in 1989.) I decided to tear it apart and replace the non-functional insides with an LED strip. I’ll also be adding some vinyl to the front plate, but I’ll save that for Part II of this project.

Here’s some of the tear-down process, in photos.

A New Light

The front plate sort of press-fits into place. It seems like it should slide in from the side, but it wouldn’t budge, so I was able to pull & pry it out the front.

A New Light

After the bulbs were removed, the back reflector came out. I mean, it came out with a lot of pulling and a bit of bending. You can see that this thing is a bit worn and dirty. Looks like it may have gotten wet or had some chemicals seep into it (or out of it.)

A New Light

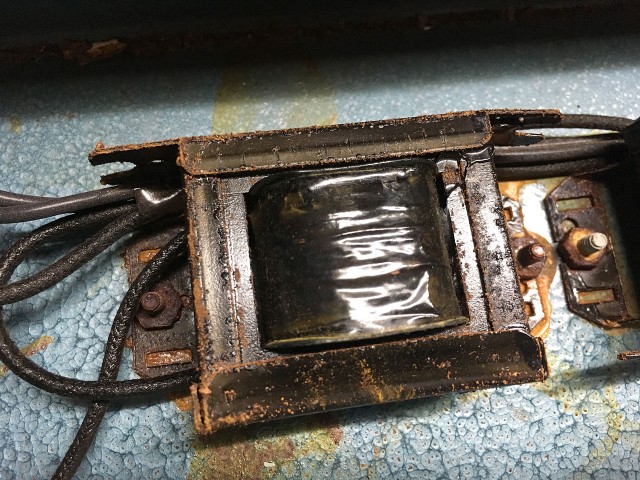
Plenty of rust, dirt, and corrosion. This is a not a transformer I’d trust to use in the future. Luckily I’ll just need a 5 volt power supply.

A New Light

More nasty stuff. The contacts for the bulbs didn’t look bad, but there was enough crud elsewhere.

A New Light

Everything out! The wires were brittle, and falling apart. The hardware was rusted, and overall just a mess. Still, it was nice to see the construction of this thing, and admire some parts of it.

If I don’t use the existing reflector plate I’ll just make a new one. I could probably make one using foamcore since heat won’t really be an issue with the LEDs.

A New Light

That crackle finish is beautiful. Luckily the outside is in much better shape than the inside. Just a little bit of rust on the back, but nothing that will be noticeable.

Categories
Uncategorized

We Humans Create Things…

ART

“Sometimes we don’t understand the significance of something until we create it.”

Categories
Uncategorized

LaserCut LetterPress

ART

“LaserCut LetterPress” (for lack of a better name) is a project I worked on in 2014/2015 which was an idea to create a full letterpress set using a laser cutter capable of cutting 3mm Baltic Birch plywood. The idea was that the files would be released that allowed anyone with access to a laser cutter (even lower-powered cutters with small beds) to create the set.

I know there are many ways to create things, but at the time I wanted to limit production to one method, and one particularly fast method, vector cutting with a laser cutter. (Note: If you’re fascinated by the production of wood type, check out Moore Wood Type.)

I mentioned some of the process in a post titled Measure Twice, Laser Once… but never wrote up the whole thing, so here we go.

LaserCut LetterPress Example Print

The typeface I chose was OpenDyslexic, which was inspired by a friend who is Dyslexic. I also thought it would be interesting to use a typeface that was new, and didn’t exist in the time that wooden type was widely used.

Art Letters

I did the design in Inkscape, creating the letter and the pieces that fit under the letter so it could slide into a tray.

Letter and Tray

Wood is such a wonderful material, except when it isn’t. Tolerances caused a number of issues, but I kept going forward, and didn’t worry too much about having things fit together perfectly. (I won’t say this was my downfall, but I spent a lot of time fighting it.)

Art Letters Tray

Here’s the design for the small tray. Ultimately I wanted a larger tray that had multiple lines so you could do an entire poster. That of course would have required an entire alphabet, and multiples of most letters, and punctuation, and… letterpress is hard.

Oh, somewhere along the way I also started to write code that would generate all the characters needed by outputting the needed SVG files. In theory it was totally doable, but in practice it served as a distraction that I eventually ignored.

Art Letters

With the plan to turn this into a kit that one would assemble, I thought about how one would determine what pieces would go together, and thought that etching the letter onto each piece would be a good idea. (I didn’t get to this step due to being stuck in the prototyping phase.)

Tray

Here’s the letter “A” sliding into the small tray I made. Tolerances were good with the first batch of letters, but with subsequent pieces not so much.

ARTS+TECH

You can see a bit of the height difference with this batch of letters…

Height Comparison

…and you can really see it with these. Yes, this is all 3mm wood. Again, as mentioned with the previous post, there can be quite a difference when the layers add up.

ARTS+TECH

I did manage to create enough letters for one of the Arts + Tech Nights at UWM.

TEACH ART

And oddly enough, I was able to arrange the letters into “TEACH ART”, which I ended up doing six months after I abandoned this project.

LaserCut LetterPress Example Print

Here’s a few test prints I did. They worked fine, which made me think I may have overthought how “perfect” it had to be. In the process of talking to printmakers (who were very interested in the project) they got me thinking about type height, which is useful for a press (and I considered using these letters on a press) but in the end I think I should have stuck with my “hacker ethic” and just made it work with the minimal amount of success.

I don’t consider this a “failed” project because I learned a lot in the process (and got to meet & work with some awesome people) but I’d love to see someone else run with this idea… or maybe it’s something I’ll pick up again in one form or another.

Remember kids, Keep on Making!

Categories
Uncategorized

We are a Nation of Makers

NoM

I’m pleased to announce the Nation of Makers organization has finally launched. Check out nationofmakers.us for the full story.

I wish I could have done more to help with the launch, but between organizing Maker Faire Milwaukee, launching a new exhibit, and teaching PCOMP at UWM I was pretty much devoid of any free time for other things the past few months.

Luckily, we’ve got just six more weeks of class and then the holidays hit, and I’m hoping by January I get just a bit more free time to pitch in and help with NoM stuff if I can. (I know a number of great people involved, and they’re doing a fantastic job, but if my skills can assist, I’ll certainly lend them!)

No matter what role I play officially with the Nation of Makers organization, I’m sure I’ll continue to help the movement by producing Maker Faire Milwaukee (still the largest free-to-attend Maker Faire in the US), doing what I can to help Milwaukee Makerspace (and other creative spaces) and sharing my knowledge by teaching others and trying to build a community around the love of making and creating.

Let’s hope for some greatness in 2017!