Categories
Uncategorized

XQuartz is the new X11

XQuartz

Since I still think Inkscape is the best open source vector editing application for the platforms I use, that means I need an X Window System running on my Macs. With the upgrade to Mac OS X 10.9 (Mavericks) Apple has done away with their X11 release, but luckily XQuartz is there to help out.

And once you’ve got XQuartz installed, you’ll want to go into the preferences and change it from this:

Preferences (Default)

to something much more reasonable, like this:

Preferences (Changed)

Yes, deselect that “Updated Pasteboard when CLIPBOARD changes”, because if you don’t, copy/paste will be all screwed up in Inkscape on Mac OS X.

(I’m hoping this post will help future me fix the problem much faster next time someone asks me about it.)

(There might also be useful info on Inkscape.org.)

Categories
Uncategorized

The Art of Tinkering

The Art of Tinkering

I recently got my copy of The Art of Tinkering and I must say, it is a beautiful book. It just looks amazing. It’s full of ideas and images and makers and artists.

I’ve only read bits and pieces so far, though I’ve spent a lot of time pouring over the images and admiring the layout.

And yes, I know you kids with your “e-books” don’t care about “dead tree editions” but I still love books made with ink and paper. They just have a certain quality a digital copy will never have. (And yes, you can hack the book! It’s got conductive ink right on the cover which you can build a circuit with.)

The Art of Tinkering

Oh, I should also mention that one of my photos is in the book! On page 183 is a photo of the MaKey MaKey Banana Pong I created last year.

If you’re at all interested in creating things, or perhaps you just need some inspiration from others grab a copy of The Art of Tinkering.

Categories
Uncategorized

Return of the EXPERT

EXPERT

Back in 2009 I took this photo of myself with EXPERT written on the whiteboard behind me. I had no grandiose scheme when I took the photo. It was taken at the office of z2 Marketing, in the conference room. I’ll admit, part of the reason I took the “EXPERT” photo had to do with a (slight) jab at people who were declaring themselves “experts” at the time. The photo gets used a lot when someone posts an article and needs a photo that depicts an expert or expertise.

When the photo is used, people who know me tend to tell me about it, which is nice, as it’s fun to track the usage of the photo. Of course I really do like to get credit for my work, so if you use it, please credit it properly, because I am also an expert in Creative Commons.

The most recent use is in an article titled The Death Of Expertise. (It’s an interesting article, go read it!)

Now, as far as being an expert, I like to say “You are an expert at your own experience”. This goes back to 2006, when we had one of the first meetings about BarCampMilwaukee. We were discussion session topics and someone said “Well, I’ve installed Linux a few times, but I’m no expert at it.” I then pointed out to the person the fact that he was an expert to anyone who had never installed Linux, and that sharing your own personal experience is an important part of teaching and learning.

Through the years of helping make unconferences happen, and getting involved in Milwaukee Makerspace, and in publishing this blog, I’ve come to understand just how important it is to recognize that you need be willing to share the things you know, even if you don’t think you know enough, and you also need to be accepting of others when they don’t know everything, because really, no one does. No one is an expert in all things.

Through the open sharing of knowledge, and the willingness to accept that no one is a expert (while we are also all experts) we can all end up learning more than we ever would on our own.

Categories
Uncategorized

Ignite Madison

Ignite Madison

Mark your calendars for February 12th, 2014 and head to Madison where I’ll be speaking at Ignite Madison!

Ignite is an event where presenters share their personal and professional passions, using 20 slides that auto-advance every 15 seconds for a total of just five minutes. My talk is titled “Making Without A Choice” and will cover… well, you can guess from the title. Also, I don’t want to give it all away.

Making Without A Choice

You can buy tickets to the event and all proceeds will be donated to Big Brothers, Big Sisters of Dane County.

(And if you miss it, there’s a good chance a video will show up online.)

Categories
Uncategorized

Red Flag

We’ve been using the RED ONE a lot in the past few months over at z2 and while we’ve had the matte box for a year now, we never managed to get top or bottom flags for it, so I finally got around to solving that problem.
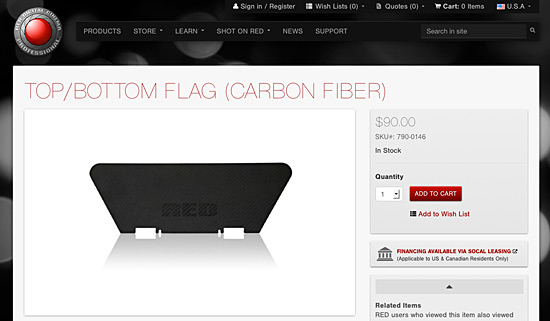
RED Flag

Camera accessories are notoriously expensive. For some things, that makes sense, and for others, I’m not sure it does. The top/bottom flag for a RED Matte Box is $90 USD. Well, hey, it’s carbon fiber. Yeah, that stuff is pricey! But, don’t worry…

RED Flag

There’s an aluminum version of the top/bottom flag for just $40USD. Hey, you could get two of the aluminum flags for less than the price of one carbon fiber flag!

RED Flag

While I was perusing the RED store, admiring their well done photography, I noticed that the large version of the photo was clean. Really clean, and at the perfect angle, straight on! So… I engaged in what I now like to call “R3Dverse Engineering”. (That’s “reverse engineering” of RED stuff, if that was too subtle.)

RED Flag

I grabbed the image from the web site, opened it in Photoshop, and started to clean it up.

RED Flag

I got rid of the shadow, added a white layer below so I could see things a bit better, and selected the object…

RED Flag

I then filled the whole thing with black so I had a high contrast image…

Once this was done, I saved the file as a PNG and imported it into Inkscape, where I used the ‘Trace Bitmap’ feature to create vector lines defining the image.

Inkscape Flag

The next step involved a lot of precise measurements with the digital calipers on the part of the matte box where the flag mounts. There were many guide lines added.

Inkscape Flag

The lines helped me determine centering of the slots and how wide the slots/tabs needed to be.

Inkscape Flag

I did a few revisions, and here’s the final cleaned up version. with most of the guide lines removed.

Inkscape Flag

Here’s a visual diff to show the tweaks between the original trace of the image I imported, and how much I ended up adjusting the lines a bit for a better fit. (The reddish hue shows the final. I mainly had to add a bit more space around the larger tab.)

I should mention that with each revision, I was printing out a sample on tabloid size paper and cutting it up to test the fit.

Inkscape Flag

Once my paper prototype was good enough to consider “final”, I ended up sitting on this project for a bit trying to determine what material to use, and how to cut it.

I’m still thinking about it… I’d prefer to go CNC versus trying to cut it by hand. Perhaps using the CNC Router at Milwaukee Makerspace would work. A very thin sheet of aluminum perhaps? I thought about laser cutting something, but didn’t think acrylic or wood would be a good option. I’ll need to keep thinking about materials…

Black Flag

Meanwhile, we have lots of black board at work, so I stuck my paper prototype onto a piece and hand cut it with an X-ACTO blade. (I did not round the corners.)

Black Flag

The tabs and slots are a little messier than I’d like, but again, I’ll call this part of the prototyping stage.

Black Flag

But it also totally works… and is probably less than 1/100 the cost of the carbon fiber version. It may not hold up as long, but then again, I can easily make a bunch of these for next to nothing. (I can also just laser cut the black board instead of sliding an X-ACTO around to do it.)

Black Flag

Update! I ended up laser cutting the black boards, and they works great!   You can grab the files from Thingiverse.