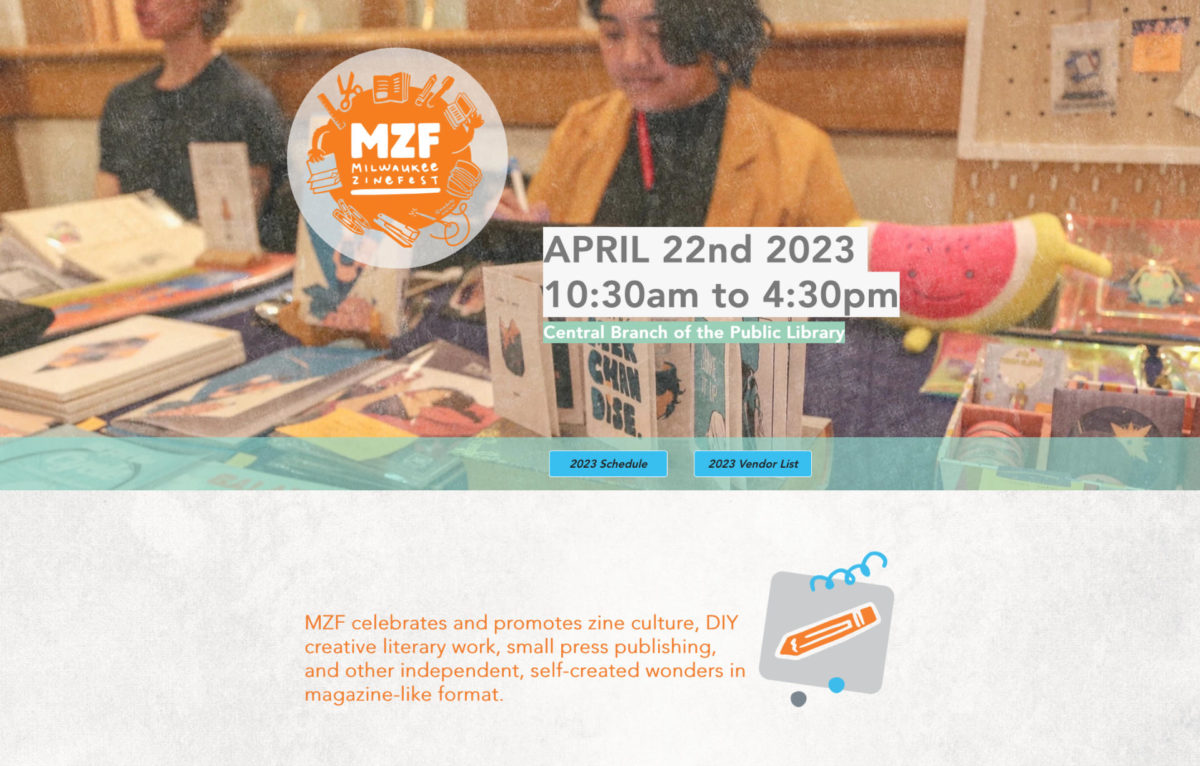
Categories
Uncategorized

QWERTY Prints

Since I got the press up and running I figured I should put it to good use. I made a plate and made a few prints. One of the things I used to do when I did screenprinting was to do a print, add more ink of a different color, print again, and keep it going. In the end you have (usually) brown ink you can’t really put back into a can since you’ve mixed it all up, so I’d usually have a “brown” can of ink.

Anyway, this is a similar process, where you add more ink with each print. Luckily with this type of printing there seems to be less waste.

Since I recently posted about The Process I’m going to take some time with this post to talk about that…

Of course if you like these prints for their visual qualities, cool. That’s great! You can like them for that, but with everything, there is a story… a narrative… and there’s a process.

Often for me, creation is a exploration. I am extremely lucky that a good amount of the art I make does not need to be commercial art. I don’t have to rely on selling it to survive. I often make things, create things, or attempt to bring something into existence because I am curious. I ask “What if…?” and every now and then I have the means to find out. So let’s go for a journey!

I had attended a meeting for QWERTYFEST MKE, which will be an event focused on typewriters, writing, books, and all that stuff. (If you want a diversion, check out this post about my QWERTY Keyboard.) After the meeting I was thinking about typewriters and how back in the 1990s before we had easy access to computers we would go to Kinko’s and use the IBM Selectric typewriters to create type. This was our primitive method of typesetting: Use a typewriter to type, then blow it up on a copier until you had it large. We used this method to make flyers, and zines, and sticker and t-shirt art, or whatever. It was cheap and easy and fast.

Above is the artwork I used for the printing plate. I got this by starting with the one functional typewriter in my house. An old Royal that sits on our mantle. The ribbon is a bit dried up, but I was able to bang out q w e r t y.

I took the paper I typed on and scanned it into my computer using a Brother MFC-L3770CDW Printer/Copier/Scanner. Sadly it’s a digital thing, and you can see scan lines. I did try to blow it up quite a bit. I may have even printed it and scanned it again. Either way I was not pleased with the outcome, so I did not use it. Maybe I can play with the scanner settings a bit? (Fun Fact: I used to do a ton of scanning at my first internship and then job.)

After the poor performance of the Brother (which is actually a really nice printer and okay scanner) I grabbed the USB Digital Microscope on my desk and actually used that to capture the small type. The microscope can (supposedly) magnify 1000 times. I’m not sure that’s accurate, but that’s what it says on the tin. I did end up using this one. I brought the image into Affinity Photo and messed with the levels and made it monochrome as you can see in the stark black & white image further up the page.

After I made the plates and the prints I remembered I got a nice scanner for Dana’s desk. It’s a Canon CanoScan LiDE400 that can do 4800 dpi resolution. Much higher than the 600 dpi my Brother does. You can even see the grain of the paper!

The other method I probably could have used to magnify the type would be to photograph it with my Nikon DSLR. I didn’t think about that until later.

So as I said, it’s a journey. I now have a number of methods to try next time, and have some idea how they will turn out. I can also do the copy and enlarge thing multiple times. The “copy” feature of the Brother allows for 200% enlargement which is… okay I guess. The idea is that with each copy things degrade a bit, and you get type you cannot get by using a digitally created font. You can see that attempt in the image above. Maybe I should have started with that method… (Note: The Brother can do 400% enlargement. It’s in a submenu.)

Lots more to explore here, and I look forward to it!

Categories
Uncategorized

Provisional Press

Last year I bought a printing press kit from Provisional Press. I used to have access to a press when I worked at the museum, and I’ve also borrowed a press from a friend of mine in the past, but most of my “home made” prints have been done with a baren. (I even 3D printed one.) Can you do prints with a baren? Totally, but using a press does make things much easier and more consistent.

I got the base kit with no extras (more on that later) so that’s what you see in these photos. Once you do the assembly, which consists of gluing and screwing things together, you can add in the metal plate as the base. If you use letterpress the metal base comes in handy, and you can grab some galley magnets but honestly I’ll probably just make my own plates like I normally do.

It comes with two “galley high” blocks, which you use to square things up properly so the roller height is consistent across the press. There is a process involving adding tape under the inside rails before you screw them in place.

Here’s what the bottom looks like. You’ll see that some things are not jammed tightly together. Maybe because wood can expand and contract over time and based on temperature and humidity? I’m not sure…

Here you can see some (blue) tape sticking out a bit. You basically add strips of tape to get things level with the roller. It didn’t take long, but it’s one of those things you should take your time with and get right, since once you screw things together you probably don’t want to unscrew them.

The roller is a large piece of PVC or “Charlotte” pipe. I used a bit of acetone to remove the red “Charlotte” lettering on it. It’s still slightly visible though, which is fine.

My plates are typically made from 3mm (1/8″) Baltic Birch plywood. I have a pretty good supply of scrap due to the fact we use a ton of it at work and often get strips left over that are around 4″ tall by 24″ long. I tend to cut them into smaller pieces to fit in my laser cutter. Making 3″ x 5″ plates is quick and easy and I can probably make 50 more with the scrap I have on hand right now.

To get the plate to the right height I dropped in a piece of 3/4″ plywood I had lying around, with some old cereal box board and sheets of paper underneath to get just the right height. It works well and if I consistently use the same wood I shouldn’t have to adjust things too much.

Hey, I made a print! You can see I added two pieces of soft felt as my “press blankets” which seemed to work well. The one upgrade I’ve already added is the 9″x17″ Grid Base which I should have grabbed when I ordered but for some reason did not. It makes it much easier to line things up and to clean things up.

About the assembly… It went well, but it did take some time. I think part of it was that since there was gluing involved I really wanted to get things right. The other issue (for me) is that the last few things I’ve built have been CNC machines, where getting things exact and precise is extremely important. This press is… a bit less so in that regard. It’s all wood, but you end up shimming things to get stuff aligned, and it just feels like there’s some wiggle room. Having built one I’m pretty sure I could build another in half the time.

I will recommend this: Watch all the videos and read everything completely before you start the assembly. Some of the parts do not match up exactly, which was confusing for a bit. The videos are not professionally produced, but hey, it’s a DIY kit, so that’s fine. Watch them all before starting. (And, read the FAQ!)

For the pins that keep the top roller from coming off, I did not glue them in place, as I wanted them to be removable in case I take the top roller part off for some reason. (Maybe for transport.) I just wrapped some tape around them to press fit into place. I did stain the side parts of the top roller section, and thought about staining more of the press, but you should do all that before assembly, and I didn’t want to spend the time doing that. I think it looks pretty good as it is. I mainly stained the side parts because they are 1/4″ laser cut pieces and I just wanted them to look a little nicer.

Oh, if you want to see a bunch of fun stuff from the Provisional Press crew, check out their Instagram account. Also, you can totally build your own! The plans for this press are open source.

I’ll probably do a follow-up post once I’ve got a bit more time into using it. So Stay Tuned!

Categories
Uncategorized

The Process

For me (and I hope others) a large part of art is the process, and that includes the struggle, the narrative, the background, and the humanity we share.

I saw the gallery show of a friend of mine yesterday, and I had the opportunity to hear about what the artist had been through, and how the result of the experience of recent years led to the creation of the art, which was based on who and what their parents were, and their deaths, and the art as a remembrance of them. It was powerful, and as someone who has lost a parent (and the partner of someone who has lost both of their parents) it hit pretty hard.

Sure, there’s art we experience and like (or love) done by artists we don’t even know. Maybe they’re long gone, or they’re anonymous, or all you know is a name. And that’s fine, but I often find that the human connection, the understanding, the details about the work, and how and why it was created, is a key element of the work. I’ve always been someone who enjoys the “behind the scenes” stuff. As a kid I loved the Star Wars films, but I equally loved the documentaries explaining how they made them. Seeing the models and practical effects gave me a sense of understanding, and seeing the people involved in the creation, the “back of house” people who are crucial to any production, helped guide me.

I don’t want to just dismiss AI art as “cheating” because it’s different/easier than what’s come before, but I see AI art as a specific process, and right now it’s not a process I care for. Others do, and well, good for them? Personally I think some of the humanity of art gets lost along the way. And what is art without a dose of the human condition mixed in?

I did photography in the film days, but it didn’t stick. Film was expensive to process and after I left school I didn’t have access to a darkroom. A decade later when digital cameras were readily available I was all in. Was it cheating? To me the process of framing a shot, capturing the light, seeing a subject and recording it, that’s the process to me. I wasn’t a fan of the darkroom, but every shot I take with a DSLR gets “developed” or processed, in an image editing application. Levels, white balance, brightness, hue, saturation… all adjusted. The stuff that would be done in a chemical darkroom, I still do, but digitally. It’s extremely rare I capture an image on a DSLR and it’s not processed it some way. (Oddly enough, my daughter is a darkroom nerd. Probably using the same darkroom at UWM that I used 30 years ago!)

If AI art opens the door to more people being creative and making things they never could before, I’m all for that. It if just gives corporations more power and says to artists “Fuck you, we have machines for that now” well, I don’t care for that at all.

Categories
Uncategorized

Solder Board

I created what I am calling a “Solder Board” which is like a breadboard but with no internal connectors. The solder board is used for… soldering! Specifically, for soldering pins onto PCBs, and in this case, onto microcontrollers. But first, some history…

For years I’ve soldered pins onto PCBs by jamming header pins into whatever breadboard was lying around and then slapping the PCB onto the pins, soldering the pins on, and then prying the board off. It works… mostly.

A year or two ago I had to solder a lot of Teensy boards, and finally found a use for those tiny breadboard. I taped off the edges to mark the size of the board and then taped it onto a chuck of Aluminum I had lying around for some extra weight and height.

And it worked pretty well. I would stick the pins in the outer columns (which I sized using my Header Pin Snapper tool) and be ready to go.

Drop the board on top, get to soldering, and then pry it off. Was it the best thing? No. Was it better than other methods? Yes. Could it be improved? Probably.

Since I now solder a lot more Raspberry Pi Pico boards, the little Teensy jig was too small, so I started using a larger breadboard, which presented a few problems. The first is that unless you have an old and somewhat “worn out” breadboard, inserting the pins can be a bit difficult. Often it took a lot of pressure to get them inserted. Sometimes one or more would pop up and be uneven with the rest. After that you need to solder them and remove the board, which can take quite a bit of prying if it’s in there tight. None of this is super difficult, but it’s a pain point, and we don’t need to deal with it.

Also, the Raspberry Pi Pico boards are 20 pins long instead of 14 like the Teensy, so more pins makes it just a bit more difficult to put the pins in and remove the board after soldering.

So above you’ll see the solution. A 3D printed “Solder Board” which was specifically designed for soldering header pins in place. (Unlike a typical breadboard.)

Put the header pins in place… no hard pressing required! The holes are sized such that they just drop right in.

Solder those pins and the board lifts right out. No prying! No pulling. Heck, you can probably flip it over and the board will fall right out.

Here’s the 3D model. Pretty simple. It’s a block with some holes. This one is sized specifically for the Raspberry Pi Pico board. You can’t really put the pins in the wrong place, which means you can work faster with less guesswork and chance of screwing up.

But maybe you want more holes… Just set the “useMoreHoles” option to get all the holes. This might be handy if you just want a general purpose Solder Board, and not one specific to one board size.

Wait, you want even more holes!? You can make one any size, thanks to the magic of parametric design in OpenSCAD.

I’ve tried to add just a few parameters to the OpenSCAD file to allow for customizing it without going overboard. The number of rows and columns, the padding (part without holes) on the sides and top/bottom, the height, and even hole diameter, to adjust for (ahem) printers that are not quite dialed in very well. You’ve also got the useMoreHoles option if you want more holes. Overall it’s not very complex code, so you should be able to muck about with it fairly easily. I will say that if you want a large board with a lot of holes, it may take a bit of time to render the output. (At least it does on my 2019 iMac.)

If you do a lot of soldering this may be a useful thing to speed up the process. I’m constantly looking for ways to speed things up, whether it’s single-purpose jigs or specific-use tools. Having to not think about getting it right because there’s only one way to do it is often quite helpful.

Oh, I do recommend not printing this in black. Even though I’ve got a small lamp on my workbench pointed directly at what I am soldering, the holes just don’t stand out as well as they do on a contrasting color. (Then again, I’m old and my eyesight isn’t great. Still, keep that whole “speed things up” feature in mind.)

You can get the STL and .scad file from Printables.com – Solder Board. Print it if you need it!

Categories
Uncategorized

Granola Bars v2

I posted this granola bar photo elsewhere and a few people asked for the recipe. Here’s my version, based heavily on the one from blessthismessplease.com

The original recipe called for using butter, and I tried to replace it with peanut butter to make them vegan for my vegan crew. (I left the chocolate chips out, of course.) They worked, so I stuck with using peanut butter instead of butter, and added the chocolate chip back in (making the “non-vegan” version.)

So if I make them for Dana and myself the chocolate chips go in and they are not vegan. If I make them for my daughter, I skip the chocolate chips, and they are still quite delicious. Dana says the chocolate chips add just the right about of sweet to the saltiness you get from the peanut butter, peanuts, and salt. So leave them out for vegans, or add them in for non-vegans.

Note! Just a quick update… I started using vegan (non-dairy) mini chocolate chips and they work the best. Also, we always add the chocolate chips now.

Ingredients

  • 2 1/2 cups old fashioned rolled oats
  • 1/2 cup nuts, roughly chopped (peanuts, cashews, pistachios, whatever)
  • 1/4 cup honey
  • 1/4 cup peanut butter
  • 1/3 cup brown sugar
  • 2 Tbsp molasses (Optional)
  • 1 teaspoon real vanilla extract
  • 1/4 teaspoon kosher salt
  • 3/4 cup shredded coconut
  • 1/2 cup mini chocolate chips

Instructions

  1. Preheat the oven to 350 degrees. Line a 9-inch square baking dish with parchment and lightly spray with cooking spray.
  2. Place the oats and chopped nuts on a rimmed baking sheet and bake for 8-10 minutes until lightly toasted.
  3. Add the honey, peanut butter, molasses, and brown sugar to a saucepan. Cook over low to medium heat until the peanut butter melts and the sugar dissolves. Stir constantly. Let the mixture bubble while stirring for 1 minute and then remove from the heat.
  4. Place the nuts and oats in a large bowl. (We’ll be adding in the liquid when it’s ready.)
  5. Stir in the vanilla and salt to the liquid mixture. Pour this mixture over the oat and nut mixture and stir to combine with a rubber spatula. Add the shredded coconut (except for chocolate chips) and stir to combine. Stir it up good! Make sure none of the oats are dry.
  6. If you are adding chocolate chips, wait about 15 minutes for the mixture to cool a bit before adding the chocolate and then stirring to combine. (Otherwise they get all melty! Some people like them melted in though, so try waiting just 10 minutes or even 5 minutes before adding them.)
  7. Place all of the mixture in the 9-inch square baking pan. Press it all down good! I use another piece of parchment paper to get it nice and pressed. The more compressed you can get it, the less chance they’ll fall apart after cooled.
  8. Toss it in the fridge and wait at least two hours. Lift the bars from the pan using the edges of the parchment and place them on a cutting board. Cut ’em up!
  9. Enjoy!

The original recipe calls for storing them in the fridge, I think because of the butter. I don’t know if these need to be stored chilled. I usually keep a few in my desk at work, but I tend to finish off a batch in about a week, so they aren’t around that long.