Categories
Uncategorized

Scheduling rsync in macOS (with cron)

A shell windows with man rsync

There’s an old saying “Linux will give you enough rope to shoot yourself in the foot!” and what that means is you’ve got power but you need to know how to use it. I’ve been using macOS (pka “Mac OS X”) for almost as long as I’ve been using Linux and I use the command line constantly in macOS and try to maintain a consistent experience between macOS and Linux when I can. I also tend to be late to install the most recent version of macOS.

So last year I wanted to set up a cron job to run a shell script to run rsync. On macOS. I tested things, added the cron job and it didn’t seem to work. I debugged, I tested, I searched… It seems macOS could not run an rsync job via cron. I tried to add cron, rsync, zsh, and iTerm, Terminal.app, and WezTerm to the “Full Disk Permissions” thing in the System Preferences. Eventually I gave up.

Well, eventually I created a workaround using Keyboard Maestro which has its own cron, and Platypus which wraps shell scripts in an Application, and that worked, but it’s overly complicated, so I’ll show you the way I do it now.

Automator window showing how to run a shell script

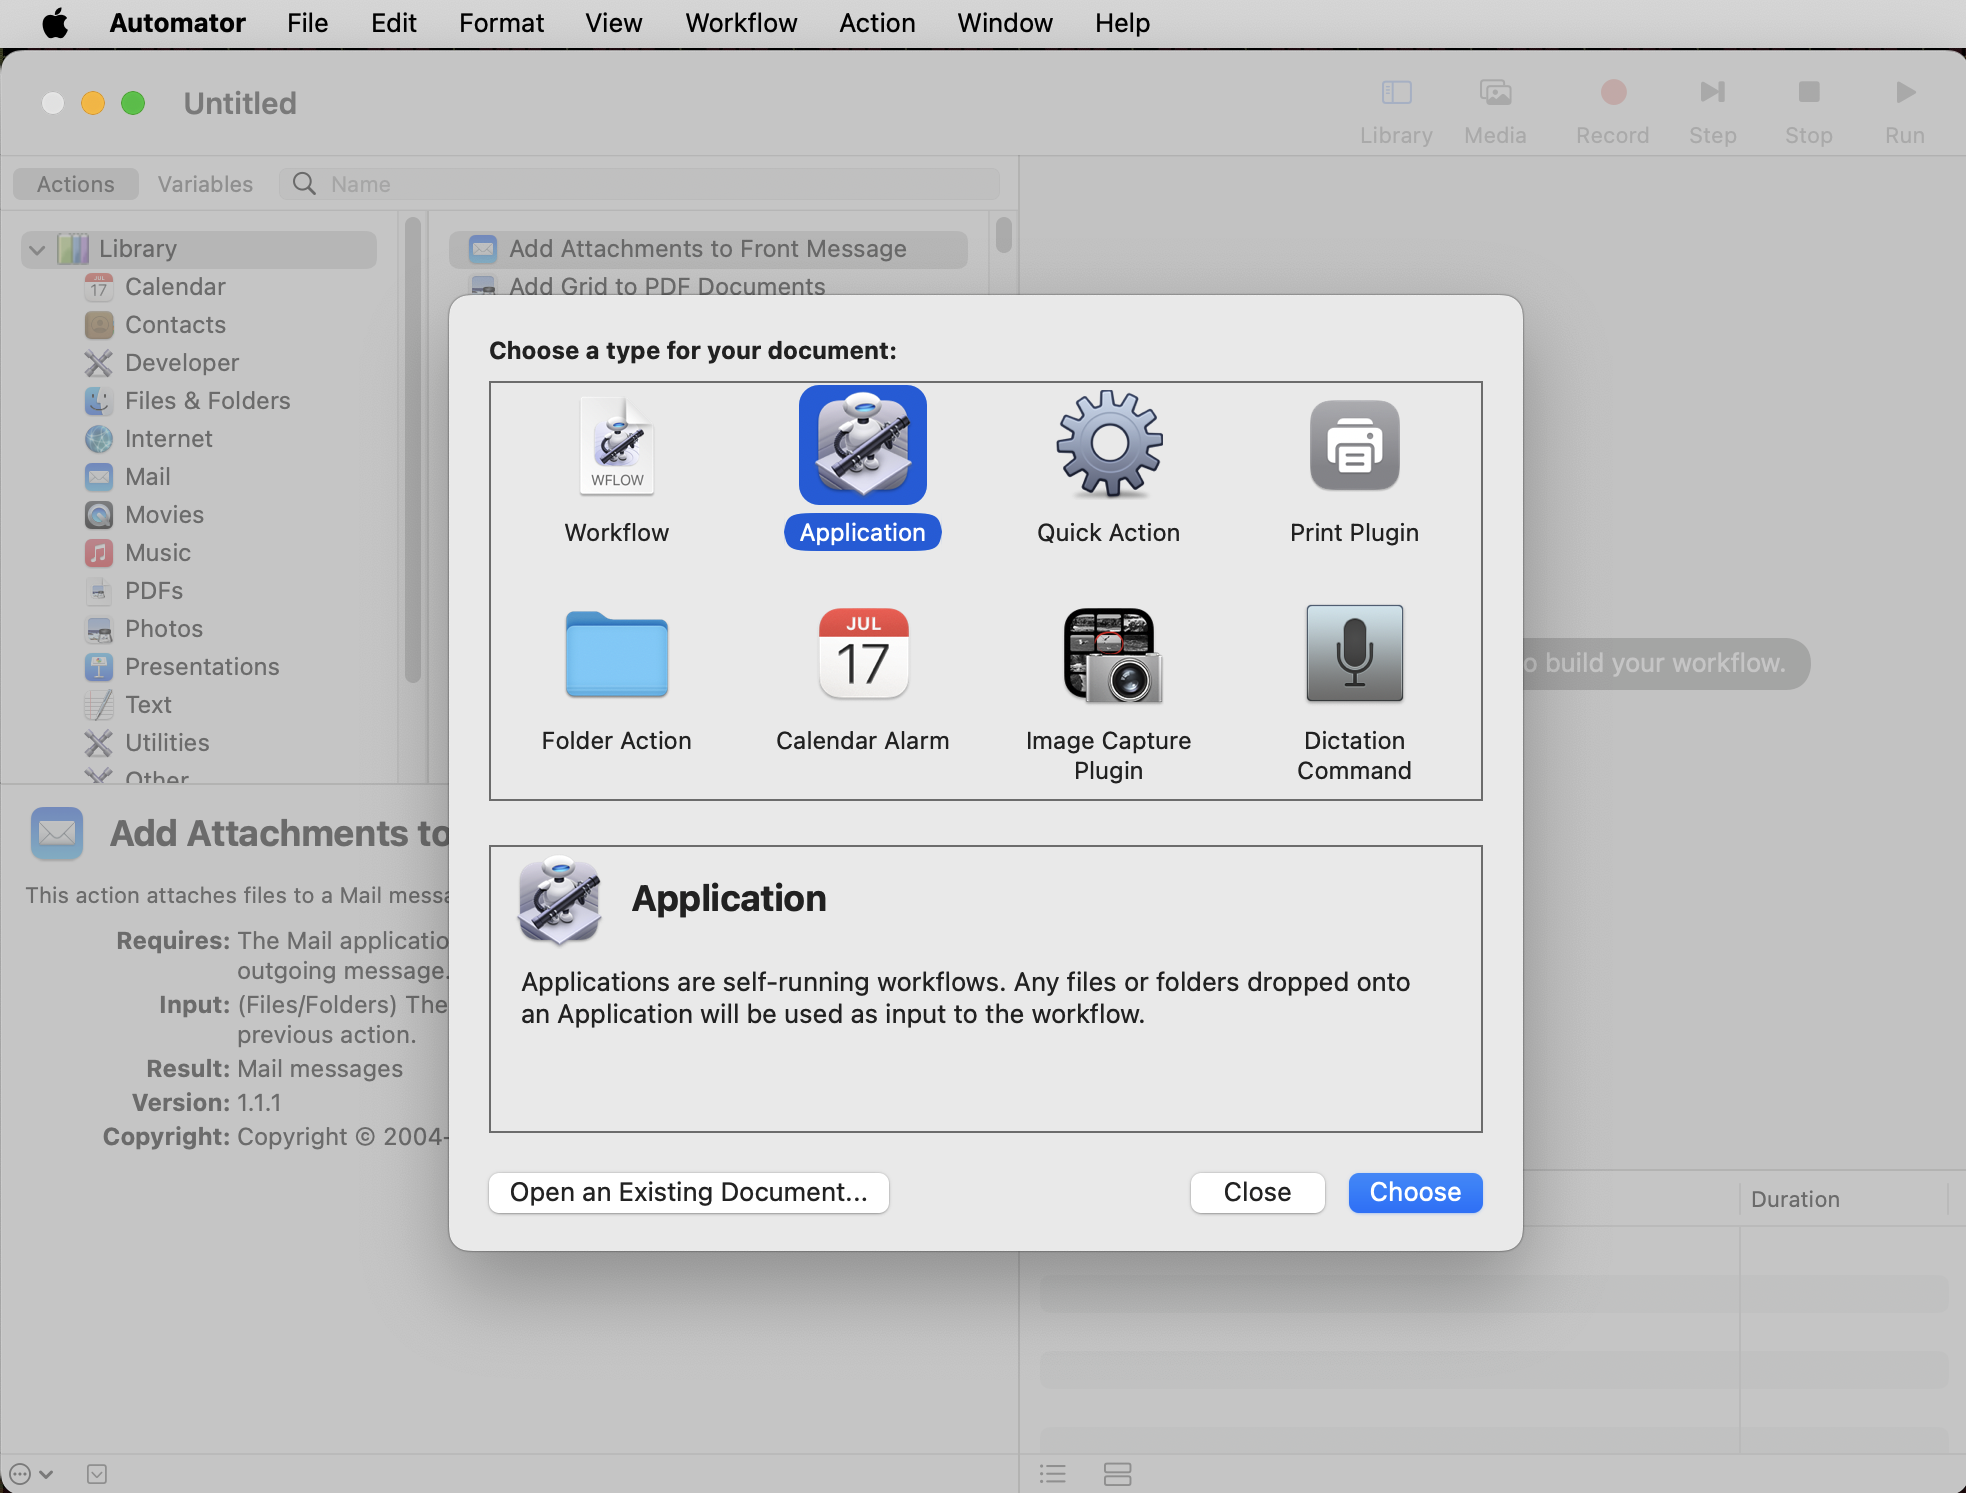
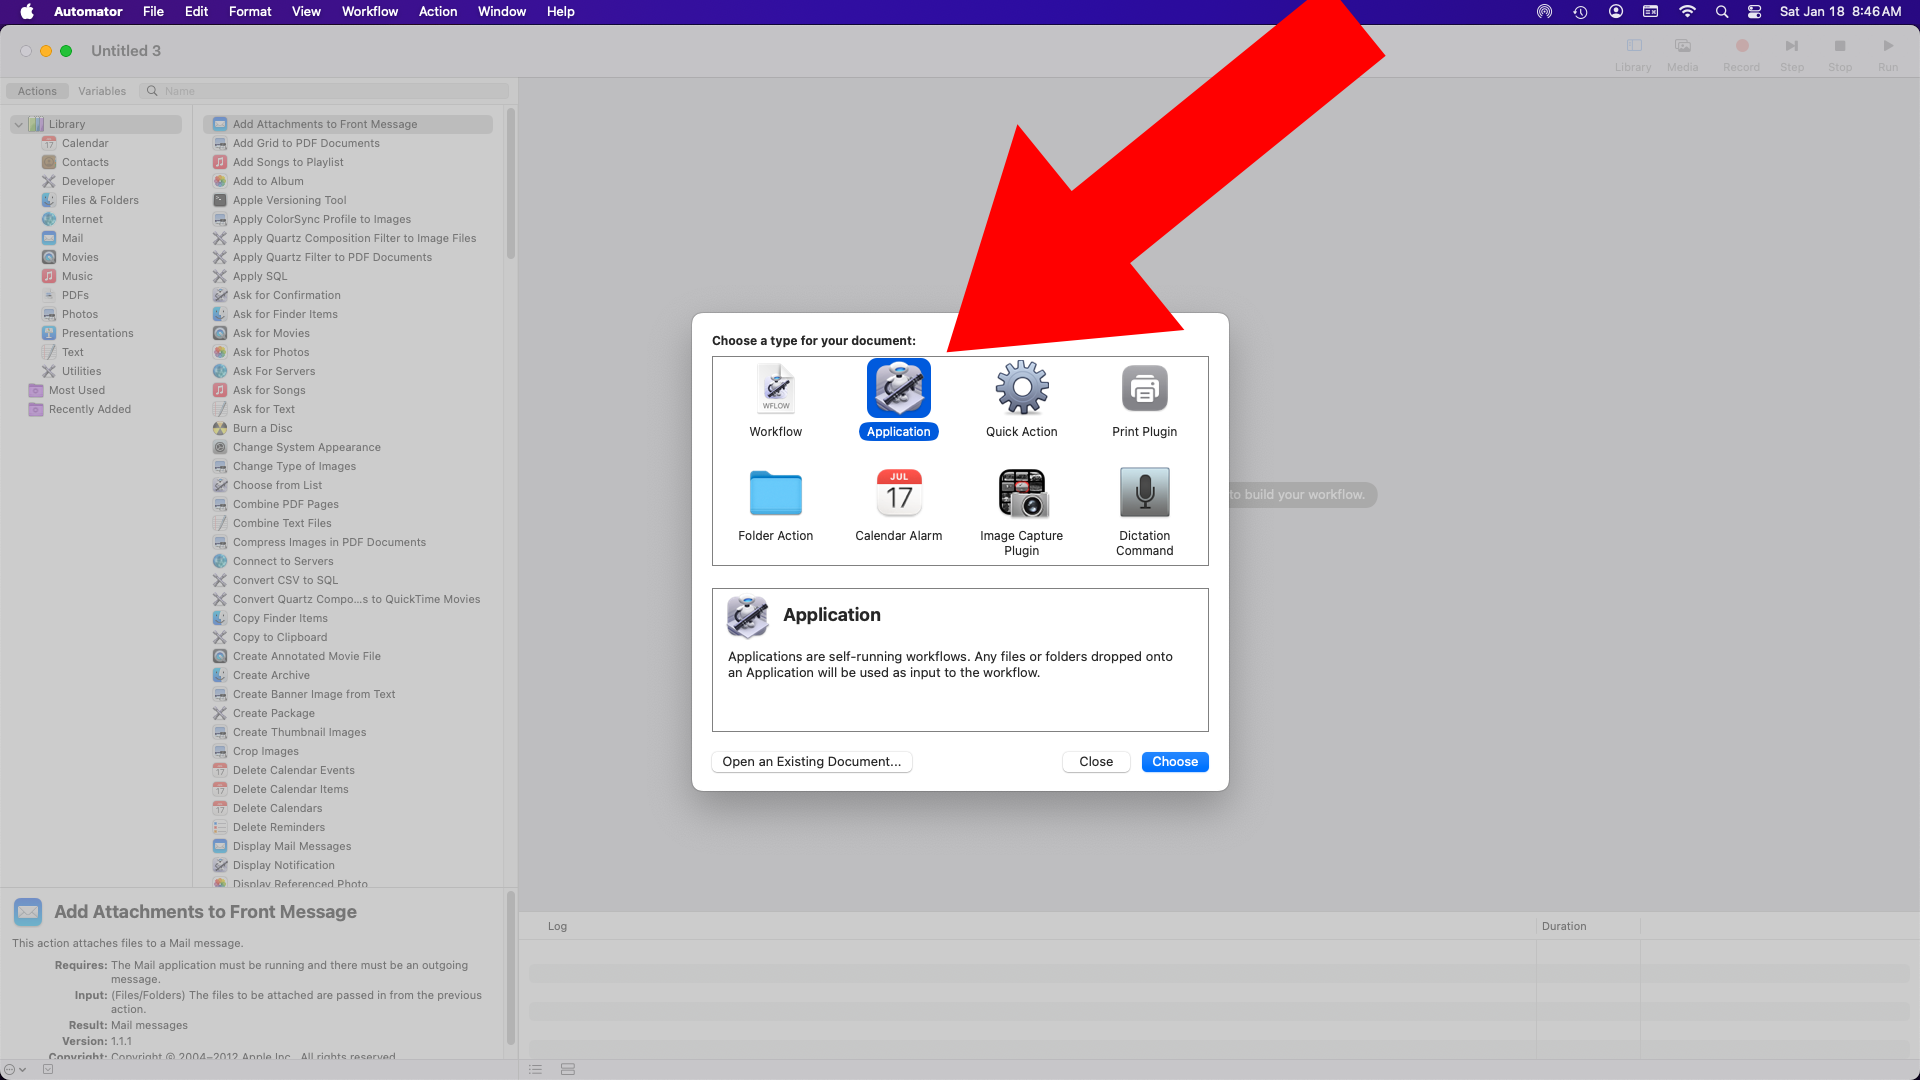
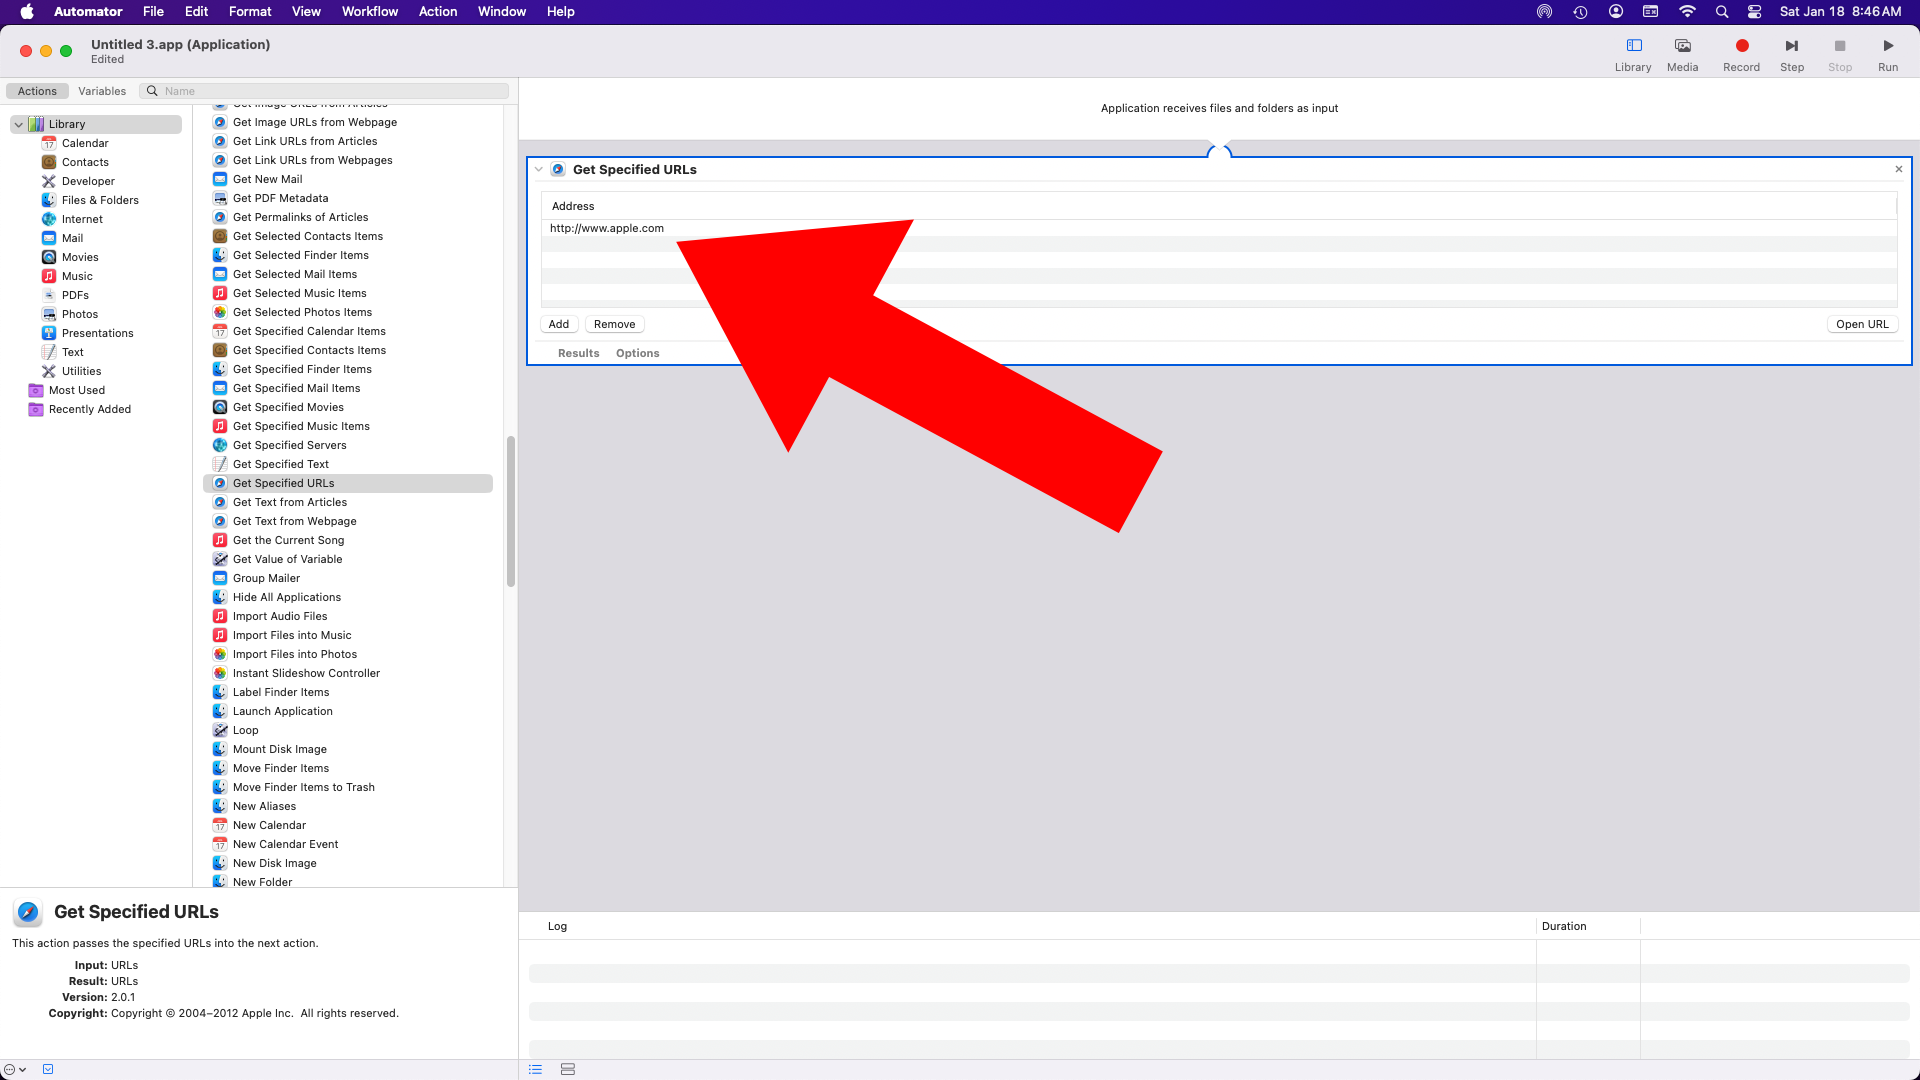
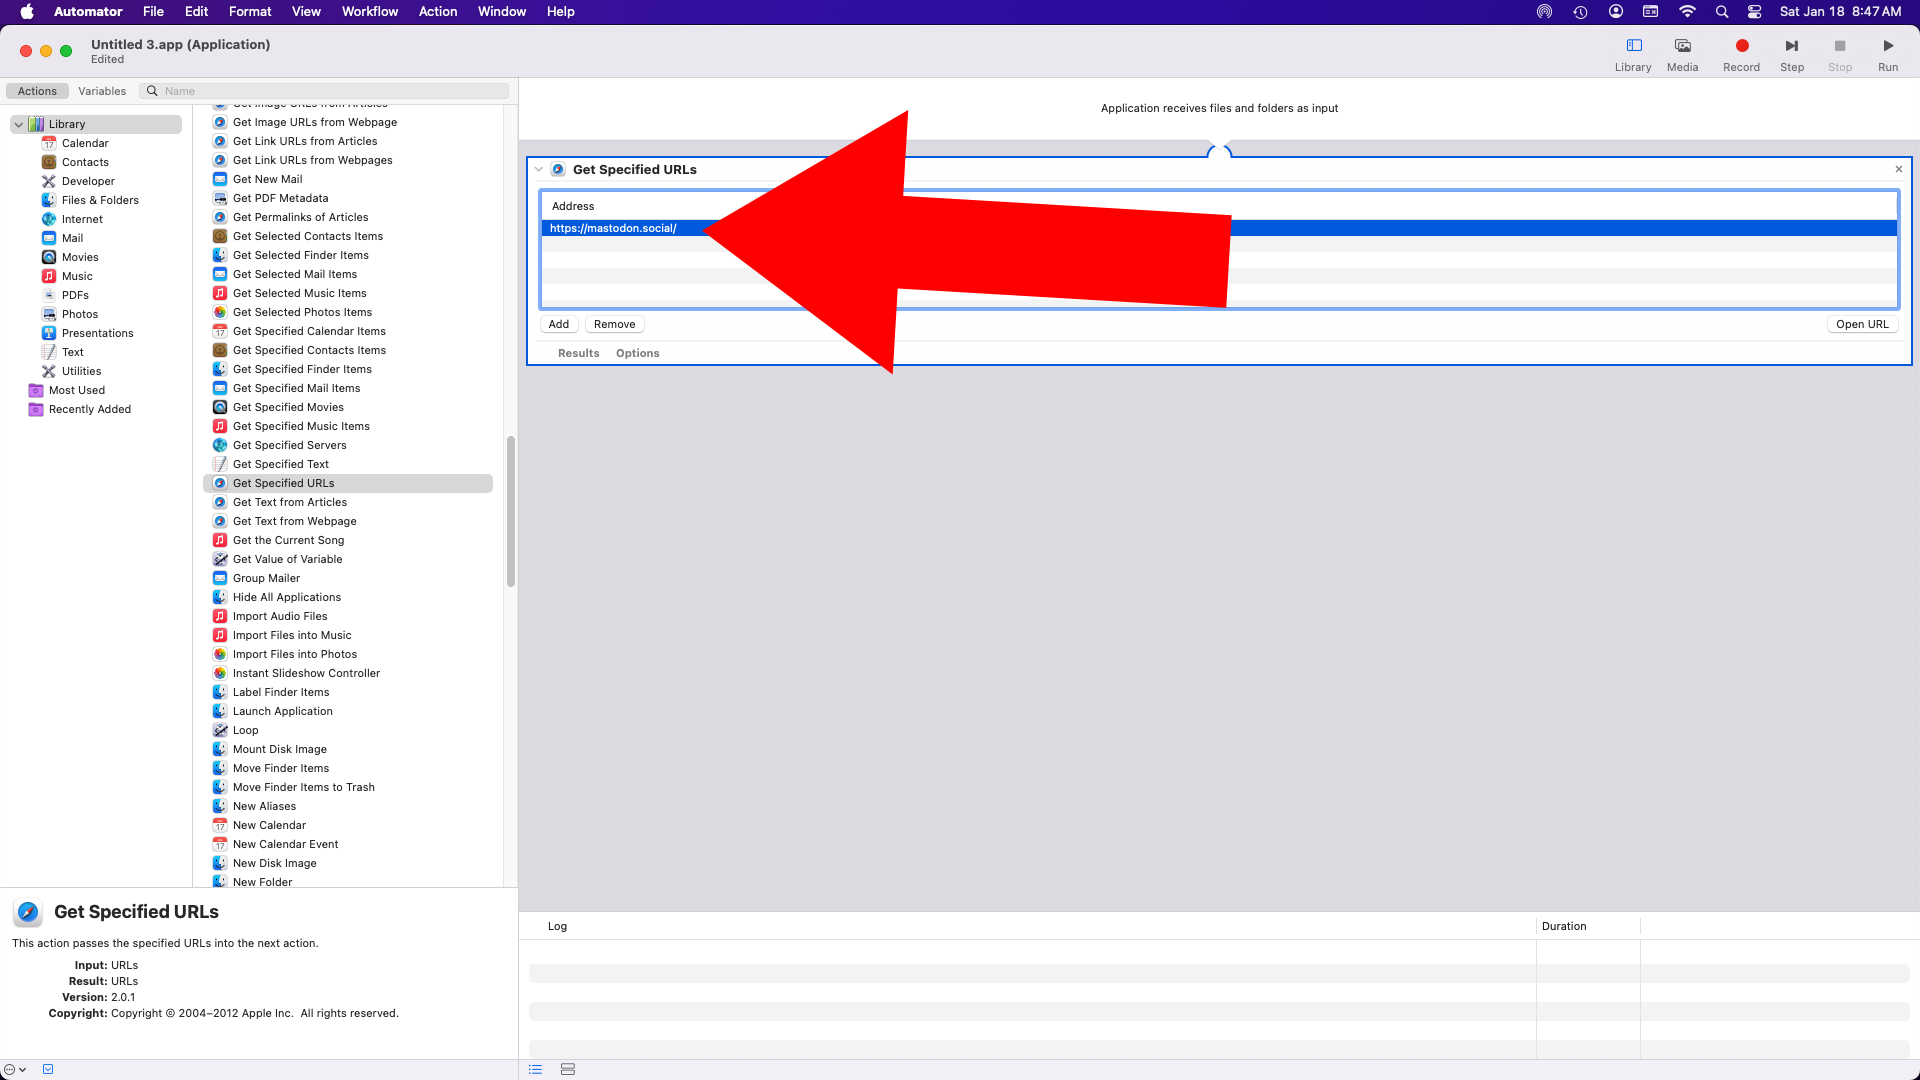
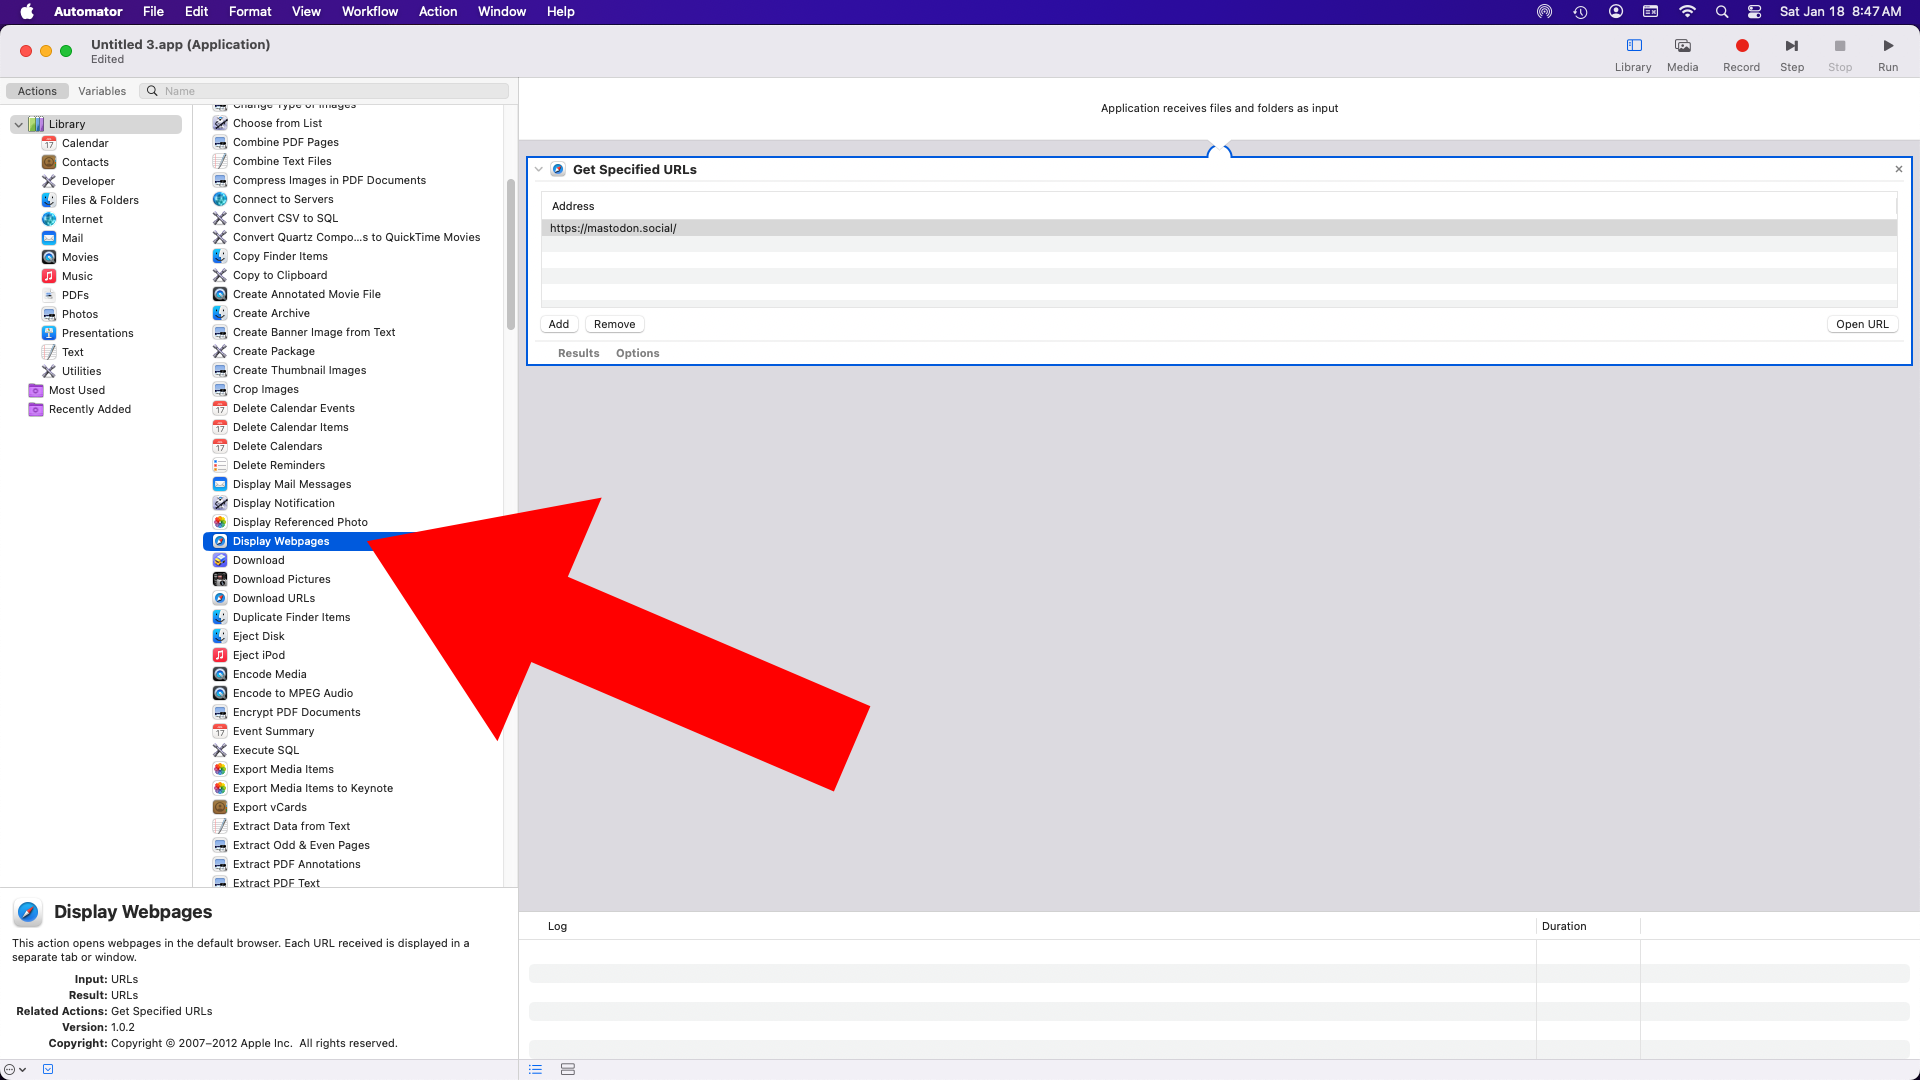
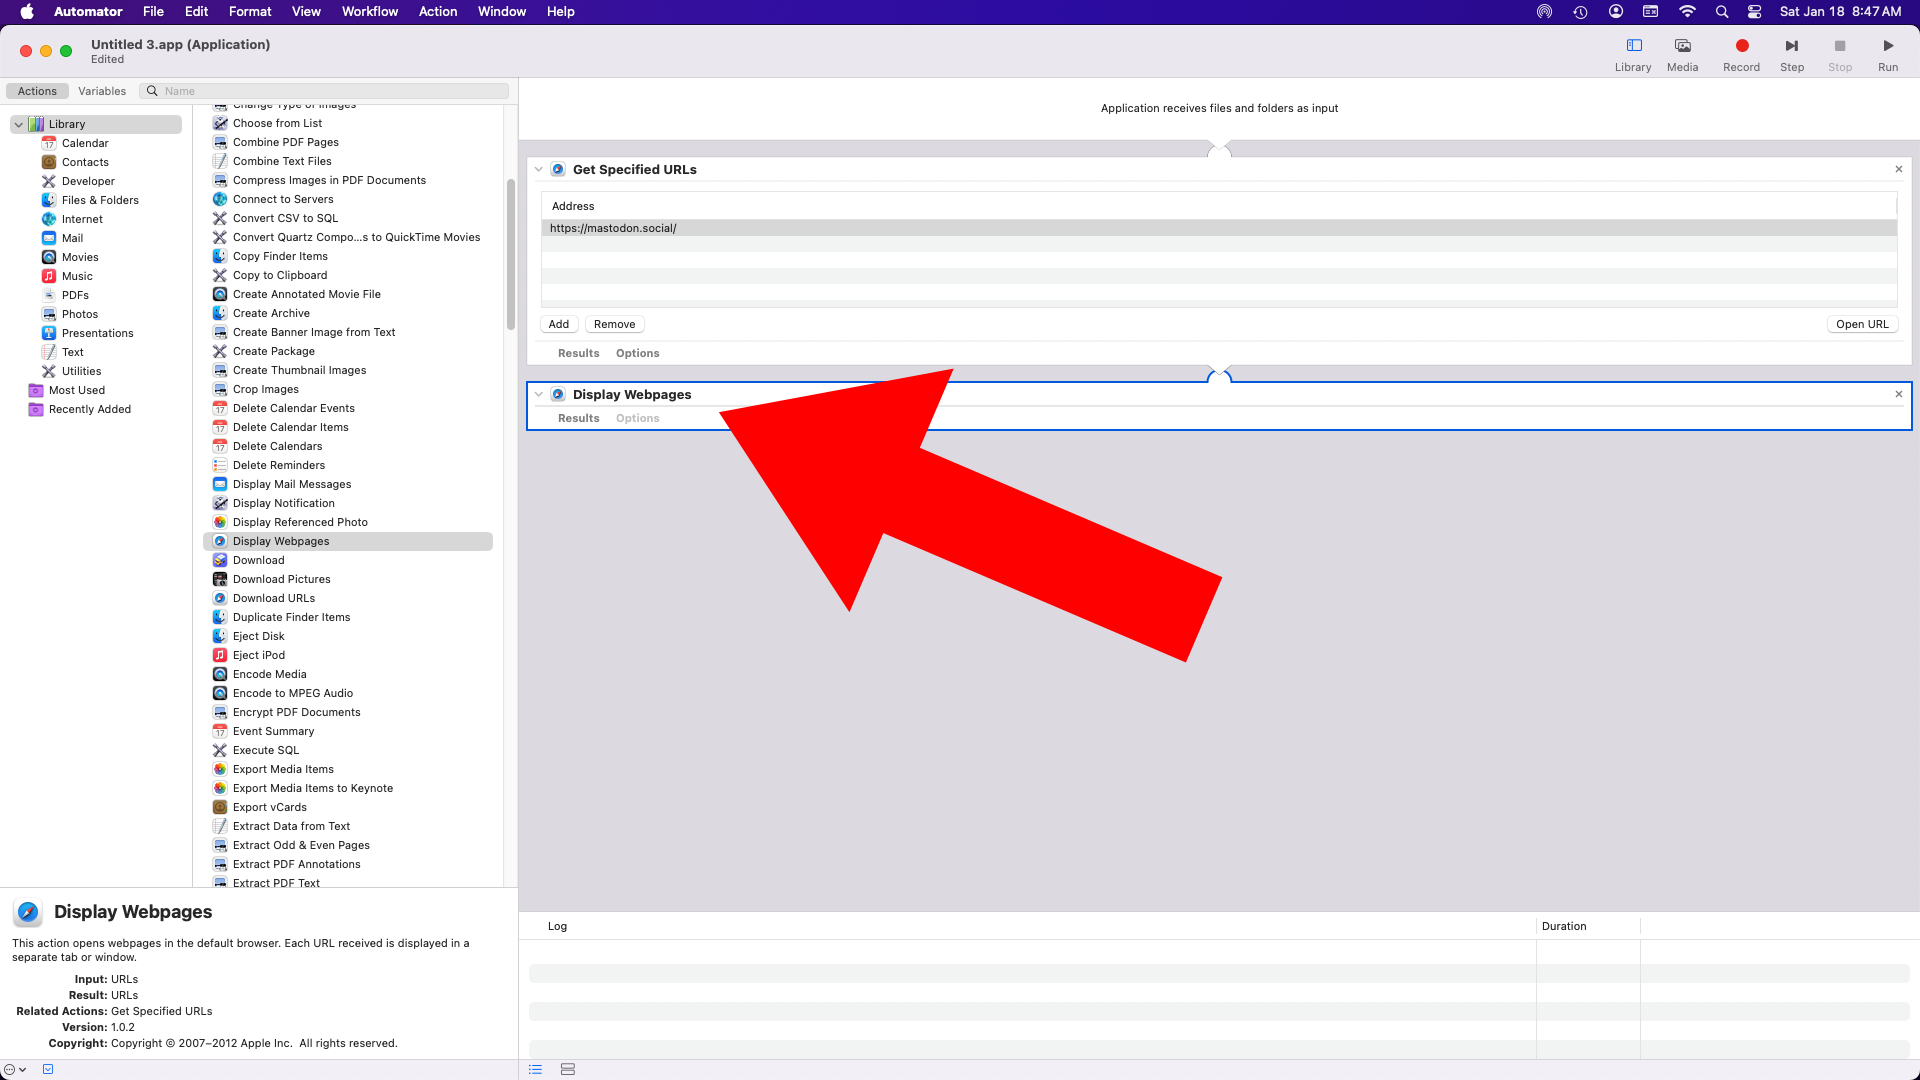
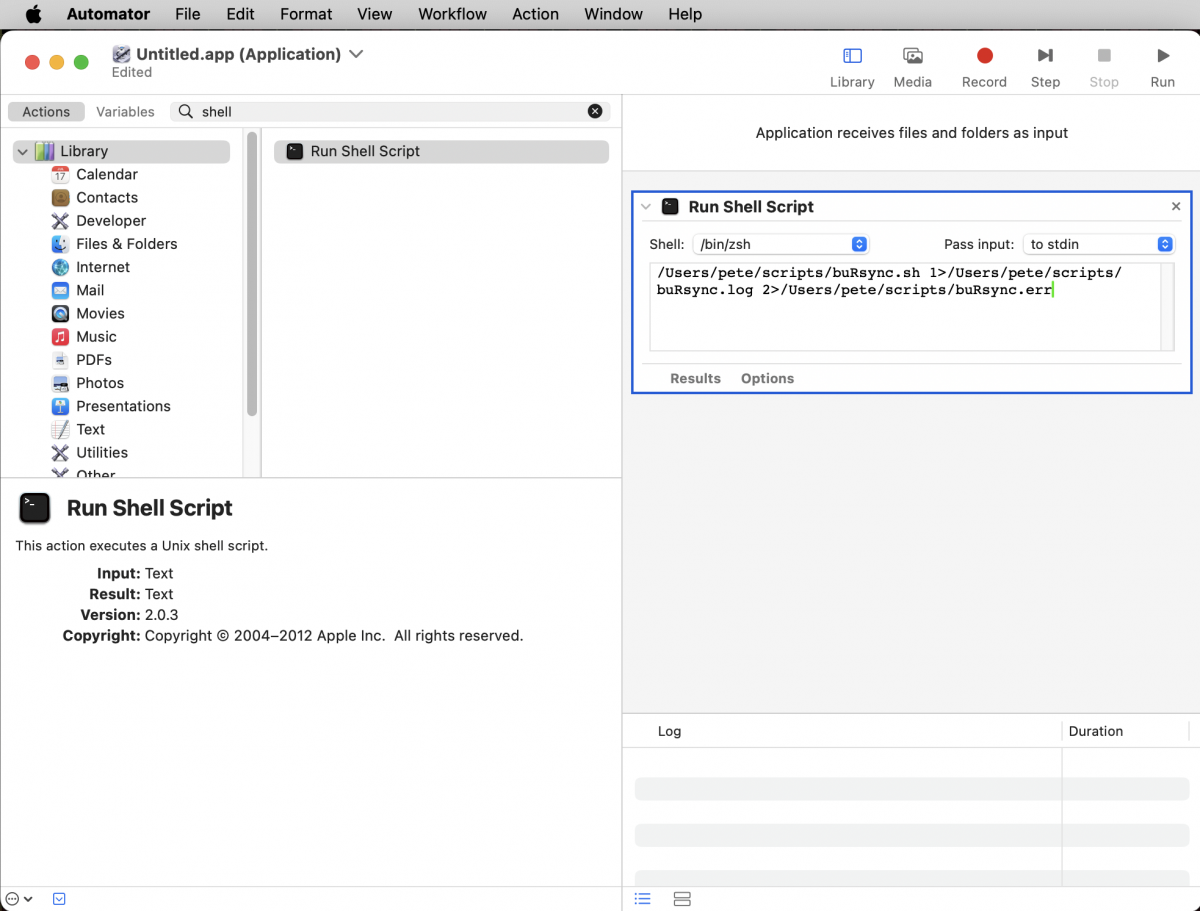
Launch Automator and create an Application…


Automator window showing how to run a shell script

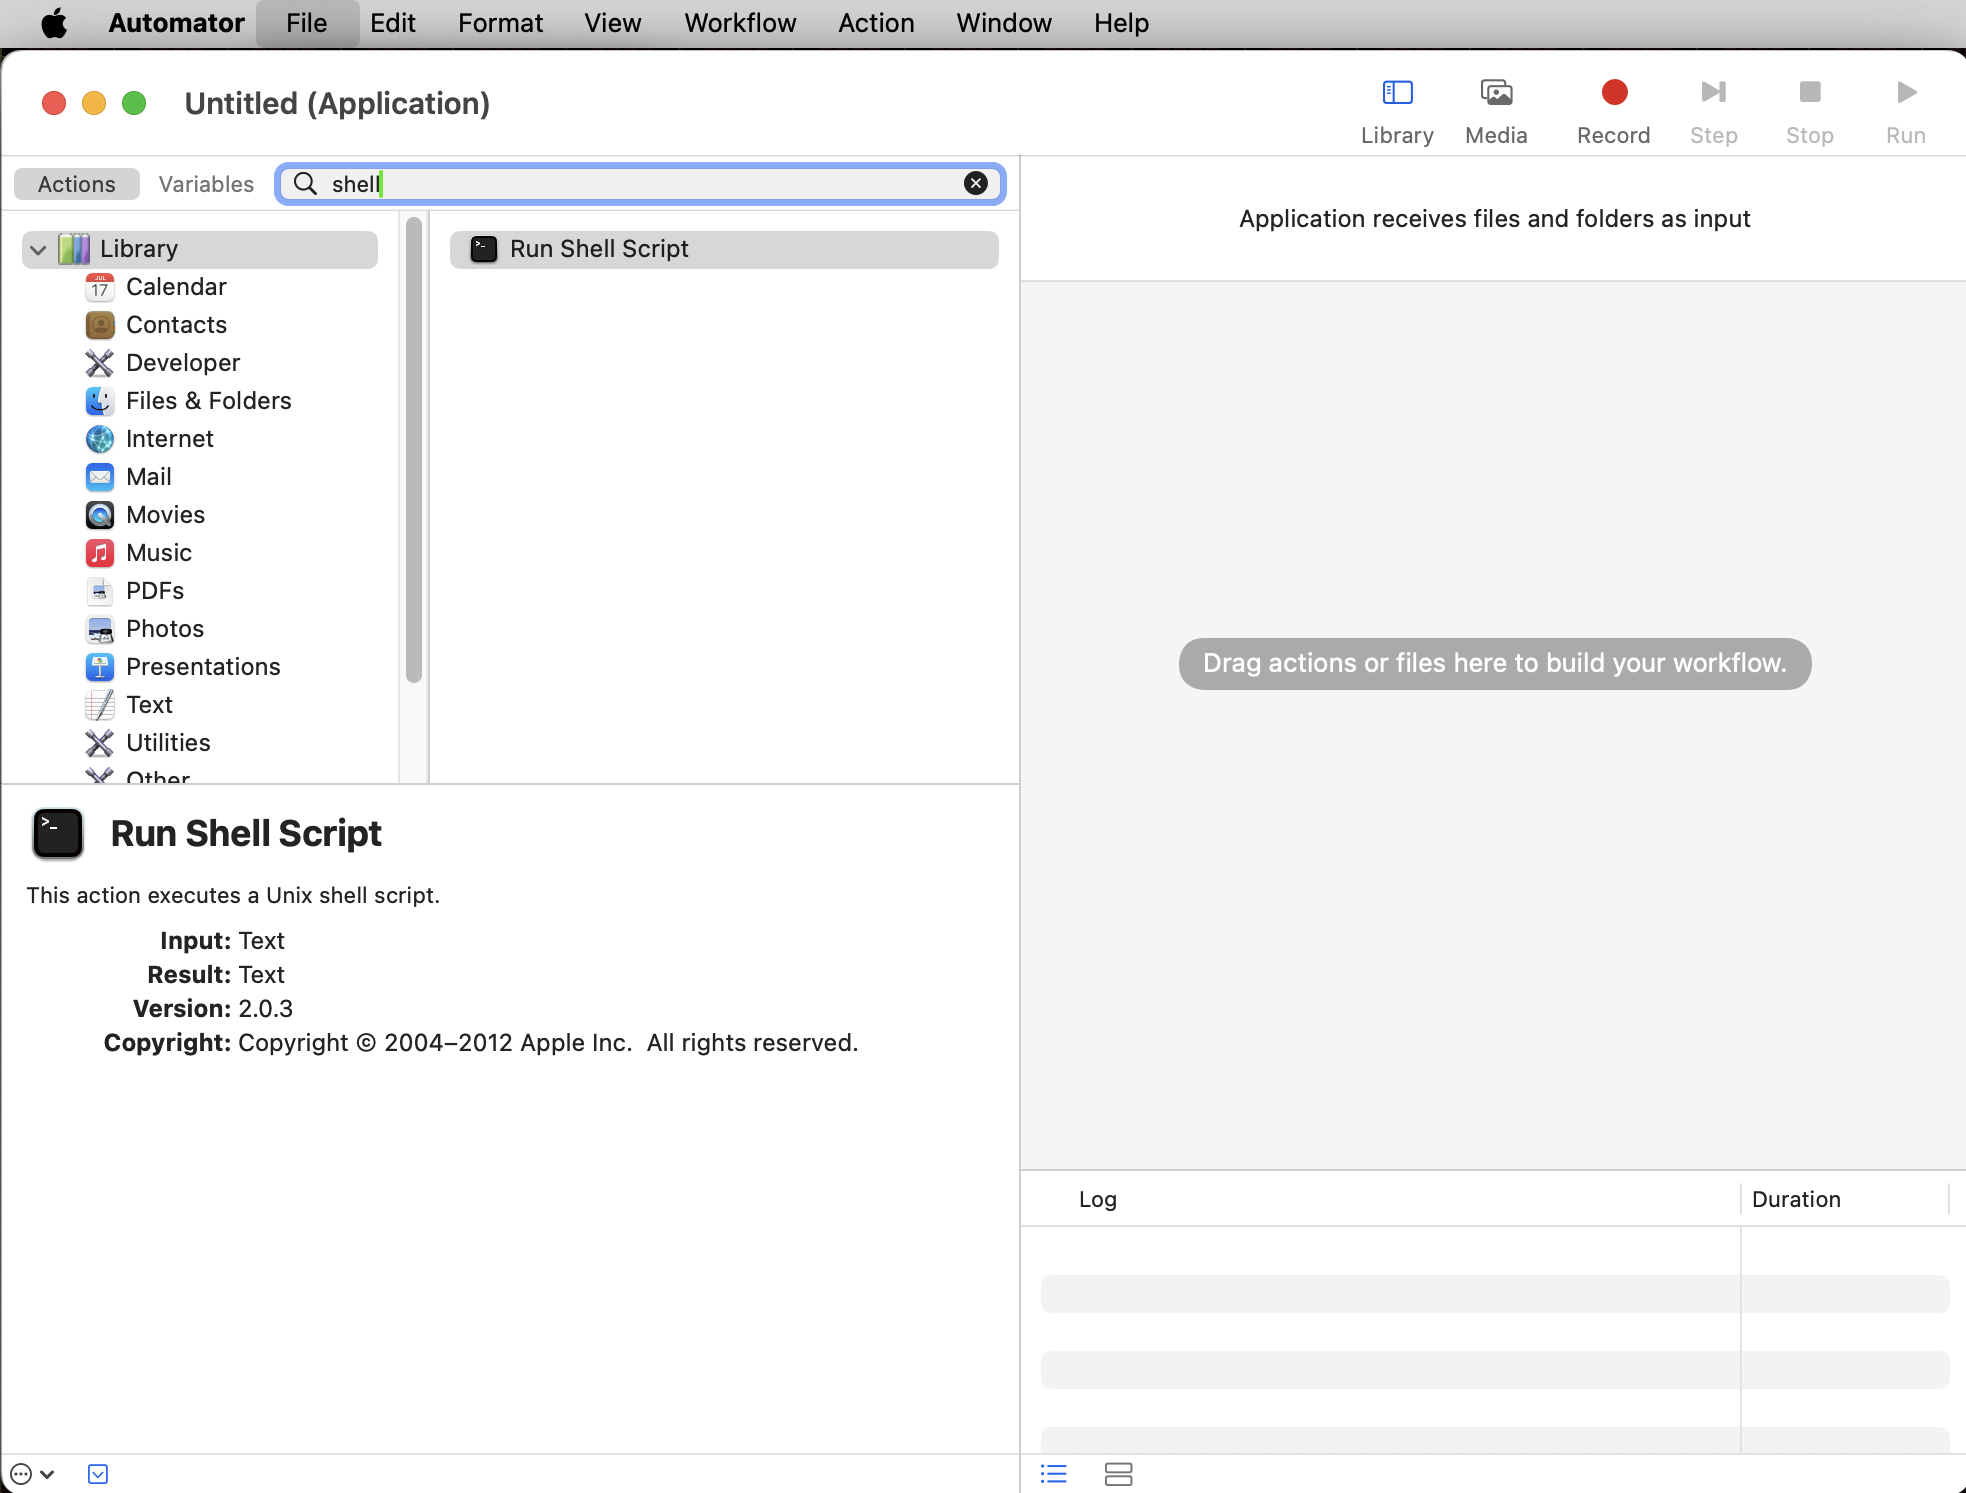
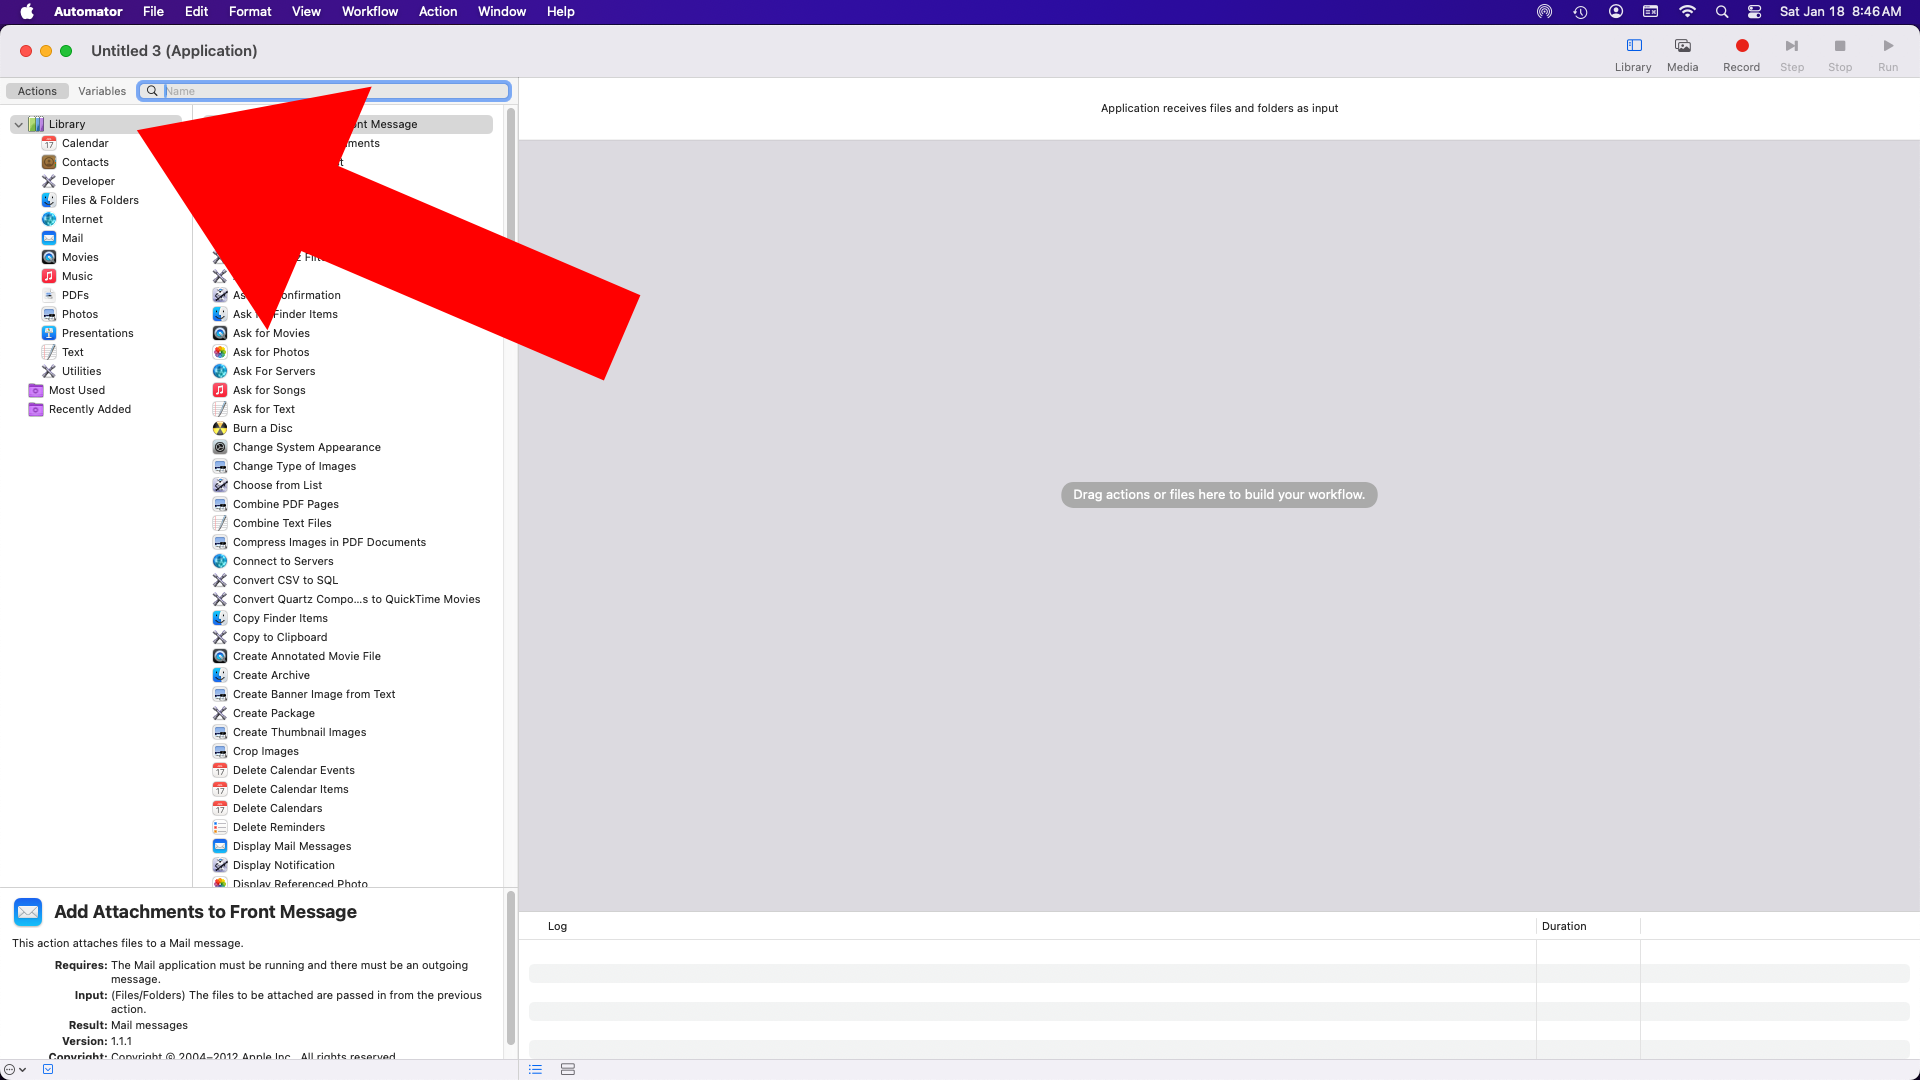
Search for “shell” and you’ll see “Run Shell Script”. Drag it to the right side of the windows…


Automator window showing how to run a shell script

Type the path to your script.

/Users/pete/scripts/buRsync.sh 1>/Users/pete/scripts/buRsync.log 2>/Users/pete/scripts/buRsync.err

I’ve chosen to pipe the output and errors to files but you can skip that if you want. I also chose to use full paths.


Automator window showing how to run a shell script

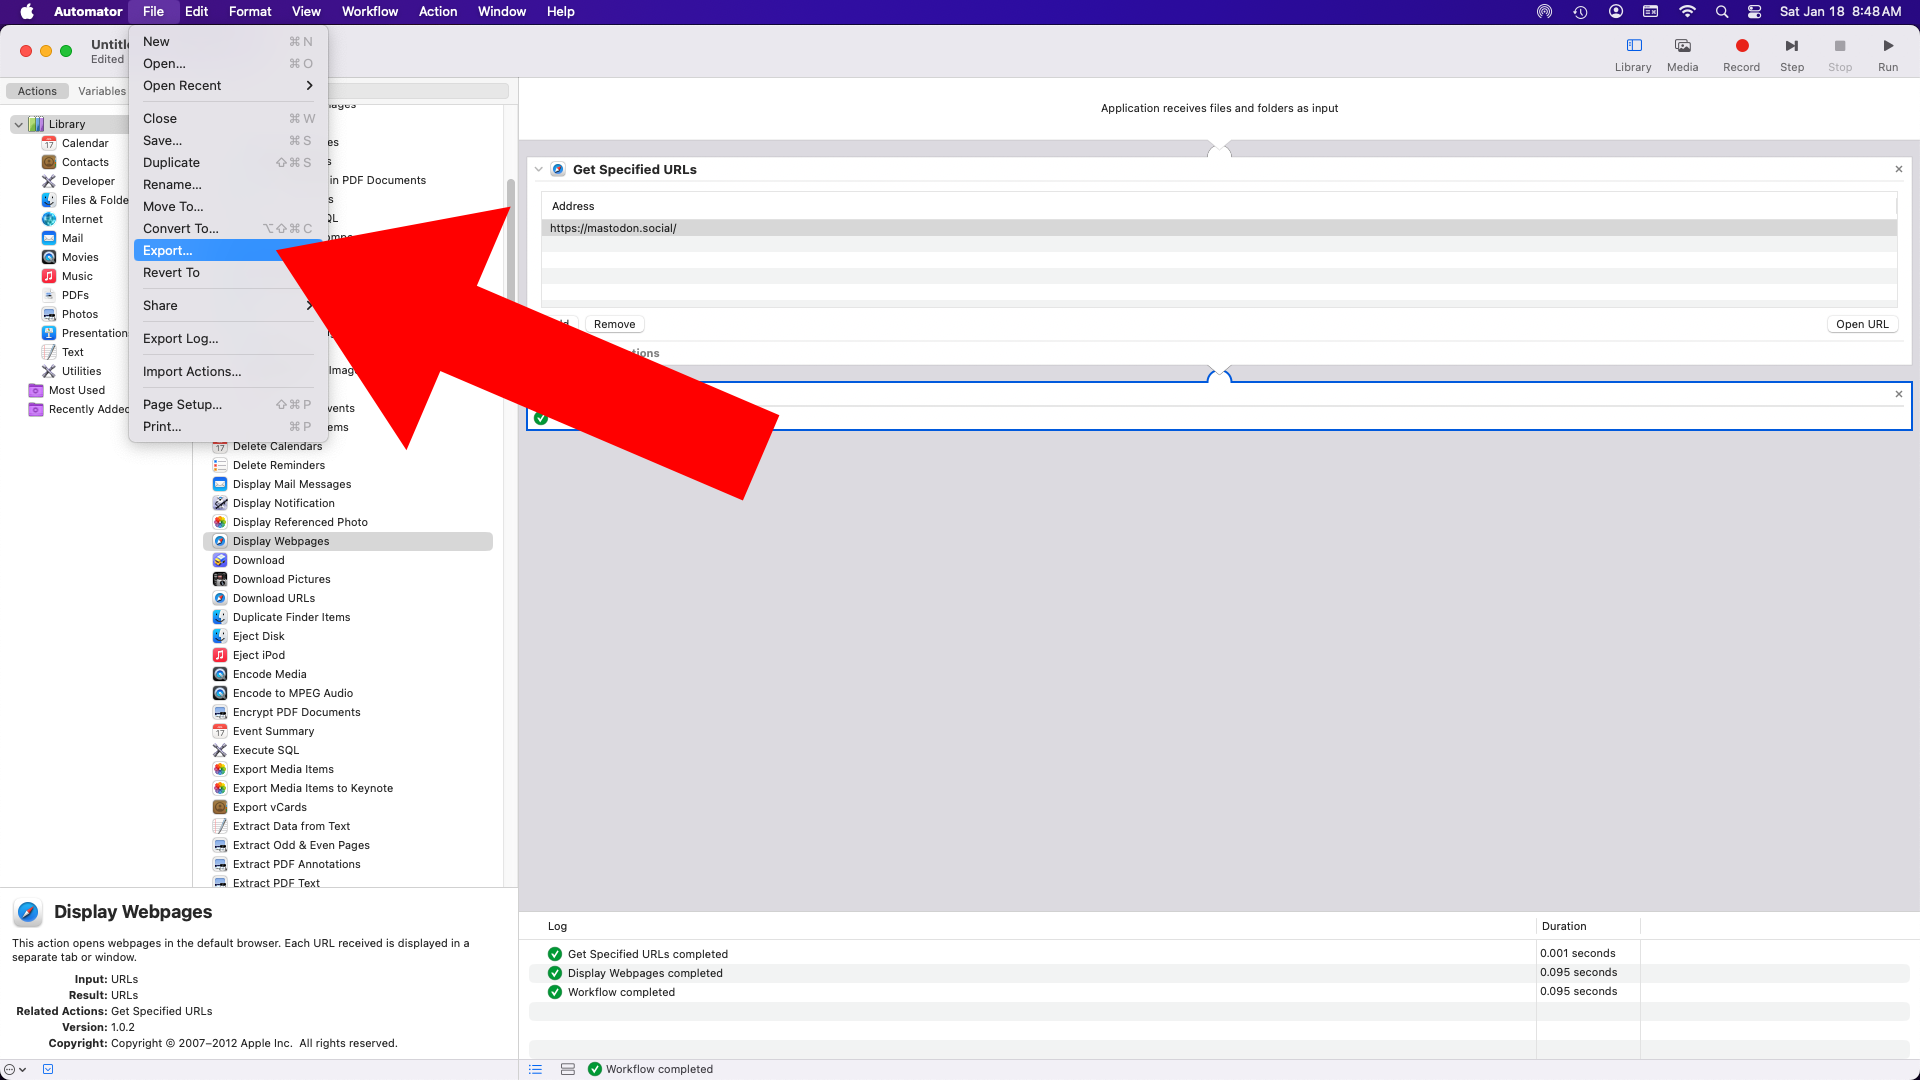
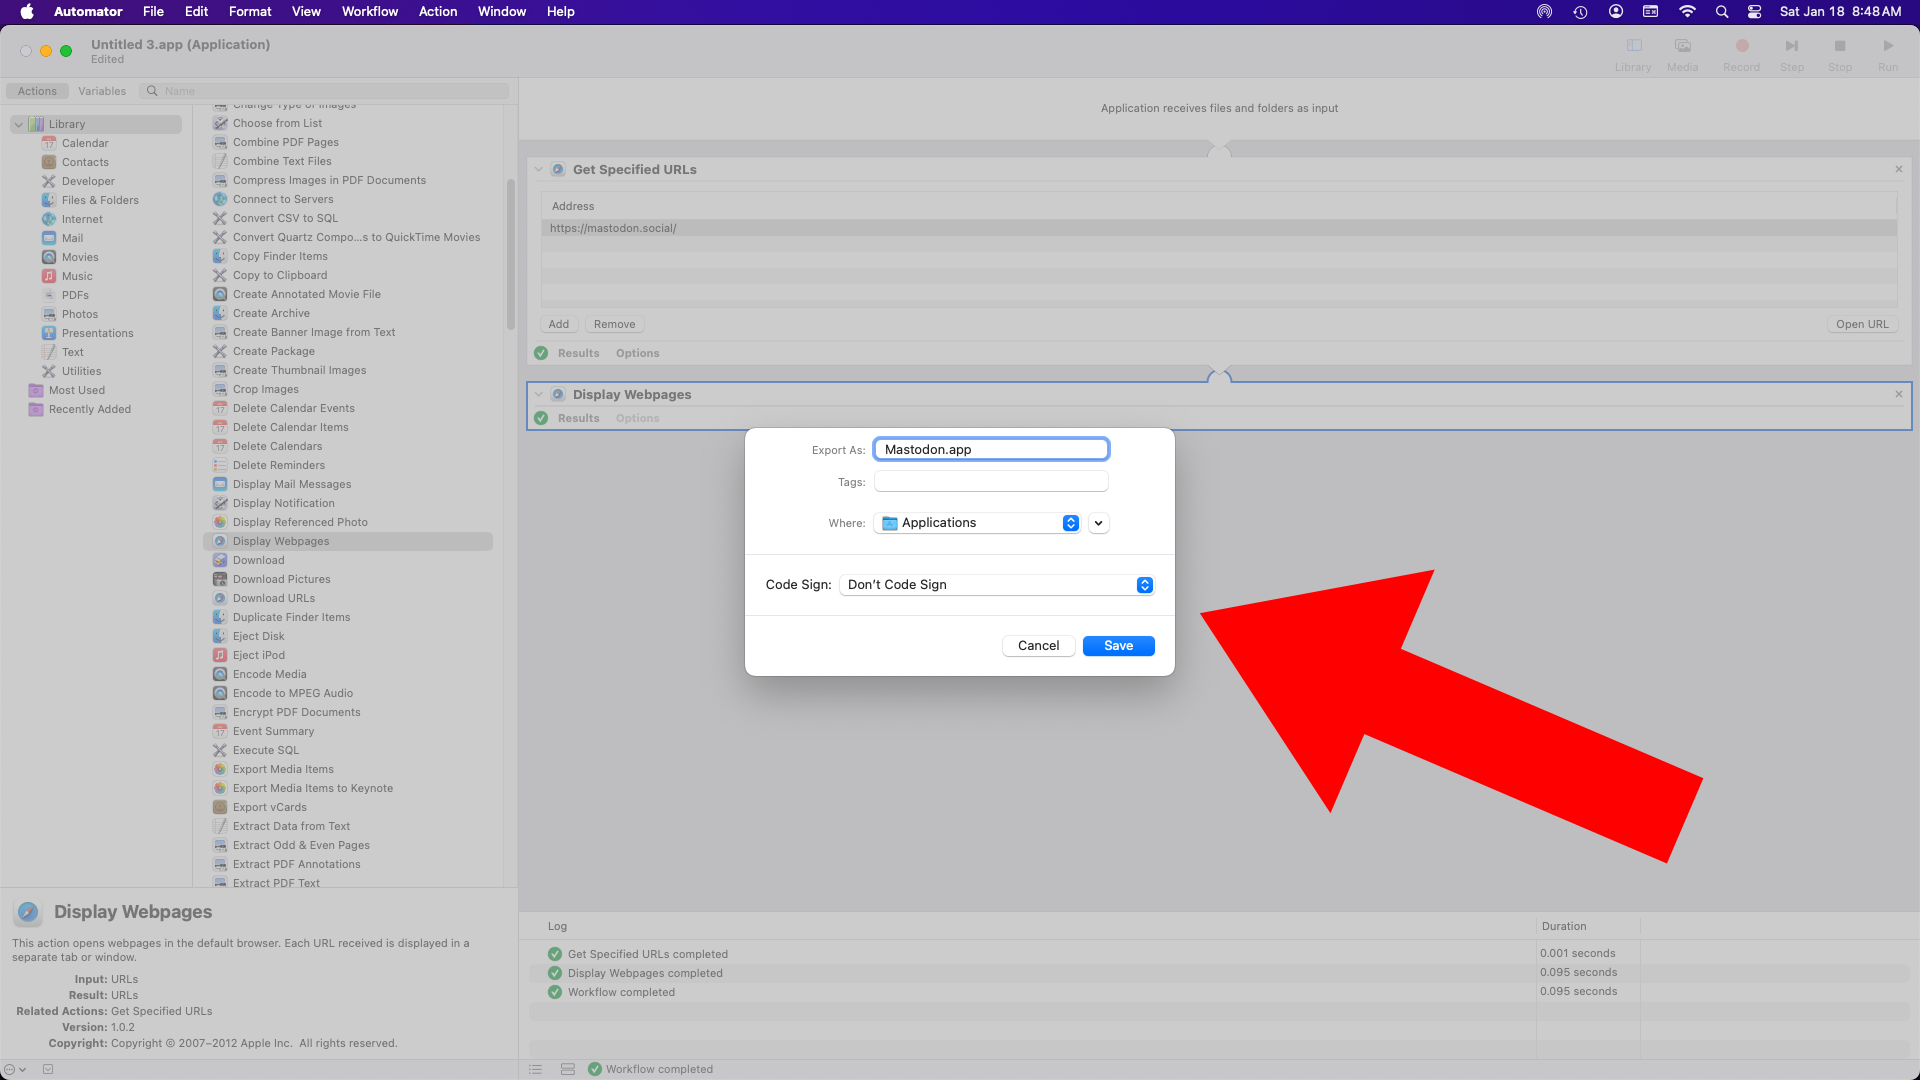
Export the Application…


Automator window showing how to run a shell script

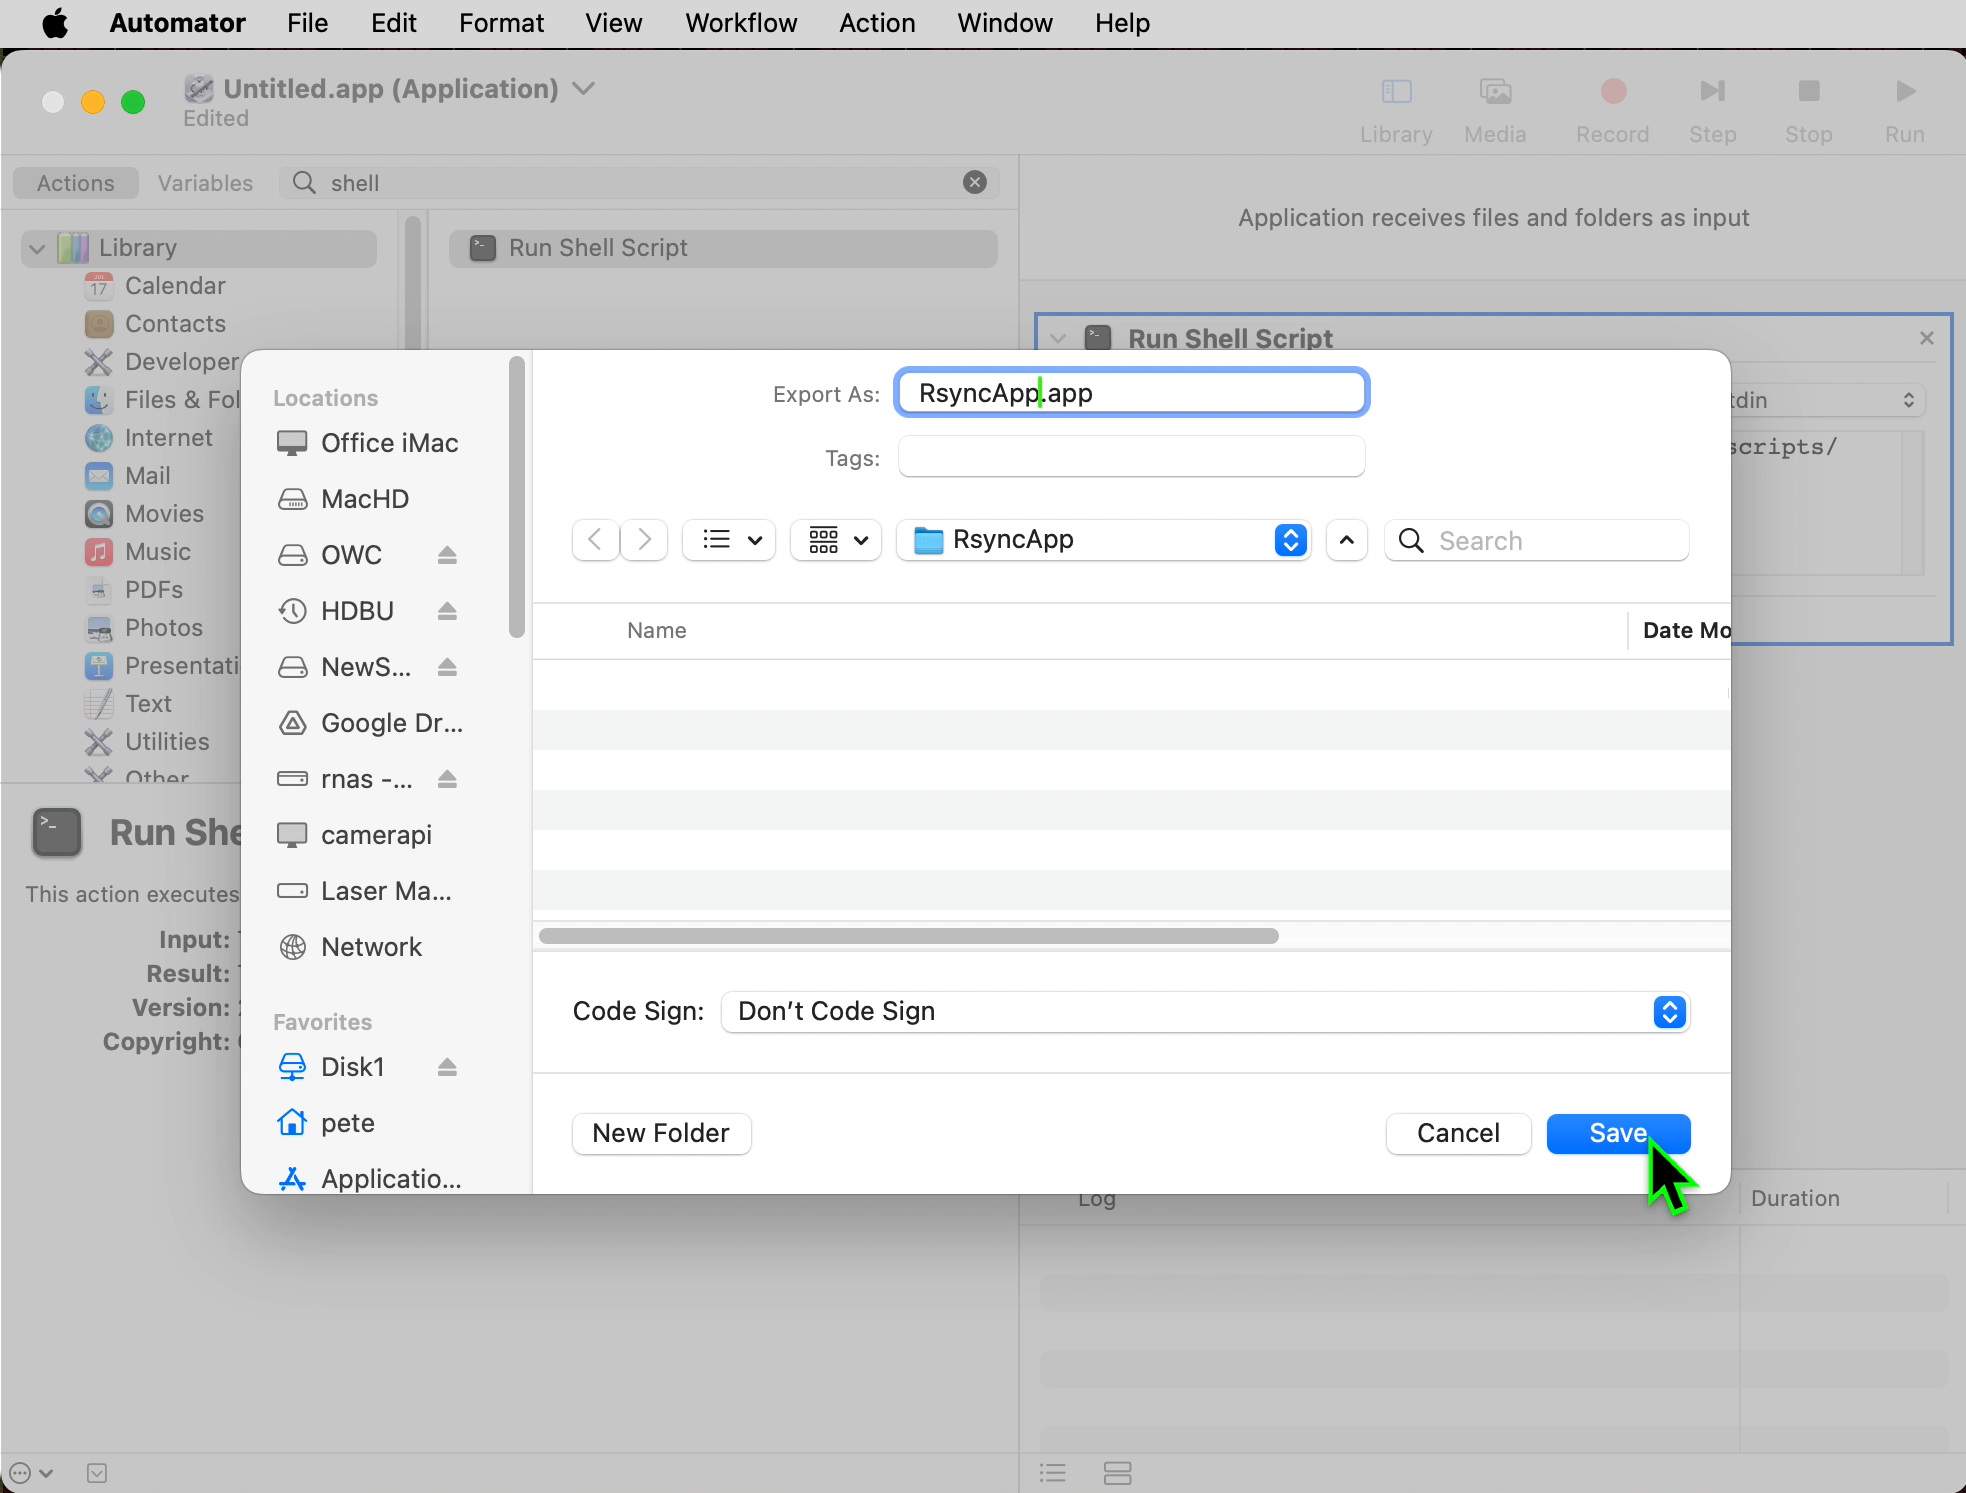
Give it a name and save it. You can put it right in the /Applications folder since it’s an actual macOS application.

Now you can add a cron job and use the macOS open command to open the application instead of trying to run a shell script directly.

0 6,18 * * * /usr/bin/open /Applications/RsyncApp.app

This seems to work fine for me in macOS Sonoma 14.6.1 but if it breaks in the future I’ll update this… if I don’t, just let me know!

Bonus: You can use the macOS Launcher to quickly and easily run shell scripts this way!


Yes, of course there is launchd but I think it’s overkill and a bit complicated for those who already know cron.

Categories
Uncategorized

MintBook – A Mint Linux MacBook Pro

Last year someone gave me a mint (LOL) condition MacBook Pro. It was a 2010 model just like my old 2012 that I got in 2014 and again in 2019 and used until 2022 when I sold it to someone who needed an older MacBook and I got a 2018 MacBook Pro that I didn’t really like and didn’t use much and then gave to Dana when her employer destroyed all the Macs…

So I’ve been without a “good” laptop for a little under a year. I would borrow my old one that Dana has every now and then but I wanted to stop doing that but also didn’t want to buy a new laptop… So I’ve got this 2010 MacBook Pro, which is a model I used for years and really liked! The issue is that it only runs older versions of macOS. When I was sick for two weeks in December I really wished I had a laptop, so I used it, but I could not installed some of the software I used, or at least not recent versions… like OpenSCAD.

So I said to myself “Self, this is an old laptop that can only run an old version of Mac OS X and old applications… time to install Linux!”

Now, I’ve installed Linux a zillion times, including on a number of old Windows laptops. But this was different. First, it was on hardware that I was used to and I actually really liked! This made a huge difference. I like the keyboard, I like the form factor… I like the hardware.

A MacBook Pro running Mint Linux

Seriously, I can’t believe how much more I like Linux when it is not running on a crappy old Windows laptop someone gave me. I have run Linux on old Mac laptops before, but they were old, old, heavy, clunky, and old. This MacBook (or “MintBook” as I call it) isn’t exactly lightweight or modern, but hey, it works well and I am used to it. That goes a long way.


Oh yeah… Mint Linux!

I started writing a post about Mint Linux so I should probably get on with it…

As someone who has used macOS (or Mac OS X) and before that System 9, 8, 7, 6… I guess I’m a “Mac Guy”, but I’ve also been using Linux (mostly on servers, oh and *BSD before that) but I’ve never been a Windows person. I did get my first Linux laptop (and my first “new” Linux computer) back in 2007.

A MacBook Pro running Mint Linux

So right now this is my primary laptop and I only have laptops running Linux. I’ve been pretty happy with Mint so far and learning all the new stuff in desktop Linux since I last used it on a regular basis. I quickly learned that SNAP is garbage and Flatpack is better.

My biggest complaint so far is the lack of resolution, which is 1280×800. This is terrible. When I ran macOS at least there was QuickRes which made the computer much more usable. Is there something like that for Mint Linux? I would love a bit more screen space!

My other complaint is about the keys and how sometimes you use control, other times it’s option/alt and then sometimes it’s command but control and option/alt are sometimes interchanged and maybe you need to press control-shift-v to paste something!? It’s a little bit madness and my muscles are not used to it yet.

When I first set it up I had to use a USB WiFi dongle to get online but I eventually got the built-in WiFi working just fine. (Whew!)

A MacBook Pro running Mint Linux

I haven’t really been using this laptop every day… It’s been a little busy the last few weeks and most of my work has been at a desktop with multiple monitors running macOS. I do try to use the MintBook when it’s the closest computer to me, so if I’m in the living room or dining room, away from the office, it’s the computer I’ll reach for.

I’m still working towards replicating as much of my normal (macOS) computing experience on the MintBook. That together with a renewed interest in getting away from the Apple ecosystem (and the US Big Tech ecosystem in general) is an experiment I’ll be working on as time allows.

Let me know what you like (or don’t like) about Mint, or what distro you are using nowadays!

Categories
Uncategorized

macOS Web Launcher

Here’s a niche one… If you use the “Launchpad Key” on a keyboard while using macOS you know it’s a handy way to launch an application. I use it constantly. But if you want a similar experience for going to a web site (as in, visiting a web site in your preferred browser) and you don’t have Keyboard Maestro or a Stream Deck, I have another solution that uses Apple’s Automator.

Launch Automator and create a new application…


On the left Library should be selected, if not, select it…


Click on “Get Specified URLs”…


It will load up on the right side with Apple’s web site specified…


I changed it to mastodon.social in this example…


Now select “Display Webpages” from the second column…


It will get added to the right panel…


If you click the Run button you might get this warning… it will probably work just fine anyway. Test it out!


If everything worked you can Export it…


Give it a name (I chose “Mastodon”) and save it as an application in the Applications folder…


Okay, it should be ready! Hit the Launchpad Key…


…and start typing the name of the Application/web site and it should pop up… Hit the return key to open it and you should go right to the web site in a new tab in your preferred browser!

I’ve made a few of these for sites I need to visit and it saves me the time of switching to my browser and opening the site in the usual/classic ways. Keyboard Maestro can make this even faster by just using a system wide unique key combo of course.


Note: This post contains an Affiliate Link. Read More.

Categories
Uncategorized

Apple ][+ Sketch

The Apple ][+ is where it all began for me. It was probably 1980 or 1981 when my brother brought one home, and it was our first “family computer” though as an 11 or 12 year old with few responsibilities I quickly became the one who used it the most. I remember at some point we put it on a desk in my room, which was pretty awesome!

I remember playing a lot of games, but I also remember learning to program in BASIC, often from typing in programs found in magazines, probably BYTE Magazine. I then discovered graphics! Lo-Res and Hi-Res blew my mind at the time… and here I am in 2024 drawing an Apple ][+ on an Apple iPad with an Apple Pencil.

I remember at one point I tried to write an adventure game in BASIC with Lo-Res graphics and I think that may have been my first “large” software project. I also remember abandoning it when I realized it was never going to work. Still, I learned a lot. When I got into high school and we used Apple Computers and did BASIC programming the teacher was none too pleased with me because I knew more than he did, and I think I let him know that a few times.

The best thing ever was MousePaint which was released in 1984. Since we couldn’t afford an actual Macintosh Computer you could connect a mouse to an Apple ][+ and use a version of MacPaint called MousePaint. Computer graphics without typing? Magical!

(Also, let’s take a second to appreciate that 40 years later I type in OpenSCAD to create graphical objects on screen that I then print as actual real-world objects using a 3D printer.)

I do these sketches mainly for fun, and to stretch my creative muscles using an Apple Pencil on an iPad with Procreate. If you ever want a framed print of my work please get in touch with me and we’ll work something out! Also, check out the Illustration page to see them all!


Note: This post contains an Affiliate Link. Read More.

Categories
Uncategorized

Kerning in Apple Keynote

Somehow over the last year or so when I tried figuring out how to do kerning in Apple Keynote I didn’t get it. For some reason I assumed it was like other applications and I guess it’s not. Sigh. Anyway, this is here for me so I get it right when I forget, and maybe for you!

If you aren’t a type nerd, kerning is the process of adjusting the spacing between characters in a proportional font, usually to achieve a visually pleasing result. Yup. It’s not tracking, or character spacing, which is different. But Keynote is confusing. Ugh.

My first mistake was trying to put the cursor between two letters, because that’s how other applications do it. Well, don’t do that. It doesn’t work. (Doing so affects the entire line of type!)

Don’t highlight two characters and try to adjust the kerning. It adjusts the space between the two letters and the space after the last letter. What!?

Right, so… Just select the one character you want to adjust the space after! In this case I selected the “A” in the word “Avenue”…

Now under the Format Menu, select Font, then Character Spacing and you can Tighten or Loosen. You’re better off just using Command-Option-[ and Command-Option-] though.

Hey, look at that! We’ve done it. Kerning. Adjusting the space between two characters. Amazing. I mean, you don’t get actual numerical values like other applications, but you just go with the visual spacing and that’s the best you can do.

The weird thing to me is that it’s not called kerning, and instead called “character spacing”, and the reason I think it’s weird is because Keynote was created for Steve Jobs, who was a big typography nerd. Maybe it was named as such to not be as confusing to non-typography nerds, but in doing so, it confuses typography nerds.

That’s part of a larger issue I’ve seen in computing over the last 25 years or so. The “dumbing down” or “simplifying” of things that are at all complex or even slightly obscure, so that people without the requisite knowledge in a specific area can understand things. Maybe that’s not the worst thing, but I still think it sort of penalizes the people who have advanced knowledge in a subject.

Anyway, that’s how do you kerning in Apple Keynote.