I’ve loved robots since I was a kid. I actually ended up trying to build one back in the 1980s. I had motors, wheels, a small platform I built out of wood, and a few really bad sketches. I also designed a robotic gripper hand using a solenoid which I thought was brilliant, but trying to build a prototype out of wood was a miserable failure. And even my plan to use an Apple ][+ as the controller never came to be. It was just too ambitious of a project at the time.
Fast forward 25 years to January 2011 and with a handful of parts from Adafruit Industries, putting together a simple robot takes less than one evening. Sure there’s no robotic gripper hand, but it has a little holder for a Sharpie marker and can draw while it rolls around. It’s a compromise I’ll accept.

Arduino-Powered Drawbot Version 1
The first attempts at drawing were just circles. We just ran both servos at full speed and it spun around. This was impressive for the first hour, but eventually we knew that new code had to be written. By the time that Milwaukee Makerspace had their Grand Opening I’d tweaked the code enough to have it draw while turning left, move backward a bit, then draw while turning right, with random values added in to make things a bit more organic.

Drawbot Version 2 at Milwaukee Makerspace
The Drawbot is an ongoing project, in hardware as well as software. For Bay View Gallery Night in June 2011 I ended up modifying the bot a bit by shortening the body and stacking the breadboard on top of the 9 volt batter holder. This made it more compact, and allowed for a tighter turning radius so it ran into the walls less often. (The idea is to have it do the drawing on an 18″ x 24″ piece of paper without rolling off, so I built a frame that would prevent it from leaving the drawing area.)
Version 2 was better than Version 1, but since I tend to run the Drawbot for hours and hours at these events, having the battery compartment under the breadboard was not ideal. Changing the battery was a pain, and I’m really not a fan of 9 volt batteries.
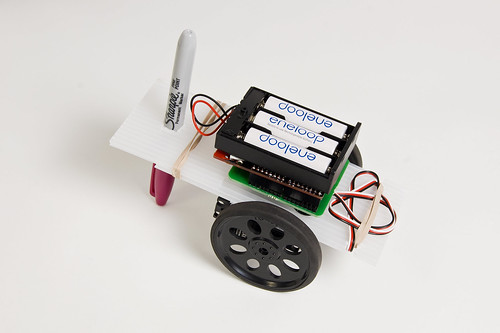
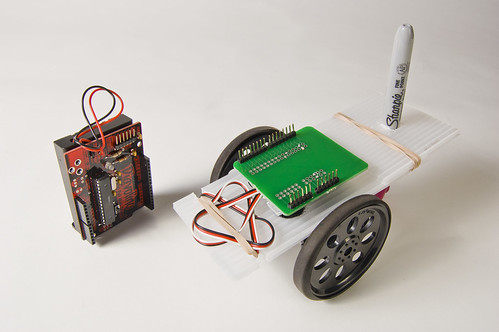
Diavolino-Powered Drawbot Version 3
For Version 3 I ended up making a lot of changes. I started with replacing the Boarduino from Adafruit with a Diavolino from Evil Mad Scientist Laboratories. This lets us use AA batteries instead of 9 volt batteries. Since I have 12 rechargeable eneloops I can bring them all charged and just swap them out as needed during the day. Using the Diavolino also meant I could clean up the wiring. Version 1 (and 2) just had the Boarduino on a breadboard with jumper wires stuck in place and a lot of rubber bands and tape. For Version 3 I moved to a shield since the Diavolino accepts them. I bought a bunch of shields from NKC Electronics earlier in the year super-cheap. They had errors which made them useless for their intended purposes, but they made great prototyping shields. The closest thing now is the Freeduino Protoshield KIT for Arduino which is twice the price. (I should probably learn to make my own shields at Milwaukee Makerspace at some point.)

The shield works well. I just soldered the 6 wires for the 2 servos onto it, and it then attaches to the Diavolino. There’s still some tape and rubber bands involved, but the structural integrity of the hull has been improved by hot glue in many places. I’m still not convinced this will be the last revision, but the body is so much more solid in this version that if it holds up, I may just leave it as-is out of laziness.
So now that the hardware part is so much improved, it’s time to turn our attention to software. We’ll be experimenting with new code, and at some point may want multiple options for how the Drawbot draws loaded into the sketch with a way to choose which one it uses. There will still be randomness programmed in (that’s important!) but being able to make some choices might be a good idea.
The Friday Night Drawbot also got a mention on the Sharpie Blog, and was in a Make Blog post.
Blog posts that mention this project: