We’ve been using the RED ONE a lot in the past few months over at z2 and while we’ve had the matte box for a year now, we never managed to get top or bottom flags for it, so I finally got around to solving that problem.
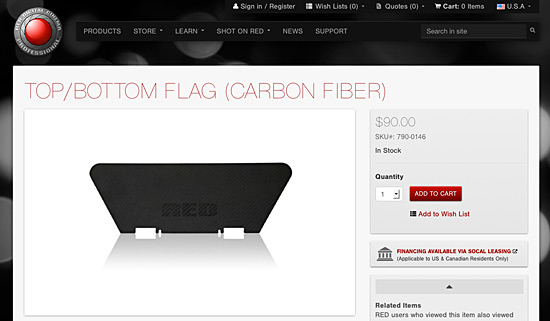
Camera accessories are notoriously expensive. For some things, that makes sense, and for others, I’m not sure it does. The top/bottom flag for a RED Matte Box is $90 USD. Well, hey, it’s carbon fiber. Yeah, that stuff is pricey! But, don’t worry…

There’s an aluminum version of the top/bottom flag for just $40USD. Hey, you could get two of the aluminum flags for less than the price of one carbon fiber flag!

While I was perusing the RED store, admiring their well done photography, I noticed that the large version of the photo was clean. Really clean, and at the perfect angle, straight on! So… I engaged in what I now like to call “R3Dverse Engineering”. (That’s “reverse engineering” of RED stuff, if that was too subtle.)

I grabbed the image from the web site, opened it in Photoshop, and started to clean it up.

I got rid of the shadow, added a white layer below so I could see things a bit better, and selected the object…

I then filled the whole thing with black so I had a high contrast image…
Once this was done, I saved the file as a PNG and imported it into Inkscape, where I used the ‘Trace Bitmap’ feature to create vector lines defining the image.

The next step involved a lot of precise measurements with the digital calipers on the part of the matte box where the flag mounts. There were many guide lines added.

The lines helped me determine centering of the slots and how wide the slots/tabs needed to be.

I did a few revisions, and here’s the final cleaned up version. with most of the guide lines removed.

Here’s a visual diff to show the tweaks between the original trace of the image I imported, and how much I ended up adjusting the lines a bit for a better fit. (The reddish hue shows the final. I mainly had to add a bit more space around the larger tab.)
I should mention that with each revision, I was printing out a sample on tabloid size paper and cutting it up to test the fit.

Once my paper prototype was good enough to consider “final”, I ended up sitting on this project for a bit trying to determine what material to use, and how to cut it.
I’m still thinking about it… I’d prefer to go CNC versus trying to cut it by hand. Perhaps using the CNC Router at Milwaukee Makerspace would work. A very thin sheet of aluminum perhaps? I thought about laser cutting something, but didn’t think acrylic or wood would be a good option. I’ll need to keep thinking about materials…

Meanwhile, we have lots of black board at work, so I stuck my paper prototype onto a piece and hand cut it with an X-ACTO blade. (I did not round the corners.)

The tabs and slots are a little messier than I’d like, but again, I’ll call this part of the prototyping stage.

But it also totally works… and is probably less than 1/100 the cost of the carbon fiber version. It may not hold up as long, but then again, I can easily make a bunch of these for next to nothing. (I can also just laser cut the black board instead of sliding an X-ACTO around to do it.)

Update! I ended up laser cutting the black boards, and they works great! You can grab the files from Thingiverse.


