Categories
Uncategorized

Birthdays, Anniversaries, Updates

Robot Plate!

Well, we’ve been busy! In fact, we’ve been so busy we missed our own anniversary. That’s right kids, on August 5th, 2012 we celebrated 15 years of blogging. I suppose that’s pretty good. I probably should have planned some sort of celebration. Oh well, I guess I have (almost) 5 years to plan for the next milestone.

Speaking of milestones, and birthdays, and August 5th, I now have a child that can legally drive a car. That seems crazy. Crazy but true… I look forward to being a passenger more often. Except…

MM Racing
Concept art

…when I drive in the Power Racing Series next year. I mean, assuming there is a next year. I ended up going to Maker Faire Detroit and got pulled into the Milwaukee Makerspace Racing Team. It was a lot of fun, and now I’d like to do it again next year. Yeah, sweet.

Marco2

What else have I been doing? Well, I made this sweet video of the building of Red Lotus with Time Lapse Bot as well as other posts, and I continue to hack at my RepRap and 20 other projects. (Including at least one with lasers.)

RED BTN
Amusing, if you know my making activities

I’m also still selling buttons, and doing other things, like planning the next 3D Printing Meetup happening August 12th, 2012. Oh, I’m also hoping to be awarded $25,000 this year. I’ll let you know if that happens or not.

J33P
This may be my new car

There’s more, but I can’t think of it right now because I got interrupted 10 times while writing this post…

So what have you been up to?

Categories
Uncategorized

3D Printed Guns for Everyone!

Glock (from Thingiverse)

The media is up in arms about Have Blue’s “3D printed gun” (which he brought to the Milwaukee 3D Printing Meetup last month, by the way…)

And yeah, I put “3D printed gun” in quotes because it’s just one part of a gun. But you’ll see headlines like Hobbyist builds working assault rifle using 3D printer, Functioning 3D-printed rifle you can make at home, The world’s first 3D-printed gun is a terrifying thing, and A Working Assault Rifle Made With a 3-D Printer.

Those are all great headlines, and if you read the articles, they might explain things a bit more, but the short version is, Have Blue printed a part of a gun. He didn’t print an entire gun, and he didn’t print ammunition. The next headline might be “Guy with tools makes a gun” because the only new thing here is the 3D printed part. People have been making guns at home with machine tools for years, and as I understand it, it’s legal in the United States.

Saying he printed a working gun is akin to saying I printed a house because my RepRap made a coat hook, and I just, you know, assembled all the other parts around it to complete the house.

So before you think I’m some gun-toting lunatic building weapons in my basement, well… I’m not. (I do have a few Art Robots I’m working on, but the headline “Man builds working Art Robot with 3D Printer” is not very exciting.)

Anyway, I figured that everyone needed a gun, so I grabbed this Glock from Thingiverse. I printed it out in 30 seconds. Well, in an hour, but the time lapse below is 30 seconds long.

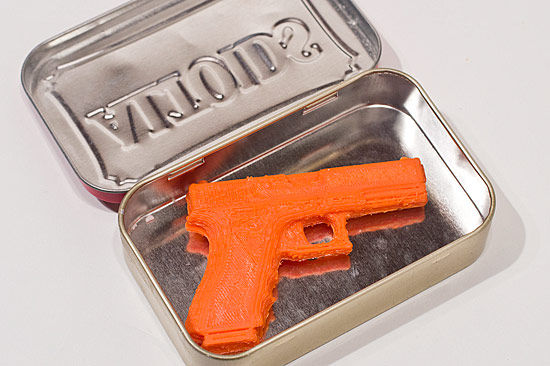
So here’s a nice photo showing my 3D printed gun. It’s orange because I’m running low on black filament and haven’t got any nice silver filament yet.

3D Printed Gun

I wanted my 3D printed gun to be a little smaller so it would fit in a mint tin. Oh, did I mention it’s not fully functional yet? Yeah, I should have mentioned that…

I’ve been thinking a lot about guns lately, and if you can forgive me this (slightly) humorous post, I’ll expand upon my gun-related thoughts in a future post.

Categories
Uncategorized

A Maker’s Perspective

Laser-cut wood

I was at Milwaukee Makerspace, using the laser cutter (that I adore so much) and another maker asked me some questions, and then offered their thoughts. This was nothing new, and it’s a welcomed thing. Often you’ll get suggestions or ideas for future projects (or the one you’re currently working on.)

The maker was looking at what I was doing (making a laser-cut spool) and said he would probably use a band saw to cut the wood, and find a large dowel to put in the middle. That’s definitely one way to do it.

He guessed about how much time I spent on my method, and if you count the file-diddling his estimate was probably low, and I’m fine with that.

Testing...

But hey, it’s all about perspective, right? I’m comfortable with software, and I like learning and designing things, so I don’t mind picking up new skills in solid-modeling and file conversions. These are skills I’d like to improve, as I plan to use them again and again. If I was just picking up a piece of wood and going at it with a saw… that’s not very enjoyable to me. I’m also not very good at it.

Spool

So instead of just finding a piece of wood and making it work with a saw, I prefer the process I took. I found something close enough to what I wanted, modified it to be exactly what I wanted (and along the way got help from another maker (Gary) and learned more about OpenSCAD) and after some tweaks I should have a repeatable process that will allow me to make as many spools as I want with relative ease. Since I’ll be sharing my files, it also means that others can make the exact same thing. To me this is powerful stuff, and while dumb power tools have their place, the smart tools (design software + CNC machines) offer so much more.

I’m also contributing to a community of makers who share their work, make derivatives, suggestions, and mashups of their work, and allow anyone else to do the same. I’m into that stuff, so yeah, that’s my perspective.

Categories
Uncategorized

3D Printing Camp ReCap

3D Printing Camp Wisconsin

It all happened pretty fast… I think it was the beginning of May when Bob Waldron floated the idea of a BarCamp-like event focused on 3D printing past me, and of course I couldn’t ignore it. I helped set up the web site and did some promotion and sponsor-wrangling, because I figured if he was throwing such an event, I wanted to see it happen so I could go to it. :)

3D Printing Camp

Getting sponsors took a lot of time, but in the end (and I mean very end!) we got what we needed, and were able to cover most of what we wanted for the event. People got fed, Sector67 got a few bucks for use of their space all day, and nothing went wrong… well, almost nothing.

If you attended 3D Printing Camp you owe a big round of applause to Bob Waldron, but you couldn’t give him one on Saturday because he was not there! Despite all the comforts of our modern world, if your plane gets delayed, and you get stuck, you miss things… and Bob missed the event. (Don’t worry, this will just ensure he does it again next year.)

3DPrintingCampWisconsin

So what did we do? Well, we printed. A lot. And we also had a few sessions related to 3D printing, modeling, security, repairing things, and we just generally got to meet everyone else who is into 3D printing. Remember back when you were the only person you know (not counting online) who was really into something, and if you got to hang out with others who were into the same thing, how awesome that was? Well, yeah, that was it. I think we had about 20 printers, and saw over 60 people come through the door throughout the day. Not a bad turnout at all.

3DPrintingCamp

For me one of the highlight was learning more about Sketchup. Kemper Smith led an amazing sessions showing tips & tricks for 3D modeling and I took plenty of notes.

And then there was Tony Warren, who showed up with a partially done RepRap and got it printing by the end of the day. I can certainly attest to the fact that having an unfinished printer is something no on wants, so getting it running is pretty awesome.

3DPCWI

The event was pretty laid back, and plenty of people just spent most of the day (and evening!) printing, which is cool. There could have been more sessions, but when you’ve got all those printers in a room, you want to talk about them, and trade tips, and melt some plastic. It’s all good.

As for the RepRaster 5000, it started a little shaky because I could not get my bed up to temperature, then I noticed a ceiling fan above me! I moved and all was well, for a while. I printed a few things, and then I did a print that failed, then the next one failed, and then it was time to just give up. I had managed to knock things out of alignment earlier and I think things just went pear-shaped from there. Too much printing I guess. Once I got home I got everything back to normal, leveled the bed, and it’s back to normal. (It’s always a RepRap adventure somewhere…)

Categories
Uncategorized

OpenSCAD to DXF

There are many posts here which may not offer new information, but what they are is my information, usually gathered from other places, and with my own point of view. So with that said, here’s how I converted an OpenSCAD file designed to be used on a laser cutter into a DXF file. I put this out there as much for myself (so I know how to do it next time) as much as for others who might find the information useful.

Converting OpenSCAD files to DXF files

We’re going to start with a .scad file in OpenSCAD. I’m using this file from the Laser Cut Filament Spool, and even though there are DXF files available, I ended up tweaking the .scad file, so I had to create new DXF files.

Rendering the OpenSCAD file

We start by opening the plate.scad file in OpenSCAD and doing a Compile and Render (CGAL) command, which is what you would do with any .scad file.

DXF? Not yet!

Once your object appears, you might say “Hey look! There’s an ‘Export as DXF’ command under the Design menu.” Well, that won’t work because our object is a 3D object, not a 2D object. So we need a few extra steps.

Instead of exporting as a DXF, just export it as an STL file, which may be what you normally do if you use OpenSCAD for generating things you can print on your 3D printer.

Render the DXF!

Did you output the STL file? Good! We’re ready for the next step…

We’re going to create a new file in OpenSCAD. Name it something like plate2dxf.scad and use the following line of code:


projection(cut=false) import("/Users/pete/Spool/plate.stl");

(Obviously you’ll need to edit the path to the file to match your own situation. If you have the files in the same folder you can just use “plate.stl” instead of the full path.)

Run the Compile and Render (CGAL) command again, and wait… wait… wait… Yeah, it took 10 minutes for this file to render. It’s not a fast process.

Once this is done, you can now use the “Export as DXF” command and get a standard 2D DXF file suitable for other applications.

DXF in Inkscape

Here’s my DXF file loaded into Inkscape. I typically use Inkscape to work with files I plan to laser cut. There’s a good explanation of my process in the post Laser. Cut. Files. (Part III). And yeah, I could have used this method previously had I known about it.

Hat tip to Giles Bathgate for his post Extracting 2D mendel outlines using OpenSCAD which was a tremendous help.