Categories
Uncategorized

3D Printed Print Baren

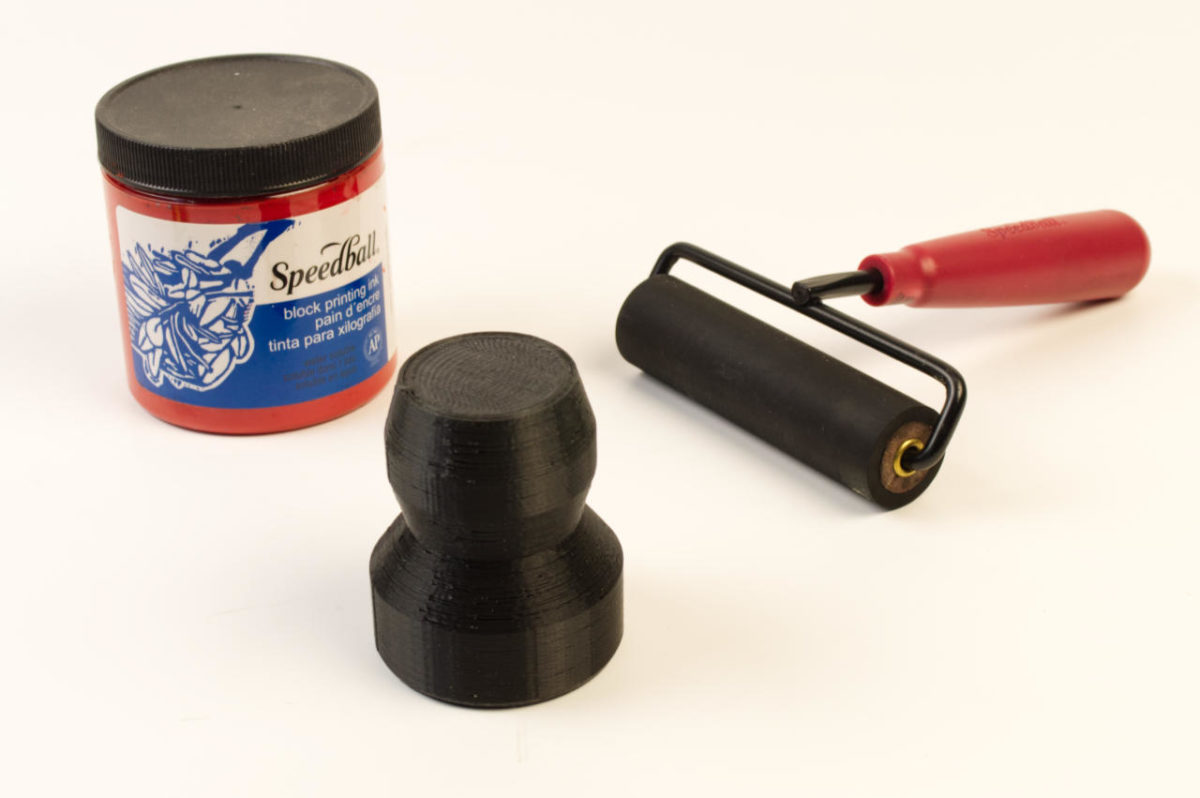
In the world of printmaking (of which I am far from an expert) there are many ways to print, including a printing press. I no longer have easy access to a press, so I’ve been using alternate methods of getting ink on paper. One method is to use a baren. The baren is a thing you hold in your hand to rub the paper against the printing plate, thus causing the ink to be transferred.

I bought a cheap Speedball baren years ago, and I never liked it, so I started looking at other barens. Now, printmakers tend to appreciate fine things and aesthetics, and there are a lot of different barens out there. Some are made of glass, some are bamboo, some have rope or ball bearings or pads, etc. So I finally asked the wisest of printmakers I know, and Jessica told me she just uses a wooden spoon.

Well, I decided to just make my own baren. So I quickly modeled something really ugly, and I 3D printed it. After I printed it I thought of a better way to model it, and I still haven’t made a new one. This one works, so I’ll just keep using it for now. It’s functional. It’s good enough.

I did sand the bottom of it… quite a bit! Working my way up to high grit sandpaper until the bottom was smooth. Really smooth. It’s smooth. Yeah. Smooooooth. I also sprayed it with Liquid Wrench and rubbed that in real good. It glides across the paper really nice. I’ve done a few prints with it and I’m pretty happy. 3D Printing. It’s handy!

Categories
Uncategorized

Reaction Game with micro:bit

I built a simple game for Brown Dog Gadgets which will test your reaction time. The basic concept is this: A series of LEDs will light up in sequence, and when the fourth LED is lit you need to press the button. If you time it right you’ll get a point! When you get 25 points you’ll win the game! But wait! Each time you press the button successfully the game will speed up… and if you press the button at the wrong time you’re score will go down.

It’s a fun and easy build for the classroom or at home, and once again we’ve got a micro:bit controlling things. (Though it would be very easy to port this to an Arduino or another microcontroller.) We’re building on LEGO because that’s how the Crazy Circuits system works. We sometimes joke that these are PCBs or “Plastic Circuit Boards”.

After creating the Reaction Game (7 Segment Version) we came up with two variations, one that uses the build-in LED matrix on the micro:bit instead of our 7 Segment Display (the Reaction Game (LED Version)) and then we got even more minimal and built a paper circuit version with even less parts, the Reaction Game (Paper Version).

As always, we’re publishing these resources for those who purchase our kits, and also for everyone else. You are free to take the ideas and run with them, make your own thing, and while credit is always nice, supporting Brown Dog Gadgets by purchasing things helps us to continue offering these resources. I mean, in the last year I’ve published over 100 guides and templates for freeeeeee….. We appreciate your support!

Categories
Uncategorized

100 Guides for Brown Dog Gadgets

Back in March 2020 things were… weird, right? But that’s when I started writing guides for Brown Dog Gadgets. The guides and resources are free for anyone to use, and we hope that people like the guides, find them useful, and support us by purchasing from the BDG shop.

One year of projects! While you should definitely check out the whole Project Database, if you want to see all of my projects they’re listed on my profile page.

I added screen shots below showing them all. Oh, there’s a few I didn’t write, and just updated it, but there are a few new ones not listed here, so it’s still over 100. :)

The projects range from paper circuits, switches, greeting cards, no-sew wearables circuits, Arduino projects, and lots of micro:bit projects. I’ve learned a lot of new things along the way, and I think I’ve become pretty good at writing guides! For each guide I usually do the writing (copy and code), illustrations, photography, and video. It’s a great mix that covers many of my skills, and I like doing it.

And while I’m not great at math, 100 guides in about a year is an average of two guides per week. Not bad! Here’s to the next year of guides.

Categories
Uncategorized

Tofu Recipe (Sort of…)

This is sort of a recipe. It’s pretty loose, but someone asked for it, so I’m gonna write it up.

I got a block of tofu at the store. Probably firm, or extra firm. I don’t remember.

I took it out of the refrigerator, opened it up, drained the water, and then put a towel on the counter, put paper towel on top of it, then put the tofu down, added more paper towel on top of it, and then put weight on it to press it down to drain more water.

I grabbed our toaster oven pan and put it on top of the tofu, then put our tea kettle on top of that since it had some water in it and a little bit of weight. You can use plates, but sometimes the tofu causes things on top to slide off, so… whatever works for you. Let that sit for a bit… maybe an hour? I probably forgot about it.

Remove the weight, get rid of the wet paper towel, the wet tea towel, and all the jazz. Then cut the tofu into pieces. What size? I don’t know… look at the photo I guess. Not too large, but not too small. (More on that later.)

Next I got a big plastic Tupperware-style container, large enough to lay all the pieces into without stacking them. Before I put the pieces in I added soy sauce, some sesame oil, a little bit of rice vinegar, then more soy sauce…

Next came the spices… Here’s a few I remember: smoked paprika, cayenne, chili powder, garlic powder, pepper, and… whatever else I had that seemed like it would fit. Dump a bunch into that soy sauce mix and swirl it around.

Put the tofu pieces into the container, flip them until all sides can soak up the liquid, then sprinkle more spices on the top and stick it in the refrigerator. Come back an hour or more later when you remember you forgot about it. It can sit a long time… whatever.

Now get some corn starch and dump a bunch on a plate. (That shit is messy! It goes everywhere!) Okay, take the tofu pieces out and roll them in the corn starch, covering each side, nice and thick is good. It’ll absorb into the tofu, that’s cool.

Do one piece, put it on a clean plate, surface, whatever, and then do the next, and do them all. Cool.

Once you’ve got them all done, put some oil in a big frying pan. I used olive oil, but use whatever you like/got. Heat that oil and put the tofu pieces in!

Use some tongs, but be careful not to tear the pieces, and check them for crispy done-ness on the bottom, then flip and do the other sides. If you use enough oil you can probably just do the top and bottom, otherwise do the sides as well. They should look browned and crispy, but not burned. Unless you like burned food, like Milt does. (Or did. I don’t know.)

When done take each piece out of the pan and place on new clean paper towel. Once you have them all on paper towel put more paper towel on top and blot out a bunch of oil. Sometimes it’ll stick to the paper towel so be watch out for that. Just press lightly I guess.

Enjoy!

Oh, the size of the pieces… if you make them too large, you don’t get enough crispy outside part and you get too much inside part per piece. If you do them too small it’s a pain to coat them, fry them, etc… So pick a good middle group.

Sorry kids, this is the best I can do for a recipe… at least you didn’t have to read about how I’m a busy (cat) mom on the go who is always trying new recipes. Apologies for constantly switching tense between past and present whatever. Hopefully Dana won’t read this.

Categories
Uncategorized

Recent Illustrations

Here’s a dump of a bunch illustrations I’ve created recently. These were all created for the Brown Dog Gadgets Project Database. I’m still learning new Illustrator techniques, so that’s good. Enjoy the drawings!