
I’ve had an easy button lying around the house for a few years now, and remembered reading about how “easy” it was to do a little circuit-bending with it, so I finally got around to doing that…
I did a quick search for some details and found this Easy! blog post, read the bit about a 1Meg pot and figured I’d give it a try. I didn’t have a 1Meg pot on hand (I’m sure the Milwaukee Makerspace probably has a boatload of potentiometers and other parts I could have used, but I built this thing at home) so I ended up going to Radio Shack, and while they don’t have breadboards or much other stuff, they do have a few electronic components on hand.
Once you open the Easy Button (screws are under the rubber feet) you can see the main resistor, right under the rubber switch. (It’s in the center in the photo below.)
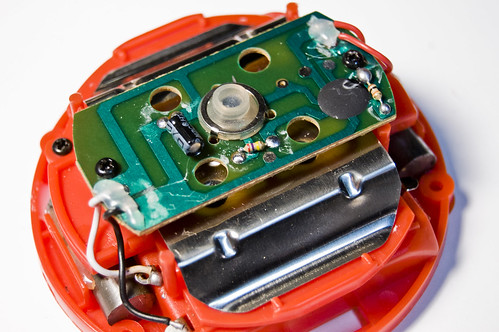
Take that resistor out and then solder in the wires for the potentiometer. That should be about it for the electrical part of it… (I know, you also see a push-button switch in the top photo, I’ll get to that in a minute.)
Since I tend to just start on these things without any real thought as to how they will be finished—I fly by the seat of my pants a lot—it’s always a learning experience. I had a plan to mount the pot onto the big red button, so I Dremeled the heck out of one of the legs on the bottom side of the button to make it fit, and I then realized it just wouldn’t fit, so I thought I could mount it on the inside plastic housing with a hot glue gun, this worked well, but I took out the piece of metal to do this, and, well the metal piece is what makes the button pop back up, so when I reassembled it, the button didn’t work, as it got stuck. Oh, I also built it wrong, with the button turned 180 degrees, so things didn’t line up, so I Dremeled some more, and that contributed to making the button more useless, even though I tried to put half of the metal shield thing back in. (Hacksawing that thing was a nightmare!)
I had started to document the whole thing with photos, but when it was apparent I did so many things wrong, I abandoned the plan… that said, I’m pretty confident that if I did it again, I’d get it all right the second time. Despite all that, I came up with the idea of putting in the push-button switch, which worked great, as it is much easier to push, and you can use it while twiddling the knob. From the outside you really can’t tell that things didn’t work out the way I planned, so I’ll call that a win.
Here’s a video (Vimeo) of the Easy Button in action… It’s a challenge to get the knob in just the right position, so it’s become a game at our house to see who can get the best sound (or longest bend) out of it.
If you’re totally new to circuit-bending, the Easy Button is a simple project to start with… if you are totally clueless, swing on down to the Milwaukee Makerspace for one of their Electronics and Programming Nights when non-members are welcome, and I’m sure someone there can help you get started.
