Categories
Uncategorized

Please Read Makers

Please Read Makers

Over on the Make site is this warning page that shows an illustration with a bunch of tools. For some reason I felt like re-drawing those tools, so here’s my interpretation of the warning label.

Now I find myself in the mood to draw more tools, which may mean a break from the robots I usually draw, you know, unless I combined the two!

Categories
Uncategorized

Facebook vs. Google (Maker Prespective)

Make

I’ve had at least one person say “Hey Pete! I thought you didn’t like Google?” and if I can clarify, there are things about Google I don’t like, just as there are things about Apple I don’t like, and (many) things about Facebook I don’t like, and throughout my travels in the tech world, I’ve been lucky that I haven’t worked for any of these companies, so I can feel free to speak about the things I don’t like.

Don’t get me wrong, there are a lot of things about Google, and Apple, and Facebook that are good, but I try to be critical, and not give any company a free pass.

With that said, I am definitely a fan of Google+ so far, and as far as being better than Facebook? Well, in many ways it is better for me, while in some ways it still needs to catch up.

But as a maker, what company does more to help improve the world for makers? Phillip Torrone’s recent post had this to say:

I’m glad there’s an alternative for sharing and collaboration now with more features that seem to be interesting to makers. Historically Facebook hasn’t done much in the Maker community, I’ve tried to get them to participate in Maker Faire each year (and would still love to have them, there are a lot great ideas for Facebook + Maker Faire). While it would be impossible to be a fan of everything Google does, they’ve been part of Maker Faire many many times, they’re doing a Science Fair, they have a hacker space for employees, they’ve adopted Arduino for Android, lots of good OSS efforts and the tools they’re creating with more control and ownership seems to fit the maker mindset better – it does feel like they’re listening, I hope they keep it up.

Phillip sums it up pretty well. Google may not do everything right, and they may still do things I don’t agree with…. but at the end of the day, they’re probably doing a lot more for maker culture than Facebook is, and that counts for something in my book.

Categories
Uncategorized

Kitten-Proof Wiring

Charlotte

This is Charlotte. Charlotte is a kitten. Kittens are cute. When Charlotte is good, she eats out of her food bowl. This is what a kitten should do.

Chewed USB Cable

Sometimes Charlotte is bad, and chews on things she should not chew on, like a USB cable. Bad Charlotte! I’m now out one USB cable.

Luckily, that was just a USB extension cable, and not the iPad cable that was plugged into it.

Since Apple is a little picky about who can manufacture iPad cables, I’d prefer not to have to buy replacements unless I really need them.

Tubing + X-Acto Knife

Luckily, my local hardware store has this great tubing that is just 23 cents per foot, and I’ve got an X-Acto knife.

My plan was to just slice the tubing open and then push the iPad cable into it. Simple enough, right?

In my first attempt I tried to use a steel ruler to get a nice straight line on the tubing, but that didn’t really work, and it was much easier to just freehand the cut. I will warn you that I have a BFA in Graphic Design, so I’ve been using X-Acto knives for well over 20 years. If you’re not as handy with them, be careful when you cut your tubing.

Kitten-Proofed

Here’s our new improved cable, with a protective covering. I showed it to Charlotte and she tried to chew on it, but either she didn’t like the taste, or figured out she was not going to chew through it. Either way, I win.

Kitten-Proofed

One tip: when you cut the tubing to the length you need, cut it just a bit longer, so you can cut it to the exact length after you’ve fed the cable into it. I managed to cut the first one I made just a little too short, though it was easy to fix with a very small piece of tubing added to the end, and then held in place with some clear tape.

I’m hoping once Charlotte is out of her “chewing” phase I can do away with the tubing, but for now, it works quite well.

Categories
Uncategorized

An (Easy) Button

Make

Those guys over at Make (who seem to be my new BFF) mentioned another button I made, which was inspired by Matt’s AWESOME Button post on Make, which in turn inspired Patrick from Milwaukee Makerspace to build a footswitch-style button, which got mentioned on Hackaday, which is where I saw the link to Flip’s 1-Key-Keyboard Project.

It’s getting a little circular in here…

So on the Zen Button post, Flip commented on his 1-Key-Keyboard Project, and noted that it had the same “dead-simple functionality” but was a much lower cost.

Make

The “dead-simple” part was also in the post’s description of my button, but I think that “dead-simple” had more to do with the parts and the build than the function, and here’s why I think that matters.

If you go back to the original AWESOME Button post, you’ll see a few people (including me!) wondered if you could use an Arduino instead of a Teensy. Why? Because the Arduino is cheap, and easy, and lots of people already have one.

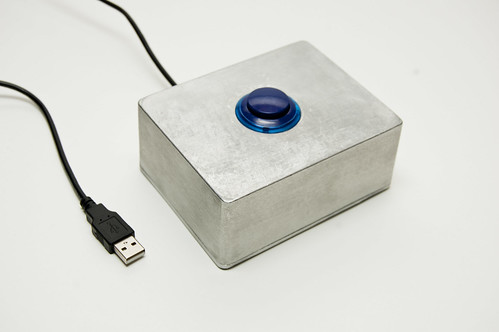
But the Teensy is also cheap, and fairly easy, maybe just a wee bit more difficult, but still fairly easy, and you just plug the dang thing in via a USB cable and hey, what could be easier!?

But with ease of use comes a price. If you look at Flip’s 1-Key-Keyboard Project, it’s probably what he considered “dead simple” but to me, I see a list of parts including either a ATTiny45-20PU, or ATTiny85-20PU, or ATTiny85, or ATTiny45… and then there’s a few resistors, diodes, capacitors, some prototype-board, and a programmer that works with the Atmel AVRs.

Flip has done a great job writing up the project. I mean, I assume he has, but it’s way over my head. All the comments lead me to believe it’s pretty awesome. If you’re comfortable with everything he talks about, and it all makes sense, then that’s awesome too. Either way, I’m definitely glad Flip shared his project.

For those of us not ready to get that deep into AVR development, things like the Teensy or the Atmega 32u4 are simple enough to use that even beginners can get pretty far. Just in blog post comments and some emails I was able to help a few folks get their Teensys up and running.

Remember, everyone starts out as a beginner… but that’s not to suggest that you eventually need to get to the level where you’ll be using an AVR programmer with bare chips if using an Arduino or some other board does what you want with less hassle. Easy really is one of the main reasons the Arduino platform became so popular.

So if you ever see your project on Hackaday, try not to be discouraged by the commenters who are quick to point out how they would have done it better, faster, cheaper, and with 10 times the capabilities of what yours does, because while they were busy leaving discouraging comments, you were busy making something. :)

Cheers!

NOTE: Need a button? Now you can buy one! Visit our store or Etsy.

Categories
Uncategorized

Another Button

(Another) Button

Button Parts

I totally failed…. I said I was going to try to go a week without making anything, and then I ended up finishing this button I was building.

And yes… it’s another button.

Oh well, I tried!

At least I didn’t paint this one. Really, that’s the most time consuming part of building one of these. (This one is going to someone else, so they may be painting it.)

NOTE: Need a button? Now you can buy one! Visit raster.etsy.com.