Categories
Uncategorized

Foot Fixing

Projection Screen

With the recent move of Bucketworks, Milwaukee Makerspace found a (slightly damaged) large projection screen in its possession (which you can see in the photo above.) So for the recent Fix It Milwaukee event, I went to work trying to repair it.

Notes

I started by getting out the digital calipers and making some measurements, as well as sketching some views on paper and writing down the dimensions. (I guess all those years of Drafting classes paid off!)

OpenSCAD

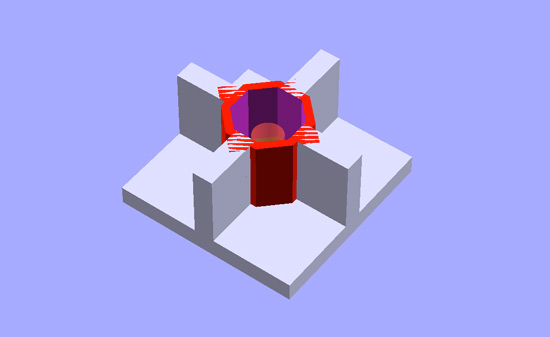
Modeling this in OpenSCAD was a little tricky, only because I often get in over my head in OpenSCAD. It’s a fun challenge though… Some people play video games, I like trying to model difficult objects.

G-Code

Because my primary goal with the first print was to do a test fit, I used only a 10% infill. I started the print at 9pm and didn’t want to stay up too late to let it finish. (Yeah, in theory the hot bits should all cool down when a print is done, but RepRaps do start on fire occasionally, so if I can avoid leaving it on all night long, I will.)

3D Print

It definitely looked how I imagined it should look. I did not model the holes for the pins, as I figured I could do that later, or just drill them out. Again, my main goal was to test the fit of the Aluminum pole into the hole.

Foot

The Aluminum pole fit great! It fit so well in fact, that I couldn’t get it out, and resorted to breaking it apart. Snug is good, but too snug is not good. I’ll increase the size a bit and try again. It might actually be good to have a snug fit and avoid the pins for the replacement. Once I get the hole right I’ll do a print with more than 10% infill, which might be strong enough to not break apart.

Oh, and since I did this at Milwaukee Makerspace where we like to over-engineer things, I had at least two people tell me we could easily cast these in Aluminum. :)

Categories
Uncategorized

Screen Printing (and Vinyl)

Shirts

Hey, we printed some shirts at Milwaukee Makerspace! There’s a nice 4-color screen printing machine at the space, and it’s been sitting in the back hallway neglected, and since I used to do screen printing full time (and as a hobby) I figured I’d get it cleaned up and use it.

Vinyl on screen

Instead of burning a screen with photo emulsion I ended up just cutting some vinyl with the Silhouette and applying it to the screen. It’s a trick I learned from Brent at Lovesick Robot Studios, and for short runs it works pretty well. (There’s clear packaging tape covering the rest of the screen. It’s a little hard to see in this photo.)

Shirts

I used a (slightly) modified version of the helmet from the standard logo, and opted not to include the wrench and soldering iron due to the fine details they have, which is a lot harder to do with vinyl.

We started with red ink on white shirts, and slowly added black ink to get some one-of-a-kind prints. Eventually the ink gets darker. Once it was black we started printing some red shirts as well. We also did a black shirt for Audrey. I suggested doing a print-dry-print process, but she really liked the subtle look of a single print.

Shirts

We probably printed 25 shirts, which we wore in the South Shore Frolics Parade so we at least looked like some sort of real group instead of a bunch of crazy weirdos riding on children’s toys… oh wait.

And when I say “we” I mean that I showed others how to screen print, and a few people printed their own shirts. I also talked through the process, which was cool, as it’s been a while since I shared it with others.

I’ll be doing more screen printing at the space in the future, like next week probably. If you need help with a screen printing project, let me know.

Categories
Uncategorized

Banana Pong Time Lapse

Time Lapse

Time Lapse

I built this crazy Banana Pong thing with a MaKey MaKey for the Art Jamboree that Art Milwaukee does… here’s a time lapse video from the event…

Categories
Uncategorized

MaKey MaKey Banana Pong

My last MaKey MaKey project was the Apple Piano, which I created for Milwaukee Makerspace‘s participation in a previous Art Jamboree event that Art Milwaukee put on…

The Apple Piano was about sound, as that’s been something I’ve been toying with in Processing for some time. With another Art Jamboree on the horizon, I set my sights on a classic video game… and bananas.

As usual, when I need a nice piece of clip art I head to OpenClipArt.org. This time I found a sweet looking bunch of bananas. I only needed one banana so a quick edit in Inkscape got me what I needed.

Wait, but why did I need these banana images again? Because a game of pong is pretty boring… unless it’s Milwaukee Makerspace Banana Pong! Controlled by real bananas.

I found a nice one-player Pong sketch written in Processing, but it was your typical vertical paddle movement, and I needed a horizontal paddle movement. I ended up rewriting the game a bit to turn it all 90 degrees so the left/right of the banana controller would make more sense.

(Disclaimer: If you know anything about me, you know that I believe in crediting people for their work. We’ve got a problem this time. I went through so many Pong sketches that somehow I lost track of the one I started with. I’ve searched for more than an hour and could not find my starting codebase! If I do find it, I’ll update this post to point to it. On with the story!)

Banana Logo

Once I got the game working, I needed to add some fitting graphics, so what better than a take on the Milwaukee Makerspace logo with… bananas. (We’ve got a history of weird/wacky logos.)

One thing I learned was that bananas are not very tough! If you let people pound on your bananas for a while they get really mushy. I should have brought a lot more spares so I could swap them out more often.

Here’s a few photos from the event:

Banana Pong Player

Pong Player

Pong Player

Pong Player

Pong Player

Pong Player

Update: The code is available.

Categories
Uncategorized

Holiday Make-A-Thon 2012 [Time Lapse]

Hack Friday

Here’s a quick time-lapse video from the 2012 Holiday Make-A-Thon that Milwaukee Makerspace does in cooperation with Bucketworks. We’ve been doing it for 3 years now, and Bucketworks has been doing it on their own even longer.

It seems like a lot more hackerspaces are doing these type of events this year, which is awesome, and there’s even a nice name for it now: Hack Friday. In my mind, part of belonging to a makerspace/hackerspace is the love of creating things, sharing that with others, especially on a day that has become completely over the top in regards to consumerism. Our mission is plain and simple: Instead of buying useless crap on “Black Friday” join us and we’ll help you make something for the holidays.

I figured it was also a good time to test out the time lapse capabilities of the GoPro Hero3. I have a workflow in place that includes taking still images with the intervalometer and then combining the frames into a video, and then resizing and cropping the video to the correct proportions. It seems to work. Oh, and the camera motion near the end is actually the gaff tape giving out before the camera fell face-down. Enjoy!