Categories
Uncategorized

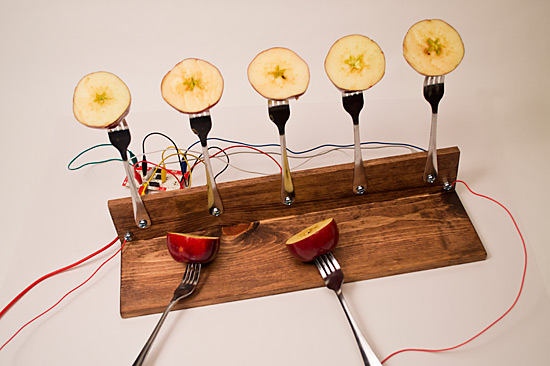
MaKey MaKey Apple Piano

A few months ago a bunch of us from Milwaukee Makerspace took part in Bay View Gallery Night, and jason set up the “Fruit Synthesizer” which was a Makey Makey with a variety of fruit, and some software combo of Max MSP and GarageBand. People really enjoyed it, and with the most recent Art Jamboree happening with jason out of town, I figured I would pick up the slack.

Makey Makey Apple Piano

With a simple base made with two pieces of wood, some dollar store forks, a few nuts, bolts, and bits of wire, we had the Makey Makey Apple Piano.

One of the issues with jason’s Fruit Synthesizer was that you had to touch the fruit. He did provide hand sanitizer, but with it being flu season, having dozens of people touch a piece of fruit seemed like a bad idea, and forks just seemed like the right thing to keep hands clean, and work like xylophone mallets.

Makey Makey Apple Piano

For a project like this it’s nice to have the controller board visible, so people can see it and you can easily explain how it works. The Makey Makey was sitting right behind the forky board thing.

Makey Makey Apple Piano

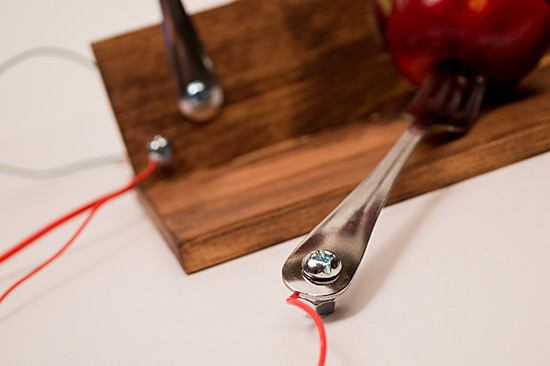
The bolts that hold the forks in place also doubled as terminal connectors that I could attach the alligator clips to.

Makey Makey Apple Piano

I added bolts at each end of the base for the ground connections. (And used red wires to match the Makey Makey, and the apples.)

Makey Makey Apple Piano

The wires running to the forks serve two purposes: they ground the forks to complete the connection that the Makey Makey needs, and they also tether the forks to the base to keep it all together. (Drilling holes through the forks was a lot of fun. I had to assure my wife I did not drill holes in our everyday dining forks.)

Makey Makey Apple Piano

But wait! You can’t just have a bunch of forks and apples and wires and expect something to happen… you also need a computer and some sort of software to do anything useful…

MakeyPlayer

I wrote a Processing application to play sounds and light up the specific apple you were hitting. (I got a good start on the code from this sketch.) I had a lot of fun(!?) with the Minim library. My original plan was to export the Processing application as a Windows executable and use an old netbook to run it. That sort of worked, but I don’t know if the Windows XP machine was up to the task, because when I set it up at the event (after extensive testing in the lab) the audio freaked out, so I ended up switching to my MacBook. An Apple Computer controlled by Apples… fitting, right?

(Processing isn’t the greatest thing for this sort of task, and MIDI really is the right way to go, but we’re already planning our next Makey Makey Monstrosity, so expect some improvements.)

So did it work? It worked! People had a good time playing with it. Here’s a few photos…

Makey Players

Makey Players

Makey Players

Makey Players

Makey Players

Pro-tip for using apples: Keep some lemon juice on-hand! I gave the apples a squirt every now and then to keep them moist and prevent browning. Over the course of 4 hours I did have to change out the apples that were used as the mallets after they got a little mushy. Some people were really pounding on them!

Update: Here’s a short video of the first test of it.

Categories
Uncategorized

Processing PhotoBooth v2

Simple Photobooth

If you saw my old post about a simplistic photo booth using Processing, you probably loved it so much that you used it, and you probably loved using Processing so much that you used that too, and you even installed the betas of Processing 2.0, and then you cursed out loud as the code no longer worked.

Calm down, sport… we’re here to help.

While not final yet, Processing 2.0 has a lot of changes compared to Processing 1.5.x, and those of us who dabble in writing sketches can expect some breakage, but we can also attempt some fixage.

Here’s what I’ve got now… which works for me! (YMMV)

/**
 * PhotoBoothV2.pde
 */
 
import processing.video.*;

// resolution: 800x600 - change it if you want
int cols = 800;
int rows = 600; 

Capture cam;

int mainwidth  = cols;
int mainheight = rows;

void setup() {
  frameRate(30);
  size(mainwidth, mainheight, JAVA2D);
  colorMode(RGB);
  cam = new Capture(this, cols, rows); 
  cam.start(); 
  noSmooth();
  background(0);
}

void draw() {
  if (cam.available()) {
    cam.read();
    image(cam, 0, 0);
  }
} 

void keyPressed() {
    if (key == ' ') {  // space bar
       saveFrame("picture-####.jpg");
    }
}

Boom! You got a simplistic photo booth application. Congratulate yourself by purchasing this lovely button for it. (Or get this “bare” button and build your own damn case.)

Also, special thanks to Evil Mad Scientist for releasing their Atkinson Dithering sketch, which reminded me I had to fix my Processing code, and provided some hints on what needed updating.

Categories
Uncategorized

Art Jamboree [Time Lapse]

argh, blip.tv shut down… no video!

Wahoo! We had a good time at the Art Jamboree at City Hall… and I even wrote all about it on the Makerspace blog, so here is the video I created during the event…

I had a camera connected to my MacBook and ran a Processing sketch to capture still frames which I then compiled into this time lapse video. The sketch was (heavily) based on ASCII Video by Ben Fry. I changed the character set to spell out “Art Jamboree” and added in code to capture the still frames at an interval.

Enjoy!

(You can also see the video at blip.tv)

Categories
Uncategorized

Learn Processing!

Processing

I had a lot of fun with Processing last year when I joined in with a few other folks and declared May as “Processing Month” and my final project was the Make A Sketch, which was an Arduino + Processing piece.

There’s two other guys at Milwaukee Makerspace with an interest in Processing, and we figured it was worth sharing what we know, and we’ve decided that a 3-hour workshop on the subject would be a good idea, so…

Join us Thursday, February 23rd, 2012 at 6pm to learn about Processing! [Sign up here]

We’ll expect you to have Processing installed on a laptop, basic knowledge of writing code, and a few simple sketches running. If you can do all that, and want to dive a bit deeper into Processing, we’d love to have you there. (If you’re a Milwaukee Makerspace member the cost is $20, otherwise it’s $25 for the general public.)

Besides some basics of Processing we’ll be creating a collaborative team project, so it should be all-around awesome. If you’re a coder who wants to make some interactive art, or an interactive artist who wants to write some code, well… you’ll fit right in. :)

sketch

Categories
Uncategorized

Processing PhotoBooth

You probably know I’m a fan of Photo Booths, and while Sparkbooth is awesome software, you might want something free (and open source) so here’s “PhotoBooth” written in Processing.

This is all the code you need for the most minimal photo booth application:

/**
 * PhotoBooth.pde
 */ 
 
import processing.video.*;
Capture cam;

void setup() {
  size(1280, 720);
  cam = new Capture(this, 1280, 720);
}

void draw() {
  if (cam.available() == true) {
    cam.read();
    image(cam, 0, 0);
  }
} 

void keyPressed() {
    if (key == ' ') {  // space bar
      saveFrame("picture-####.jpg");
    }
}

Once you’ve got that, you can export it as an application from Processing.

(Note that I’m using a Logitech C910 webcam, so I’ve set the resolution to something that makes sense for that camera. If it looks weird with your camera, try 640×480 or something else.)

PhotoBooth Export Application

I generally use Mac OS X, but other operating systems are supported. This is one of the great things about Processing.

PhotoBooth Application

Over in the Finder you’ll see a standalone application named “PhotoBooth” that will run fullscreen when launched. (You can exit it by hitting the escape key.)

Spazz!

Once you launch it you’ll see some spazzy dude, wait, that’s me! You’ll probably see yourself instead.

Hit the space bar, and it’ll save a photo. Hit the space bar again and it’ll save another one. And on, and on.

PhotoBooth Photos

The photos will show up in the same folder as the application. They will have a random number in the name. It’s not sequential, but you can view by date created if you need them in order.

Here’s a more full version of the Processing code with a few extras commented out. Uncommenting them may prove useful for debugging or camera set-up.

/**
 * PhotoBooth.pde
 */ 
 
import processing.video.*;
Capture cam;

void setup() {
  size(1280, 720);

  // If no device is specified, will just use the default.
  cam = new Capture(this, 1280, 720);

  // To use another device (i.e. if the default device causes an error),  
  // list all available capture devices to the console to find your camera.
  //String[] devices = Capture.list();
  //println(devices);
  
  // Change devices[0] to the proper index for your camera.
  //cam = new Capture(this, width, height, devices[0]);

  // Opens the settings page for this capture device.
  //cam.settings();
}

void draw() {
  if (cam.available() == true) {
    cam.read();
    image(cam, 0, 0);
  }
} 

void keyPressed() {
    if (key == ' ') {  // space bar
      saveFrame("picture-####.jpg");
    }
}

And hey, I know that hitting the space bar ain’t cool… so you might want to use an awesome button instead.

This is a super-simple application, which basically takes some example code that ships with Processing and adds a bit to it. I hope to have a few more posts that talk about some changes you can make to this application. Stay tuned!