Categories
Uncategorized

Vinten Tripod Leg Lock

I was doing a video shoot with Ben Nelson for Brown Dog Gadgets last week and I noticed his Vinten tripod leg had an issue staying locked in place… Seems one of the leg lock pieces had broke in half. It seemed liked a perfect reason to fire up OpenSCAD and get the 3D printer spitting out a new part.

In the photo above you can see the new part in silver, and the two original parts on the other legs, in black.

It took two prints to get an acceptable fit. The first was a little too wide and wouldn’t quite fit in place. I tweaked the file just a bit and the second version worked well. I’ll walk through the process a bit below.
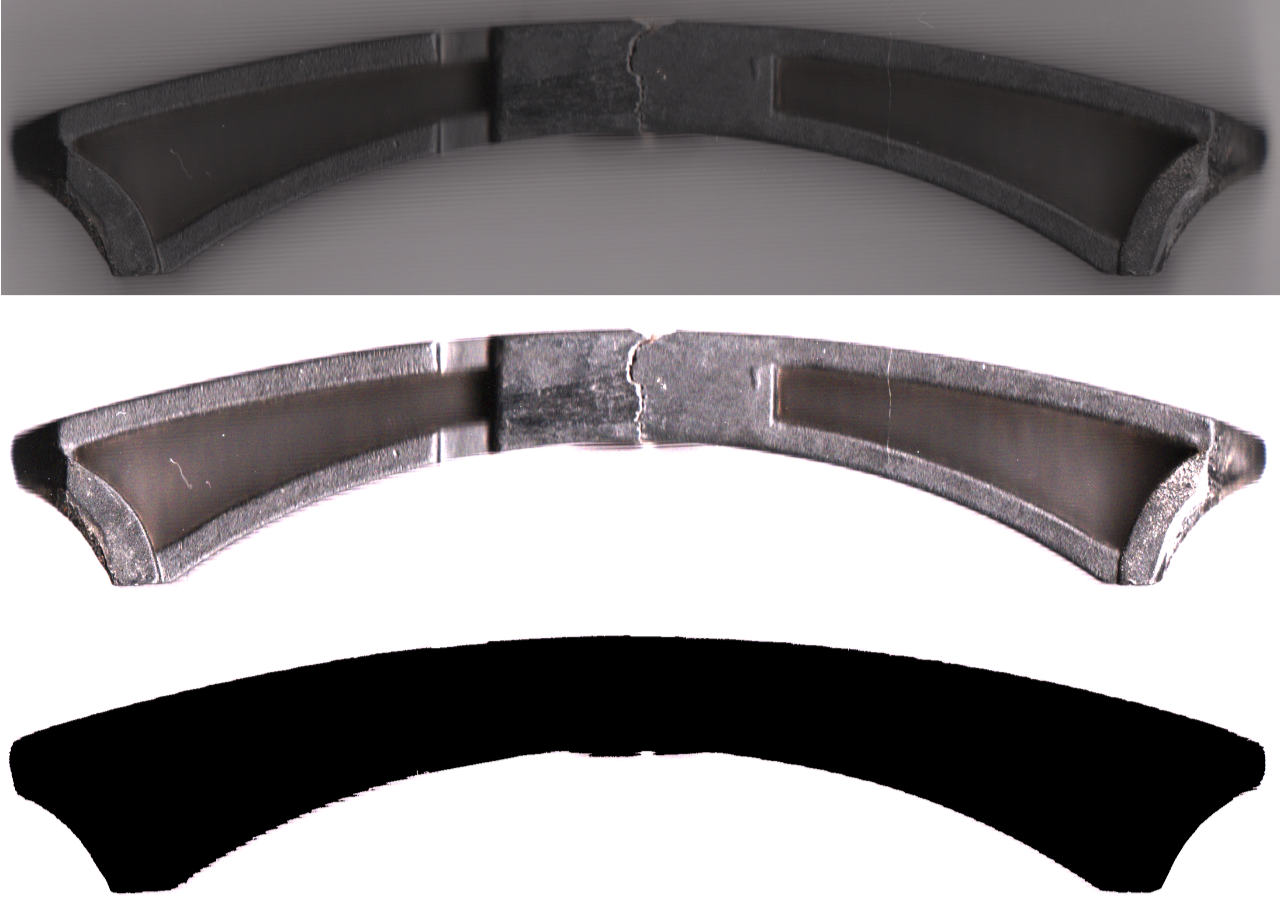
For an organic shape like this I usually start by putting it on a desktop scanner to get the profile. This one is curvy, and I’m not big on drawing curves in OpenSCAD, but I am big on scanning in an object and then tracing it in Inkscape. I did a few scans and even then I edited the image a bit to adjust the contrast.

I import the images into Inkscape, each layered directly on top of each other, then add another layer on top of that to do the drawing. I can then easily switch out the image below and compare things. For a symmetrical drawing like this I really just need to draw half of it, then I just dupe and flip to make the other half and combine them into one.

Once I have a vector file created I export that and then import it into an OpenSCAD file where I can extrude it changing it from a 2D shape to a 3D shape. Creating a solid object is the goal. Once I’ve got a solid object I can start knocking holes in it and adding angles by subtracting with various shapes. (The reddish parts are all subtractions or differences from the main piece.)

And yes, the above image does appear to be some sort of special forces TIE Fighter from the Star Wars universe.

Here’s our final piece, ready to be rendered, sliced, and printed. The original part had some pockets on the top and bottom, but since they were not required for functionality I left them out.

Ben installed it and briefly tested it and it seemed to work, though time will tell if it holds up under stress. (Also, this one is PLA so if he leaves the tripod in a hot car, it might soften and fail.) I’ll probably print a few more for him to keep in the tripod bag in case this one does fail in the field.

If you want to print one of these, you can grab the file from Vinten Tripod Leg Lock and have fun!

Categories
Uncategorized

Cutting Fan Blades

Here’s a fun project. My uncle asked if I could cut down some ceiling fan blades to be about 38mm shorter. Without knowing the material or how I would do it I said “Sure, I’ll give it a try!” and he was fine with that. I guess he purchased a new set for his fan thinking they were shorter but they were the same length as the existing blades, so it was low-risk if I failed.

My first idea was to build a jig and laser cut the ends off. This would (in theory) make sure all the cuts matched exactly. Since the cuts are curved, I thought this would be a good idea. The blades are plastic though, and I didn’t know what plastic. I gave up on this idea. (I think they might be ABS, but I don’t know for sure.)

So what I did was used my desktop scanner to get an image of the blade, then printed a paper template I could tape to each blade to do a cut on the bandsaw. (Note: I have a pretty low-quality bandsaw at home, which is fine for rough cuts of thin materials, but not exactly precise.)

I taped the template to each blade and cut them one by one. I did better on the first two than the third, and probably better on the first one than the second, so I had three cuts that were not exactly matching. No matter, on to the disc sander!

Did I mention the blades are plastic? I ended up taping all three blades in a stack so I could sand them evenly. It mostly worked. I had to take breaks to allow the plastic to cool and use a razor to keep cutting off the gunked up plastic on the bottom of the stack, but I think I got them really close to being even with each other. (Apologies for the lack of process photos, I was concentrating pretty hard on getting them right.)

I cleaned up the edges a bit with a razor, but didn’t actually shape them like the original ends were. Hopefully these will work. If not, it was a (somewhat) fun challenge to do something I’d probably never otherwise do…

Categories
Uncategorized

RepRap Y Carriage

acrylic-bed

Contrary to what the photo above may suggest, I am not using a laser cut acrylic piece for the Y carriage of my RepRap… What I am using it for is a template to make sure things work properly, and once I’m sure I’ll use it as a drilling template to mount things on the Aluminum Y carriage I have. (Which Frankie gave to me, oh, maybe six years ago!?)

y-plate-metal

Here’s the Aluminum Y carriage. The photo looks weird because it’s from my flatbed scanner. I often scan objects so I can bring them into Inkscape and trace them to get a vector drawing I can work with. (And I had to scan it in two passes and stitch it into one image.)

y-plate-drawing

Here’s the SVG file created in Inkscape by tracing things. Notice I added more holes, which will be used to hold the bearing blocks.

acrylic-fake-bed

It seems to slide pretty smoothly. I mentioned in a previous post, the igus drylin slide bearings want to be under some pressure to work properly, so I adjusted them just right with the blocks I printed and did some slide tests. So far I’m pleased!

Next up will be the holes in the Aluminum. I’m not sure if I should drill and tap for 3mm bolts, or drill for pass-through of 3mm bolts and hold in place with nuts. My thought on the first method is that my alignment via drilling has to be perfect, while with the second method I can adjust just a bit with some slop. Thoughts?

Categories
Uncategorized

Roundy’s Milk Chocolate Almond Bar

roundyschocolate01

It’s been quite a while since I’ve done a candy review, in fact, I may have last done one in an issue of Psychotherapy zine published (on paper) back in 1993. No matter…. you’re here for a candy review, and that is what you shall get!

Today we’ll be looking at the Roundy’s Milk Chocolate Almond Bar, and we’re going to try our best not to make too many direct comparisons to the classic HERSHEY’S Milk Chocolate with Almonds Bar.

But who am I kidding? The “Roundy’s Milk Chocolate Almond Bar” is a direct competitor to the “HERSHEY’S Milk Chocolate with Almonds Bar” in every respect. Think of the Roundy’s version as the “generic equivalent” that is cheaper, and maybe not quite as good…

Roundy's Milk Chocolate Almond Bar
Here’s an image courtesy of our desktop (candy) scanner.

Besides the design, which I find a bit uninspiring, you’ll notice that between the 3 samples, the amount and distribution of almonds varies wildly!

The first bar has 5, while the second has 4 1/2, and the third is the jackpot with 4 1/2 almonds on each side! This is the one you’ll want to break in half to share with a friend. Doing so with number 1 or 2 would leave either you or your friend seriously lacking in almonds.

As for the chocolate itself, I’d rate it as “ok but not great” and if I compared it directly to the chocolate from the fine folks at HERSHEY’S, I’d probably be more disappointed.

As for the actual ingredients and the “Nutritional Information” label? I don’t even look at those, because if I did, I wouldn’t be eating either of them.