Categories
Uncategorized

Three Button Tradeshow Video Player Controller

Custom USB Controller for trade show video playback

I was contacted by a trade show company about helping with a project on a tight deadline. At first it seemed as though they had a solution but just needed some hardware or some advice, but I did a call with the software developers and it seemed like the quickest (and most solid) plan was to create a drop-in replacement for what they were working on (and were stuck on) that would do exactly what was required.

Custom USB Controller for trade show video playback

One of the requirements was for each button to be lit a specific amount of time to match the length of video playback for each button. Since we didn’t yet know the lengths of the video, and I had to ship this across the country, I suggested an easy method of setting the time for each button to be lit. This would allow them to dial in (literally) the timing once they had the videos completed.

Custom USB Controller for trade show video playback

We did know that the videos would be under 75 seconds. Just to be safe I set the timers to go up to 90 seconds (1 minute, 30 seconds, to be precise.) The controller plugs into a computer via USB and sends commands that the custom software needs to play the appropriate video.

Cabinet

There are a lot of details I didn’t know, but it seemed like I had enough to do my part. They sent me a rendering of a cabinet the controller would live in (which I’ve replicated in the simple sketch above). When I was building museum exhibits much of my work lived inside of cabinets and was never seen by the public, only technicians… that doesn’t mean things shouldn’t look nice.

Custom USB Controller for trade show video playback

There’s a small OLED display in the controller which shows the time that corresponds to each button, and can be adjusted by the appropriate dial. The dials are 3D printed because I forgot to pocket out the back of the lid where the potentiometers are placed. There’s a few compromises that were made due to this being a rush job. (I completed this build in under a week, using only parts I had in my shop at the time.)

Custom USB Controller for trade show video playback

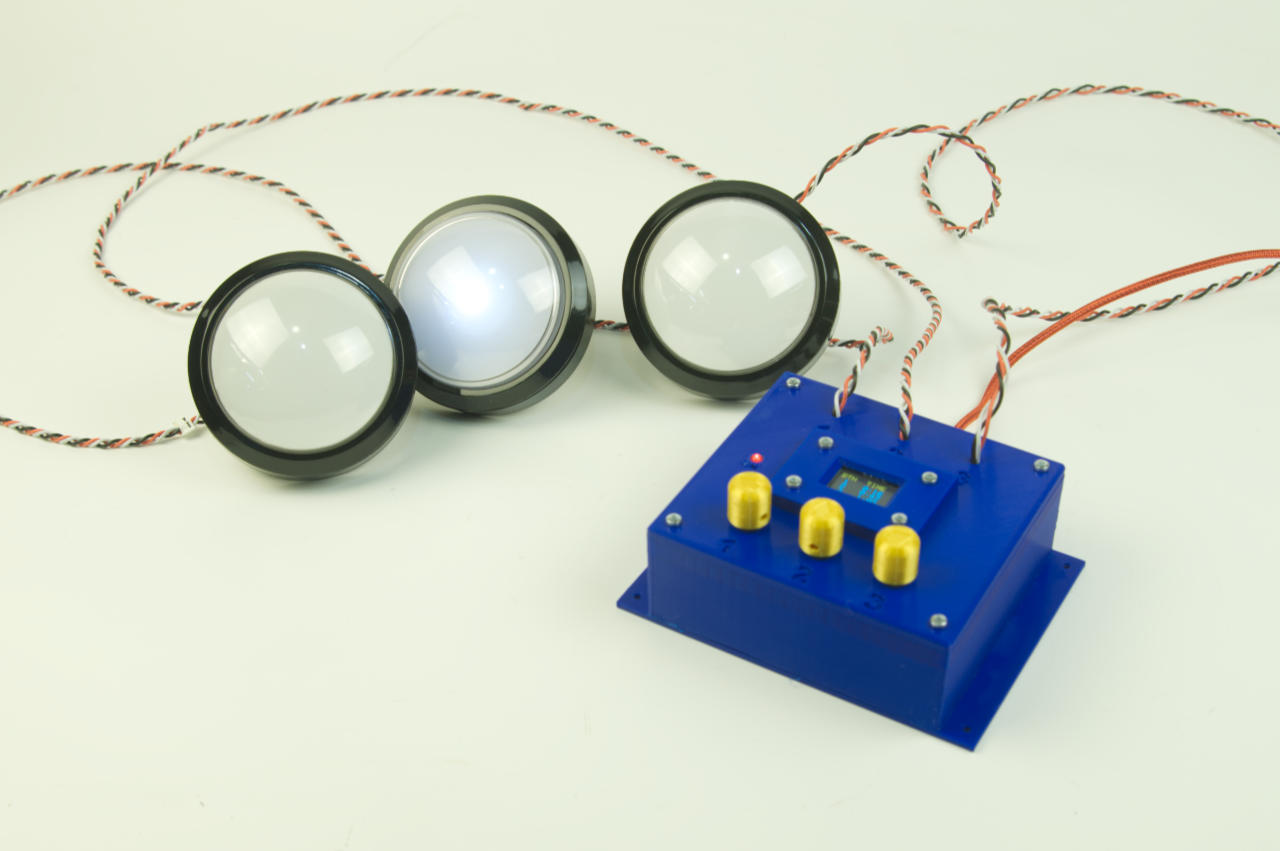
For other controllers I’ve used TRS jack and cables to connect the buttons, or on occasion, Cat5 cables and connectors. Both are nice because they are easy to obtain in any length, and trade show companies usually have a bunch in their inventory.

Custom USB Controller for trade show video playback

The bottom of the enclosure has four mounting holes, and I included screws to allow it to be attached inside the cabinet. Alternately, VHB or hook & loop could be used to attach it.

As always, if you need a device you can check out raster.etsy.com for some of the more popular stock items I make, but if you need something custom just get in touch.

Categories
Uncategorized

1/2/3 USB Controller

Here’s the story on this one. A local tradeshow company bought some of my controllers about six years ago. Since that time I’ve worked with them on other projects where I was the client, and I’ve worked for them (in various capacities) on other occasions.

Back in December the owner got in touch with me to purchase a few controllers and I got them built and programmed that night, and delivered the next day. Tradeshow exhibits can change on a dime, so he then texted a day after that with a more custom request. We texted around 5pm and by 9pm I had a device built and programmed and ready to be dropped off the next morning so they could get it installed over the weekend.

It’s not the prettiest thing I’ve built lately, but speed of delivery was the primary goal with this one. I also took some photos and wrote up a small manual to describe the operation and installation of it. Below are some of the notes from the docs.

The 1/2/3 USB Input Device consists of three buttons (with wires) and one controller box with a USB cable connected to it.

Each button connects with wires to the solderless snap connectors on the box. All of the black wires go into the large connector, and then the yellow wire(s) from buttons 1, 2, and 3 each go into the corresponding numbered connector.

The snap connectors have orange levers that open to insert the wire, and then close to lock the wire in place. Make sure the wire is inserted all the way. Once you lock the lever in place give the wire a light tug. If it comes out it was not inserted all the way. Open the lever and try again.

If longer wires are needed just strip the ends so you have bare wire, and twist them securely onto the ends of the wires connected to the buttons and wrap with tape. Then strip the other end and insert into the solderless connectors.

Note: The wires connected to the buttons do not have polarity, but one is black and one is yellow to simplify making the connections to the box. As long as one wire from a button goes to ground, and the other goes to a numbered connection, it will work. Color coding was implemented so that making the connections is easier.

If a longer (or shorter) USB cable is desired, the enclosure can be opened and a new Micro USB cable can be swapped for the existing one. Note that strain relief was added to the USB cable to prevent damage to the controller board.

A few more notes: I just happened to have this plastic enclosure in the shop which was handy. It’s been sitting on a shelf for years and it saved me the trouble of building a custom enclosure. (I often 3D print or laser cut an enclosure, but this was enough of a rush job I didn’t want to spend time doing that.)

The connectors I used are not Wago connectors but “Glutoad” connectors. They are cheaper and not as good, but I had a bunch in the shop so I used them. I know the tradeshow company has used Wago connectors before so I figured this would be familiar to them.

I tend to write documentation like this not just for the client, but for myself. Chances are they might want another one in the future and the docs help me remember exactly what I built. In a previous life I built exhibits that needed to be supported for five years or more, so some documentation was always required. Reading the docs now I realize they are not great, but again, this was a rush project so I figures something was better than nothing.