Categories
Uncategorized

Foot Fixing

Projection Screen

With the recent move of Bucketworks, Milwaukee Makerspace found a (slightly damaged) large projection screen in its possession (which you can see in the photo above.) So for the recent Fix It Milwaukee event, I went to work trying to repair it.

Notes

I started by getting out the digital calipers and making some measurements, as well as sketching some views on paper and writing down the dimensions. (I guess all those years of Drafting classes paid off!)
OpenSCAD

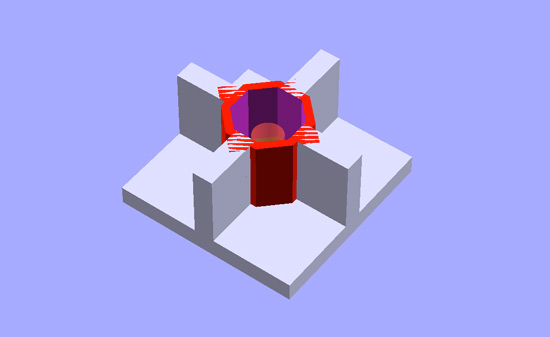
Modeling this in OpenSCAD was a little tricky, only because I often get in over my head in OpenSCAD. It’s a fun challenge though… Some people play video games, I like trying to model difficult objects.

G-Code

Because my primary goal with the first print was to do a test fit, I used only a 10% infill. I started the print at 9pm and didn’t want to stay up too late to let it finish. (Yeah, in theory the hot bits should all cool down when a print is done, but RepRaps do start on fire occasionally, so if I can avoid leaving it on all night long, I will.)

3D Print

It definitely looked how I imagined it should look. I did not model the holes for the pins, as I figured I could do that later, or just drill them out. Again, my main goal was to test the fit of the Aluminum pole into the hole.

Foot

The Aluminum pole fit great! It fit so well in fact, that I couldn’t get it out, and resorted to breaking it apart. Snug is good, but too snug is not good. I’ll increase the size a bit and try again. It might actually be good to have a snug fit and avoid the pins for the replacement. Once I get the hole right I’ll do a print with more than 10% infill, which might be strong enough to not break apart.

Oh, and since I did this at Milwaukee Makerspace where we like to over-engineer things, I had at least two people tell me we could easily cast these in Aluminum. :)

Categories
Uncategorized

Power Racing Series – Detroit 2013

I posted a nice recap of Power Racing Series adventures at Maker Faire Detroit, but I also compiled this video showing part of the fun.

For those unfamiliar, we take a kid’s Power Wheels vehicle, and refurb it with a stronger frame, bigger motors, better batteries, and then race them. It’s sort of hilarious, but there’s also serious engineering involved.

There’s also a nice pile of photos from the race over on Flickr, so check those out as well.

PPPRS Detroit 2013

Categories
Uncategorized

Maker Faire Detroit #PPPRS

Maker Faire Detroit / PPPRS

Heads up, kids! I’ll be at Maker Faire Detroit on July 27th & 28th, 2013, mainly to take part in the Power Racing Series, but I’m sure I’ll find time to check out the faire as well.

Milwaukee’s Team will be represented by great new crew this time around, including Audrey, Tony, and Chris, as well as Sean (our veteran) and myself. We’re hoping to bring 3 cars to the race… well, 3 working cars, hopefully. We’ll probably return with no working cars.

Shirts

Special thanks to Mike Massie who worked on the racing team logo. He got it about 95% of the way there, and I supplied the last 5% (mainly by messing with the files he gave me.) So this year our team will have spiffy shirts, and to make them even more obnoxious moxilicious noticeable, I’ve dyed them all sorts of crazy colors. You should be able to find us.

mmrtshirts02

Anyway, join us at Maker Faire Detroit on Saturday and Sunday at 1:00pm for the races. It’s pretty entertaining. There will probably be fire.

Categories
Uncategorized

Screen Printing (and Vinyl)

Shirts

Hey, we printed some shirts at Milwaukee Makerspace! There’s a nice 4-color screen printing machine at the space, and it’s been sitting in the back hallway neglected, and since I used to do screen printing full time (and as a hobby) I figured I’d get it cleaned up and use it.

Vinyl on screen

Instead of burning a screen with photo emulsion I ended up just cutting some vinyl with the Silhouette and applying it to the screen. It’s a trick I learned from Brent at Lovesick Robot Studios, and for short runs it works pretty well. (There’s clear packaging tape covering the rest of the screen. It’s a little hard to see in this photo.)

Shirts

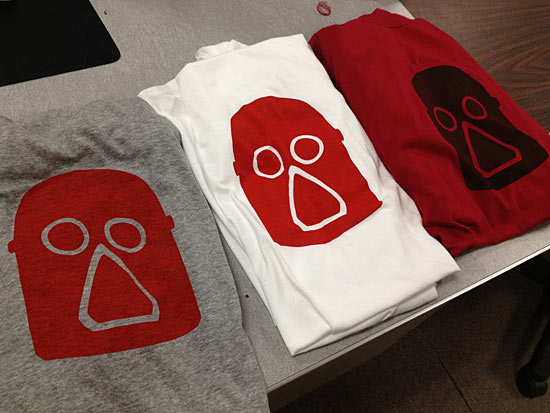
I used a (slightly) modified version of the helmet from the standard logo, and opted not to include the wrench and soldering iron due to the fine details they have, which is a lot harder to do with vinyl.

We started with red ink on white shirts, and slowly added black ink to get some one-of-a-kind prints. Eventually the ink gets darker. Once it was black we started printing some red shirts as well. We also did a black shirt for Audrey. I suggested doing a print-dry-print process, but she really liked the subtle look of a single print.

Shirts

We probably printed 25 shirts, which we wore in the South Shore Frolics Parade so we at least looked like some sort of real group instead of a bunch of crazy weirdos riding on children’s toys… oh wait.

And when I say “we” I mean that I showed others how to screen print, and a few people printed their own shirts. I also talked through the process, which was cool, as it’s been a while since I shared it with others.

I’ll be doing more screen printing at the space in the future, like next week probably. If you need help with a screen printing project, let me know.

Categories
Uncategorized

Tracking Maps

Google Map

I’ve had a few people ask how I create the maps showing where I’ve been recently, so here’s a quick tutorial on the process.

I’ve got Google Latitude installed on my phone, and it runs constantly tracking my location, and the data is saved to Google’s servers. (Note: If you’re paranoid about being tracked, you can stop reading now.)

Google Latitude

Every now and then I log into www.google.com/latitude using my desktop browser, click on ‘View location History’ to get a map of my travels, and then choose the date and a time frame.

Map

I’ll often do the last 30 days (which is the maximum) but for this map I did just two days to show all the traveling I did over a weekend. (Minneapolis and back!)

Once you’ve got the date and time frame set, you’ll see your map. Just resize it, position it, and do a screen capture, and you’re all set!

Wikipedia has a good write-up about Google Latitude.

Update: It seems Latitude will be shut down on August 9th, 2013. Sorry, kids! I’ll be investigating other ways of doing this.