Categories
Uncategorized

3D Printing a Replacement Part

One of the promises of 3D printing is being able to print replacement parts to things around the house that break. Since I’ve got access to a MakerBot Cupcake at Milwaukee Makerspace, I figured I’d give this a try, not just downloading some object from Thingiverse, but actually going through the entire process of measuring, designing and printing a part.

Light Switch v1
Light Switch Button v1

I got out the calipers and measured the light switch to determine the size of the replacement part I’d need to create, and then I used Sketchup to design the actual object at the correct width, height and depth per my measurements. Since the original part was long gone, I had to estimate how it should be designed, so I just used my best guess.

My first attempt (version 1 above) may have looked good, but even if it was a perfect match to the original, the fact that it was a very small part, and had to be printed on a older model MakerBot meant that the actual print was terrible. The part was just 10mm x 12mm x 6.7mm. That’s pretty damn small.

Light Switch v2
Light Switch Button v2

Version 1 just didn’t work. The hole that was meant to slide over the shaft of the light switch was too short, ill formed, and not even close to round in the inside. So for version 2 I changed the circular structure to a rectangle with a hole in it, as well as making it a bit thicker all around.

Version 2 was definitely better than version 1, but the hole still wasn’t looking too good, and the top (where the MakerBot finishes printing) was pretty ragged. I figured I could sand it down flat though if needed, which is why I ended up making it taller.

(Oh, I should mention that with version 1 I just printed it at the makerspace and then brought it home to test it out. It would have been awesome to have a 3D printer in the house, because I probably could have just kept tweaking it until I got it right, but as it were, I printed one, took it home, and then there was a week before I could try the next version. So yeah, this is why you need a 3D printer at home!)

Light Switch v3
Light Switch Button v3

So right after I printed up version 2, I was concerned it still might not work, so I quickly tweaked the file a bit to make it taller, and to remove the hole completely, with the idea that I could drill a nice clean hole at the appropriate size. Version 3 looked pretty good out of the Cupcake. Not great, not amazing, but pretty good… at least in comparison to the others.

Light Switch
Printed Light Switch Button

So here’s our actual printed object. Yeah, it looks pretty rough around the edges, at least from this view. I ended up using the Dremel on the top to get it a bit shorter and smoother, and then drilling a hole that would allow it to fit on the shaft. Of course, I don’t have metric drill bits, so I tried to find something close. This was my first real attempt at using the Dremel or a drill on a printed part. It wasn’t great. The Dremel doesn’t react the same way it does to metal or wood. Do I go slower or faster or what? I’m not sure… As for the drill, I tried to just hold the piece in one hand while drilling it. That was not ideal. Perhaps next time I’ll use the vice.

I know that in the photo it looks pretty sad, but it actually worked, so cosmetic beauty aside, this was mostly a success.

Light Switch
Light Switch Button in place

Here’s the light switch button in place. We can actually use the light switch without pushing the tiny shaft anymore, which is good.

So in the end, this part, even with the failed attempts, probably consists of less than 5 cents worth of plastic. This is the beauty of 3D printing at home. To get a replacement from the manufacturer would have involved me contacting them, ordering or asking for a replacement, and then having that replacement shipped to me. Even if I ended up talking to some nice person who could put one in an envelope and mail it to me at no charge, the postage stamp alone would have cost more than the raw materials needed to make the part.

Oh, you may have noticed the hole in the button. Yeah, I drilled it a bit too much. Also, the red doesn’t really match very well. I’ll probably print it again in white, or maybe glow in the dark plastic, which would make even more sense.
Categories
Uncategorized

Woes in Plastic

Lens Gear

Bleargh!!! Sorry, had to get that out…

I seemed to be able to do nothing right last night at Milwaukee Makerspace. I joked that the only thing I was able to make was a mess. Besides hot-gluing my own thumb (though not my ass) and having many MakerBot failures, I was able to print two things, though even those two didn’t turn out that great. I’m getting a bit frustrated with the MakerBot Cupcake, and the mysteries of Skeinforge aren’t helping.

I’m waiting for MakerGear to ship my RepRap Prusa Mendel, which of course will require assembly, and configuration, and ten other weird things, but hopefully at the end I’ll have better prints than the Cupcake. Don’t get me wrong, the Cupcake is fun, but it’s also frustrating.

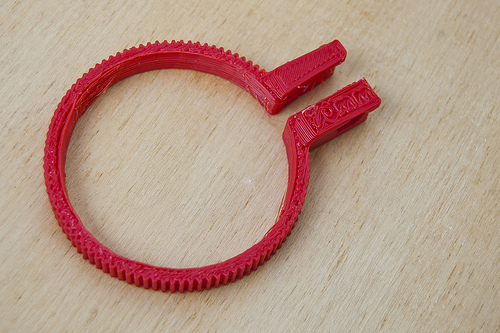
So I printed the 70mm lens gear, even though I really need one that’s about 85mm, just because I’ll be using a follow focus next week, and I want to see if this works. The gear teeth look good, even if the print itself did not turn out great.

Bottle Opener

I also tried this bottle opener, and again, while it is OK, it’s definitely not great. It looks pretty sloppy. The weird bits in the centr are the Milwaukee Makerspace logo, which was way too small to even attempt to print. It also filled in some of the hole areas a bit, which I had to remove the plastic from. That may be due to me editing the STL in Sketchup and creating a new STL with my own edits. I don’t know…

I think I need to take a break from printing things for a bit, and work on some other things. Printing takes a long time, and if it’s the only thing I do at the space, I feel like I’m neglecting other projects. (I did work on my Nutellastruder a bit, of course that led to the hot-gluing of my thumb!)

KinectToStl

Oh, we did play around with KinectToStl a bit. Again, the results were not super-impressive, but it was fun to experiment with it. I didn’t bother to read the instructions, so there may be some good times on making it work better, but that will be something to try another day.

Update: The bottle opener broke while trying to open a bottle. #fail

Categories
Uncategorized

3D Modeling Update

3D Model

In the last month I’ve made some progress in my 3D modeling education, so I thought I’d provide an update. (Besides my last post, I got some good feedback on Google+) Oh, and just a reminder, my interest in 3D modeling all has to do with creating objects I can produce with a 3D printer like the MakerBot or the RepRap.

So what am I using (or not using) now? Here’s the list:

Google Sketchup
I’ve made some good progress with Sketchup. A few tutorials (and a lot of playing around) has me creating actual 3D models. You’ll want the STL Importer and STL Exporter to deal with STL files. Sketchup is nice, and I’m sure I’ll end up using it more as time goes on, but it’s not the end of my 3D quest.

Blender
Urgh… I’ve made no progress with Blender. Haven’t even tried. I may just wait until we do a Blender class at Milwaukee Makerspace.

123D
Still no Mac OS X version.

3DTin and Tinkercad
I talked about 3DTin last time. I haven’t used it since, but it still seems like a great way for kids to get into 3D modeling. As for Tinkercad, it seems like a more advanced version of 3DTin. Make: Live covered Tinkercad in Episode 17 if you want to check it out.

Inkscape
Say what!? Inkscape is a 2D drawing application. I’m still using it. I’ll often open vector files (SVG) and export them to DXF files and then extrude those to 3D files. Here’s a great Inkscape to OpenSCAD dxf tutorial that explains it all.

OpenSCAD
I’m still just barely using OpenSCAD, mainly in conjunction with Inkscape as mentioned above. I need to dig in a bit deeper, as time allows.

So what else is there? Well, I found Pleasant3D, which isn’t exactly modeling software, but it’s what ReplicatorG might look like if it were a full-on Mac OS X application. I’ve found it useful on a few occasions.

The other one worth mentioning is MeshLab, which may have some uses when it comes to converting or transforming files. I haven’t created anything with it yet, but it sure looks impressive.

So that’s my 3D modeling software update… Anything new to report from your desktop?

Categories
Uncategorized

Weaponiverse

weaponiverse

I’ve written before about how Thingiverse is awesome, and it still is… but there’s this discussion going on which I thought I’d mention…

First of all, if you use Thingiverse, I’m sure you’ve read the Terms of Services page, right? And if you’ve uploaded something, you’ve probably seen these rules:

  • Designs must represent a real, physical object that can be made.
  • Please only upload designs you’ve created or participated closely in creating.
  • You may upload open-source/copyleft designs if you provide attribution.
  • No pornographic or sexually explicit designs.
  • Please don’t upload weapons. The world has plenty of weapons already.

Now those seem reasonable and… WAIT A MINUTE!!! What’s that “Please don’t upload weapons” bit?

And oh how the debate has raged… I think you need a Google account, but you can see some of the discussion on the Thingiverse list. I’m not worried about my highlighting this, because the big guys already mentioned it over on Boing Boing. (Their readership is slightly larger than mine I assume.) Luckily, there are many experts, and each one left a comment!

I’m not going to choose one side or the other, but I just wanted to point out that the magic of Thingiverse isn’t in allowing you to upload and download files, or in the ability to leave comments or type up a description… The magic of Thingiverse is in the community. It’s in the users. From a technology standpoint, I don’t see anything that would prevent another site from doing pretty much the exact same thing.

So here’s my ideas: Weaponiverse

Tip: As of my writing this, weaponiverse.com is still available! Update: weaponiverse.com is live!

Don’t take this as my siding with the anti-weapons people. Or as siding with the weapons people. I’m siding with the DIY people. If Thingiverse isn’t doing what you want (allowing you to publish weapons, or being unclear about it) start your own damn site. Or post the files on your own blog, or put them on USB drives and hand them out. Remember, Thingiverse is run by people. (I assume it’s these two people.) At the end of the day, it’s their site. Just like Facebook is controlled by Facebook, Twitter is controlled by Twitter, etc. Thingiverse is their ball, and they can print it out and take it home if they want to…

But don’t let that stop you. If you want to share files (legally) go for it. That’s what the Internet is for, right?

Categories
Uncategorized

Printing Violations?

Pac-Man Cookies

You may have seen that I recently printed some Pac-Man cookie cutters using the MakerBot at Milwaukee Makerspace.

This seems like a harmless enough activity, right? I wanted some cookie cutters that my daughter could use to make cookies, so I made them. Typically when I make things, I don’t think to myself “Gosh, what laws am I breaking?” because typically I think of making as a creative endeavor that isn’t harmful to anyone.

But here’s where it gets murky…

If I really wanted Pac-Man cookie cutters, I could have bought them, from more than one place even, and those all come with something mine don’t. This little bit of text that says “Officially licensed Pac-Man cookie cutters.

Oh crap.

My cookie cutters are not “officially licensed” in any way. I certainly didn’t plan on selling them, as they were just for my own use. (That said, I have mentioned printing a few extras to give to people, free of charge, but would that cause issues as well?) Is the fact that I printed my own versus buying “officially licensed” cookie cutters the wrong thing to do? Did the company that licenses the official cutters lose a sale, or multiple sales if I give some away?

In my defense, I’ll say that I would not have bought Pac-Man cookie cutters. Partly because I’m not that fanatic, partly because I can’t see paying $15.99 for less than a dollar worth of plastic, and partly because I’m a maker. I mean, I could have bent up some metal to make them, or used some other creative methods.

So what does the future hold when we can easily (and cheaply!) print out things like this? Well, if you doubted 3D printing was disruptive, doubt it no more…

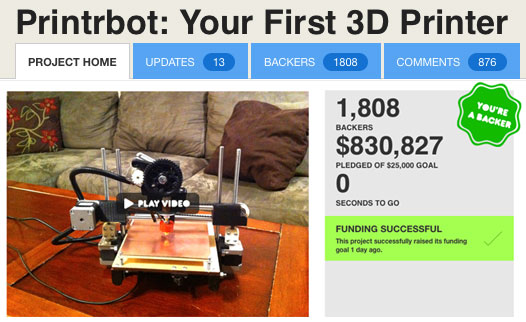
Let’s look at the Glif. Last November the guys behind the Glif launched a Kickstarter project to fund their idea. Here’s what they said:

So why do we need YOUR help? Simply put, manufacturing is expensive. We want to use a process called ‘injection molding’ to create the Glif at a level of quality we deem acceptable, but unfortunately this requires a hefty set up cost. By pledging at least twenty dollars, you will be essentially pre-ordering a Glif, and helping turn our little project into a reality.

See that bit that says “manufacturing is expensive“? Well, it is! But guess what? Making things can be cheap. I don’t want to discount the amount of work that went into designing the Glif. I love design. Design is important. Designers should be rewarded for their work. So the Glif guys wanted to raise $10,000 to bring their product to market, and they ended up raising $137,417. Wowzers!

But if you really want an iPhone holder like The Glif, you can always make your own, out of whatever materials you have handy, like wood, or maybe… plastic!

Hey, check this out, it’s the iPhone 4 Combo Tripod and Stand. See the comments on that page about “cloning” as well. Interesting stuff.

So what does the future hold for this type of thing? When we all have 3D printers, and it’s cheaper and easier to print something at home than it is to drive to the store (takes time, wastes gas) to buy one, or order one online to have shipped to your home (takes time, wastes gas.)

Maybe things should go the way the music industry went. Pirating music was a much larger problem years ago, until Apple (and then Amazon, and others) made it easier (and cheaper?) to get the real thing legitimately. What if the guys behind the Glif had a business model where you could buy their product in the traditional ways (in a store, order online) but you could also download the files needed to print one, for say, a nominal fee between $0.99 and $5.00?

Would people support this model? I think some people definitely would. And who is the winner here? The company still makes money, and the consumer saves money. Somewhere in there we also hope that less energy (money) is expended in using this method. Sure, there would still be clones and copies, but you’d assume (like we do for music, movies, etc.) that most people are honest, and want to support the work of others.

So is this idea crazy, or is it the future?