So you’ve got an Egg-Bot… Congratulations! You may want to share with others what this amazing machine can do. Here’s what I’ve learned since I built my Egg-Bot and demoed it at a number of events.
What you’ll need:
This is the most basic list of things you need to get the Egg Bot drawing on eggs. I’ll also offer up a few items I’ve found useful later in this post.
And of course you don’t have to draw on eggs, but I tend to prefer them for a number of reasons. Plus, it is called the Egg-Bot.
We’ll assume you’ve already got the Egg-Bot up and running, connected to a computer with a USB cable, and Inkscape and the Egg-Bot extension is installed and working. If that’s not the case, visit the Egg-Bot wiki and get it all working. We’re mainly going to cover an actual demo.
So… You’ve got a working Egg-Bot. Where do we begin?
Eggs!
You’re gonna need some eggs. I tend to buy white eggs at the nearest grocery store. The cheaper the better. If it’s an all day affair, I may buy 48 or more eggs, and if it’s a smaller affair, a dozen or two will suffice.

Raw or Hard-boiled?
The first time I demo’d the Egg-Bot I ran to the store, bought 54 eggs and headed to Milwaukee Makerspace to get set up. I ended up printing almost every egg, and I gave a lot of them away. To kids. I kept telling kids to not drop them, put them in their pockets, or leave them in their parent’s cars.
Raw eggs seem to work fine in the Egg-Bot, but you have to be ready for when they break. Breaking while in the machine can be messy. Egg on your plunger is no fun.
Pro-tip: Bring some napkins or paper towel! Great for cleaning up broken eggs, and useful to get the ink flowing from a Sharpie.
The good thing about raw eggs is, if you get one that turns out totally awesome, you can try to hollow it out and save it, which is something you can’t do with a hard-boiled egg.
As for Hard-boiled eggs? They are much more compatible with children. Almost every time I’ve done a demo, there are kids involved, and they are not gentle with eggs. Hard-boiled eggs also mean less-mess if they break. The downside is that you need to boil them. When’s the last time you boiled 48 eggs? It takes some time… (I still haven’t tried the oven method yet, but it’s on my list!)

Start Early!
If you’ve decided to use hard-boiled eggs, you need to allow time to boil them, but even if you are using raw eggs, you’ll want to start early. Like, a day or two early.
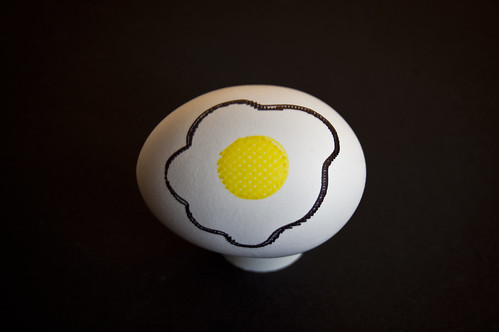
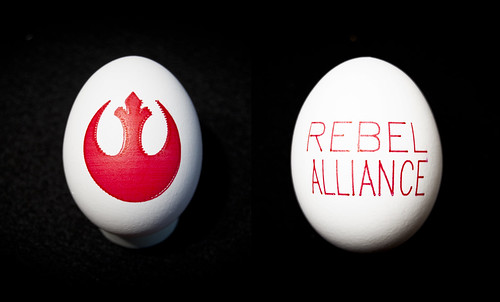
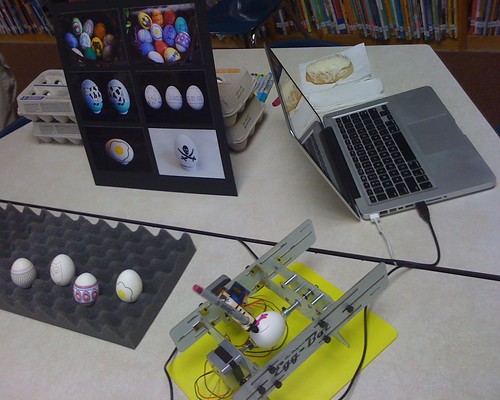
I like to show up to a demo with a bunch of eggs already printed. So at least a day before the event, spend some time printing some awesome eggs. Now’s the time to try those designs that may take a long time to print. Also, experiment! The eggs you print before the demo will be put on display while you print other eggs.
Pro-tip: If you’ve got an iPad or some sort of digital picture frame device, set it up to do a slide show of your best eggs. I’ve also showed some of my eggs with a simple display board and a bunch of photos attached. This is the kid-friendly way to do it.
Give Them Away!
It seems to happen every time… someone wants an egg. What to do? Give them an egg! usually during an event I end up printing more than one of a specific design, so once I have two or more, I don’t mind giving one away. Half the fun of the Egg-Bot is seeing it in action, and the other half is seeing the final product. If you give away too many at first, you’ve got nothing to show, so balance it appropriately.
Pro-tip: Keep a bunch of plastic baggies on-hand for people to put eggs in, especially if they are raw!
Show Them Off!
Sure, you can just use egg cartons to hold your eggs, but I like a nice piece of “egg crate” foam which is practically made for holding eggs! It’s easier to pick up and set down the eggs as compared to an egg carton, and it looks much better. As a bonus, it actually goes in the box that holds the Egg-Bot, so it serves a dual-purpose. Sure you can use a basket, but this tends to put egg against egg, which could lead to cracking.
Talk It Up!
I usually let people know what I like about the Egg-Bot. I tell them what it does, and mention that it’s a kit (they often ask if I “invented” it) and they can buy they kit, or download the instructions and build one themselves. I usually say “The Egg-Bot is an open source art robot” or something along those lines. I tell people that you can do Christmas ornaments, ping-pong balls, and other “roundish” objects with it, and that there is even an engraving attachment. If you’re excited about it, people tend to take interest it in. Most people walk away smiling and talking about how cool it is.

I Need Art!
Hopefully you’ve got some SVG files on hand… if not, get some! You can check out Thingiverse for Egg-Bot-able designs, or you could make your own, or you can scour the public domain repository at OpenClipArt.org looking for things that work. Depending on your Inkscape skills you may be able to grab things from OpenClipArt on the fly, edit them for the Egg-Bot, and print them all during the event while talking to people. It’s not easy, but yeah, I have done it. Oh, you can also just design your own art if you have those kind of skills. :)
In Conclusion…
Did I forget anything? Probably. Oh yeah, bring a power strip and an extension cord! You never know where you might be in relation to an outlet, but those two things always come in handy. Don’t do any crazy software updates just before a demo. Test everything the day before to make sure it works, then leave it as-is. OK, that’s all I can think of… Egg-Bot on my friends, Egg-Bot on!


