Categories
Uncategorized

A (DCRL) Coat Hook

DCRL Coat Hook

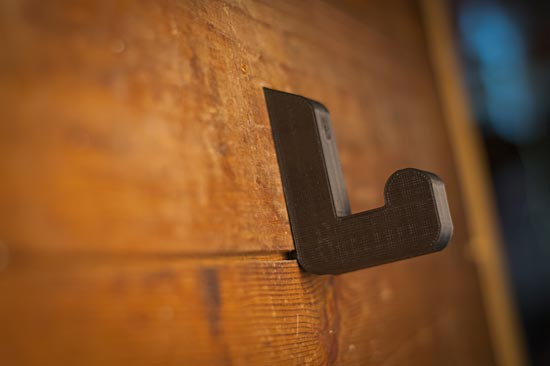
I’ve printed a coat hook before, but this time I’m doing it for school. This is the DCRL Coat Hook for the class “Digital Craft: Machines that Make” in the Digital Fabrication + Design area at UWM, taught by Frankie Flood.

The assignment was to create a 3D model of a coat hook using Rhino, and then print it. I’ve been using OpenSCAD for years, and before that I used Sketchup, so Rhino is still fairly new to me. I used it a bit last semester, but mostly just to explore it and for 2D laser cutting.

Rhino v1

My first attempt was mainly about getting comfortable in Rhino. I’m so used to the way I work in OpenSCAD, and even the way I work in Inkscape, that I found Rhino a little lacking in certain things. I’ve gotten more used to it since I started, but I still see room for improvements to how it works. Version 1 was all about unions and differences and fillets. It worked, but I wasn’t entirely happy with how rectilinear the form was.

Rhino v2

Version 2 was a bit more curvy, and while I was starting to like it more, the non-symmetrical parts bothered me. I did print out version 1 and 2 for our first class discussion, and I noticed that many students went out there with their designs, while mine tend to be very functional and utilitarian. I also have a good grasp of what is possible (and not possible) using hobby-level FDM/FFF. I don’t know if this helped or hindered my design, as I tend to think about the process I’m using at the time. (Sometimes, but I’ll get into that later.)

Vector outline

Eventually I ended up drawing version 3 in Inkscape, as I knew what I wanted it to look like, and it was an easy path to get exactly what I wanted, design-wise. I exported the file as a PDF, which imports nicely into Rhino, to get my 3D object. I also tend to look at replicating and/or extending existing workflows I already have.

Sketches

I typically find the desired size of objects by drawing them on paper. Here’s some of my early sketches (on the left) and the later ones (on the right) that I did before modeling in software.

DCRL Coat Hook v3

Once I had my vector PDF imported into Rhino I was able to extrude it to the desired height. Rhino lets you type in the height numerically while creating the object, but not after you’ve created it. It’s a bit frustrating, but I’ll get used to it. I then added the screw hole and a counter-sink hole. (I later realized I didn’t properly angle the counter-sink hole, which would have been easy to do. Perhaps for the next revision!)

I also thought about how this design could be used in other digital fabrication techniques. For instance, since the form is essentially an extruded 2D form, it would be easy to create a version using a CNC router or mill. After the profile is cut you could rotate it 90 degrees to get the screw hole, or just use a drill press. You could also cut a piece of pink foam, using a CNC machine, or by hand using a hot wire cutter, or any cutting tools, and cast it in metal (again a simple drilling operation would be needed to add the screw hole.)

If you’d like your own copy of this coat hook, you can grab it from Thingiverse or download from Youmagine.

Here’s a few photos of the final printed piece. There’s a few more photos in the DCRL album on Flickr as well.

DCRL Coat Hook

DCRL Coat Hook

DCRL Coat Hook

DCRL Coat Hook

DCRL Coat Hook

Categories
Uncategorized

Millimeters, Inches, Fraction, Decimals

inches mm
1/16 0.0625 1.5875
1/10 0.1 2.54
1/8 0.125 3.175
3/16 0.1875 4.7625
1/4 0.25 6.35
5/16 0.3125 7.9375
3/8 0.375 9.525
7/16 0.4375 11.1125
1/2 0.5 12.7
9/16 0.5625 14.2875
5/8 0.625 15.875
11/16 0.6875 17.4625
3/4 0.75 19.05
13/16 0.8125 20.6375
7/8 0.875 22.225
15/16 0.9375 23.8125
~ 1.0 24.5

Handy chart for conversion between stupid Imperial units (fractions and decimals) and smart Metric units.

See Also: Mixing Imperial and Metric and Screw/Bolt Diameters

Get to this quickly using p2url.com/inmm

Categories
Uncategorized

Iterate, iterate, iterate.

iterate

The Golden Rule from Phillip Burgess at Adafruit Industries: Iterate, iterate, iterate.

Don’t be discouraged when your case doesn’t work on the first try. Or the second. Once I thought I’d nailed a design on the third try, but was wrong. The most extreme has been our Pi Box enclosure for the Raspberry Pi…this took 23 attempts to get just right! The first few didn’t even hold together. Other projects were initially so discouraging, one was known behind the scenes as the “Piece-o-Crap-o-Tron 9000” …but many attempts later it’s become one of my favorite kits.

Fail quick, fail hard, fail often. Failure is part of the process — perhaps even key to the process. It’s how we learn and improve, and ultimately make a better product. Make mistakes now so your customers don’t have to.

I’ve known for a long time that design is an iterative process, and sometimes I think that’s what I love about it. I tend to be a fan of the process.

I remember once I asked Michael Curry how many attempts it took him to design something and 3D print it before it worked. I thought he said “two or three times”, but maybe he really said “twenty three times”. ;)

But seriously, there’s a lot of great tips not just for laser cutting things, but for designing things in general.

Categories
Uncategorized

Bay View Printing Company

Type

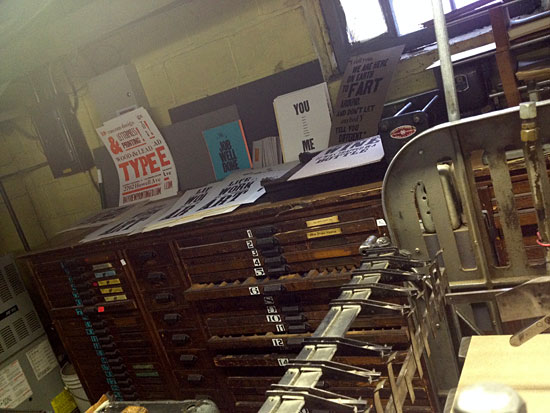
I stopped by the Bay View Printing Co recently to get some advice from Ashley Town about a project I’m working on. She was kind enough to give me a tour and show me some of the presses and other equipment, and I got to check out some of the type they have, including some of the wood type. which is just… beautiful.

Type

They’re about half way to their goal with an Indiegogo campaign to raise some funds. Here’s the pitch from Ashley:

I’m raising funds to be able to offer classes, workshops and open studio time focused on the art of letterpress printing and to transform a portion of the current space into a community gallery. The vision is to transform this Bay View institution into a creative hub for artists, designers, writers and letterpress novices and enthusiasts.

I personally think this place is a great addition to Milwaukee’s creative community, and would love to see it get fully funded.

Type

And hey, who else uses the hashtag #drinkandink? Check out the rest of the photos and their campaign video below.

Type

Type

Printing

Printing

Wood & Lead Type!

Categories
Uncategorized

What is Digital Fabrication and Design? (Part III)

What is Digital Fabrication and Design?

The first artist we had visit UWM for this year’s Artist Now! talks was Charles Beneke. His work tends to be in the areas of print-making and multi-media, but he did mention that he’s used laser cutters for some of his work.

Here’s part of his talk where he mentions using laser cut pieces:

Charles seemed to indicate that the laser cutter was just a way for him to speed up production. This isn’t the first time I’ve heard this from an artist. Many artists seem to look for ways to make their current process easier, or faster, or both. Instead of cutting things by hand, they want a machine to cut them. Most of these artists don’t seem to view the laser cutter as a unique and primary tool to create work, but just a more advanced method of what they’d do anyway, with their own hands and a sharp blade.

Charles Beneke

In most cases though, these artists (and designers) are digitally designing things, and then using CNC machines to do at least a part of the production process, though I’m not sure any would say that they are working in the area of Digital Fabrication and Design.

(Previously: Part II, Part I)