Categories
Uncategorized

Ornament 69

I’m way behind on my ornament game this year because work has been insane lately. Here’s one I made two weeks ago for a neighbors small holiday open house. They provided a heavy blank paperboard ornament and Dana came up with the concept for this.

Here’s the illustration I created. (The final piece consists of layered felt that is laser cut and then spray glued together on the blank ornament.)

Here are the individual pieces of felt. I did illustrate the stars in gold/yellow but I found a silver backed felt and used that. I ended up stacking a few layers of the white snow to give it some depth, though I should have done a boolean difference of the top of the trees for the stars, or better yet, layered the stars a bit better. (I have another project in the works that is an improvement in this.)

Oh, it’s “Ornament 69” because we live on 69th Street. Happy Holidays!

Categories
Uncategorized

First Place Ribbon

For some reason I’ve been into making things with felt lately. It probably has something to do with the fact that felt is cheap and colorful and laser cuts nicely. The colorful thing is a bit new to me. I tend not to do really colorful things, so that’s interesting as well. The colors I used for this piece are sort of terrible (in my opinion) but I wanted something “terrible” as it were.

This ribbon was made for Dana’s annual Holiday Bingo Game which has prizes for the winners, and I offered to make a (somewhat sad) ribbon for the first place winner, so here it is.

I started as I usually do, in Inkscape, designing the piece by stacking up objects. You can see the fully designed piece in the lower left corner. (The grey version next to it is sort of an x-ray view showing some of the original parts.) The top row contains the four pieces we’ll cut with the laser cutter. The second piece (red) has a slightly larger diameter than the similar part on the first piece (aqua) to allow for me not aligning things perfectly.

Here are all the pieces in LightBurn ready to be cut. Each piece gets the same cut settings but I assigned them all different colors (layers) as they’ll all be cut separately from different colored pieces of felt. I’ve also started to use LightBurn’s Library feature which allows you to save settings for different materials/thicknesses, etc. I can just click on “Felt” and assign those settings to the layer. Nice!

I think it turned out pretty good. The only thing I didn’t care for (design-wise) is the “st” part of the “1st” on the ribbon. I sort of punted on that (this was a quick project) and I think I could have come up with a better solution. I wanted to connect the letters “st” to the “1” to make assembling the whole thing easier. I think I can do better next time, I mean, if there is a next time. (Who wants a ribbon?)

Overall, though… I’m pleased with the outcome. It helps to have a spray booth and bottle of Super 77 spray glue sitting right next to the laser cutter to make creating these things quick and easy. It’s nice to have an idea for a project and see it completed in under an hour.

Categories
Uncategorized

A Tiny Little Stocking for a Spider

stocking-6186

A few weeks ago Dana posted something on Facebook about this rather large spider that had taken up residence in our doorway. I did my best to avoid using that door ever again but while decorating for the holidays she said she wanted to do something for the spider’s little corner of the house, so I offered to make a tiny stocking for the spider. (I may not like spiders, but I like making things.)

stocking-01

I started by looking at some photos of stockings online, then did a quick trace of one in Inkscape. I figured it would have three parts, the red stocking, the white upper part, and a dark colored letter “S” for “Spider”.

stocking-02

Once I had the design I broke it out into the three parts. The little hanging tab on the upper left part of the red piece took a little work. For the first one I made it was way too small, and also lacked a hole for the pushpin to go into.

One thing that’s hard to notice here is that the white part is a bit larger than the red part it will get attached to. This was done using the Dynamic Offset feature in Inkscape which will scale up or down an object proportionally.

stocking-03b

I brought the pieces into LightBurn for laser cutting, and set each of the three pieces to their own color to cut individually with different color felt, and made the little slot for the hanging tab another color as that would cut first before the rest of the red piece would cut.

stocking-05

The green outline in the image above is the tab for the pushpin. It’s tiny. Really tiny. You can also see how I increased the size of the tab here. Fun fact, I originally made this at half this size (the final version is than 30mm tall) but that was ridiculously small!

stocking-04

LightBurn also has a kerf offset setting which I used for the tiny little pushpin hole because it allowed me to cheat and make the shape just a little larger than it really was. When you cut this tiny it helps to account for the kerf.

stocking-6187

Here’s what I made. You can see the tiny little slot for the pushpin in at least two of them. Sadly the white part on the top of the stocking isn’t exactly white as I had no white felt so it’s sort of bluish-white, but it’ll do.

stocking-6188

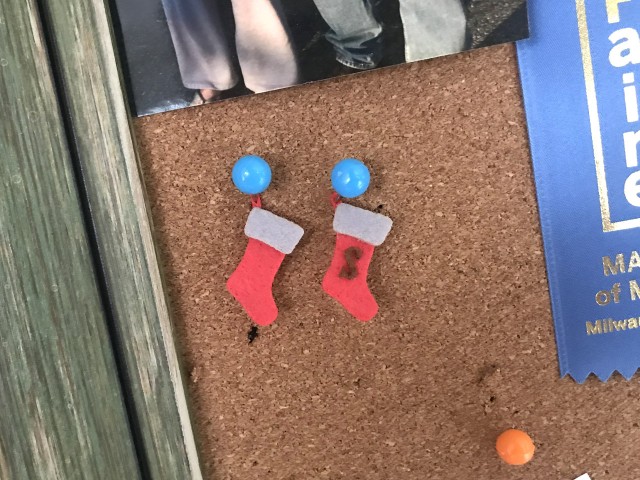
Here are some spares on the bulletin board with gigantic pushpins holding them in place. They are just assembled using some spray glue. I thought about sewing them but I’m not that insane.

So yes, this is probably the most ridiculous and tiny holiday decorations I’ve made this year…