Categories
Uncategorized

Hardware Gridbox

After I got the Bambu Lab P1S I stress tested it a bit with the 3D Printed Pegboard but before that project I actually printed this Gridbox which uses the Gridfinity organizational system.

The way Gridfinity works is that there is a grid (duh) and you print bins or other “things” that fit into the grid. The bins can be 1×1 or 2×1 or 4×4 or whatever fits into the grid. I actually used Gridfinity Rebuilt in OpenSCAD to generate these little bins because I prefer OpenSCAD to Fusion 360.

I scaled the height of the bins to the internal height of the Gridbox. I can tip the box over and all the hardware stays where it should. Almost. The washers are small and thin enough they occasionally end up in the top part of the bin where the labels are. I could probably solve this by gluing a piece of foam inside the top lid so it closes and provides just an extra bit of cushion. I may try that… If I did this again I would perhaps alter the bins just a bit to have flatter tops since I won’t be stacking these bins.

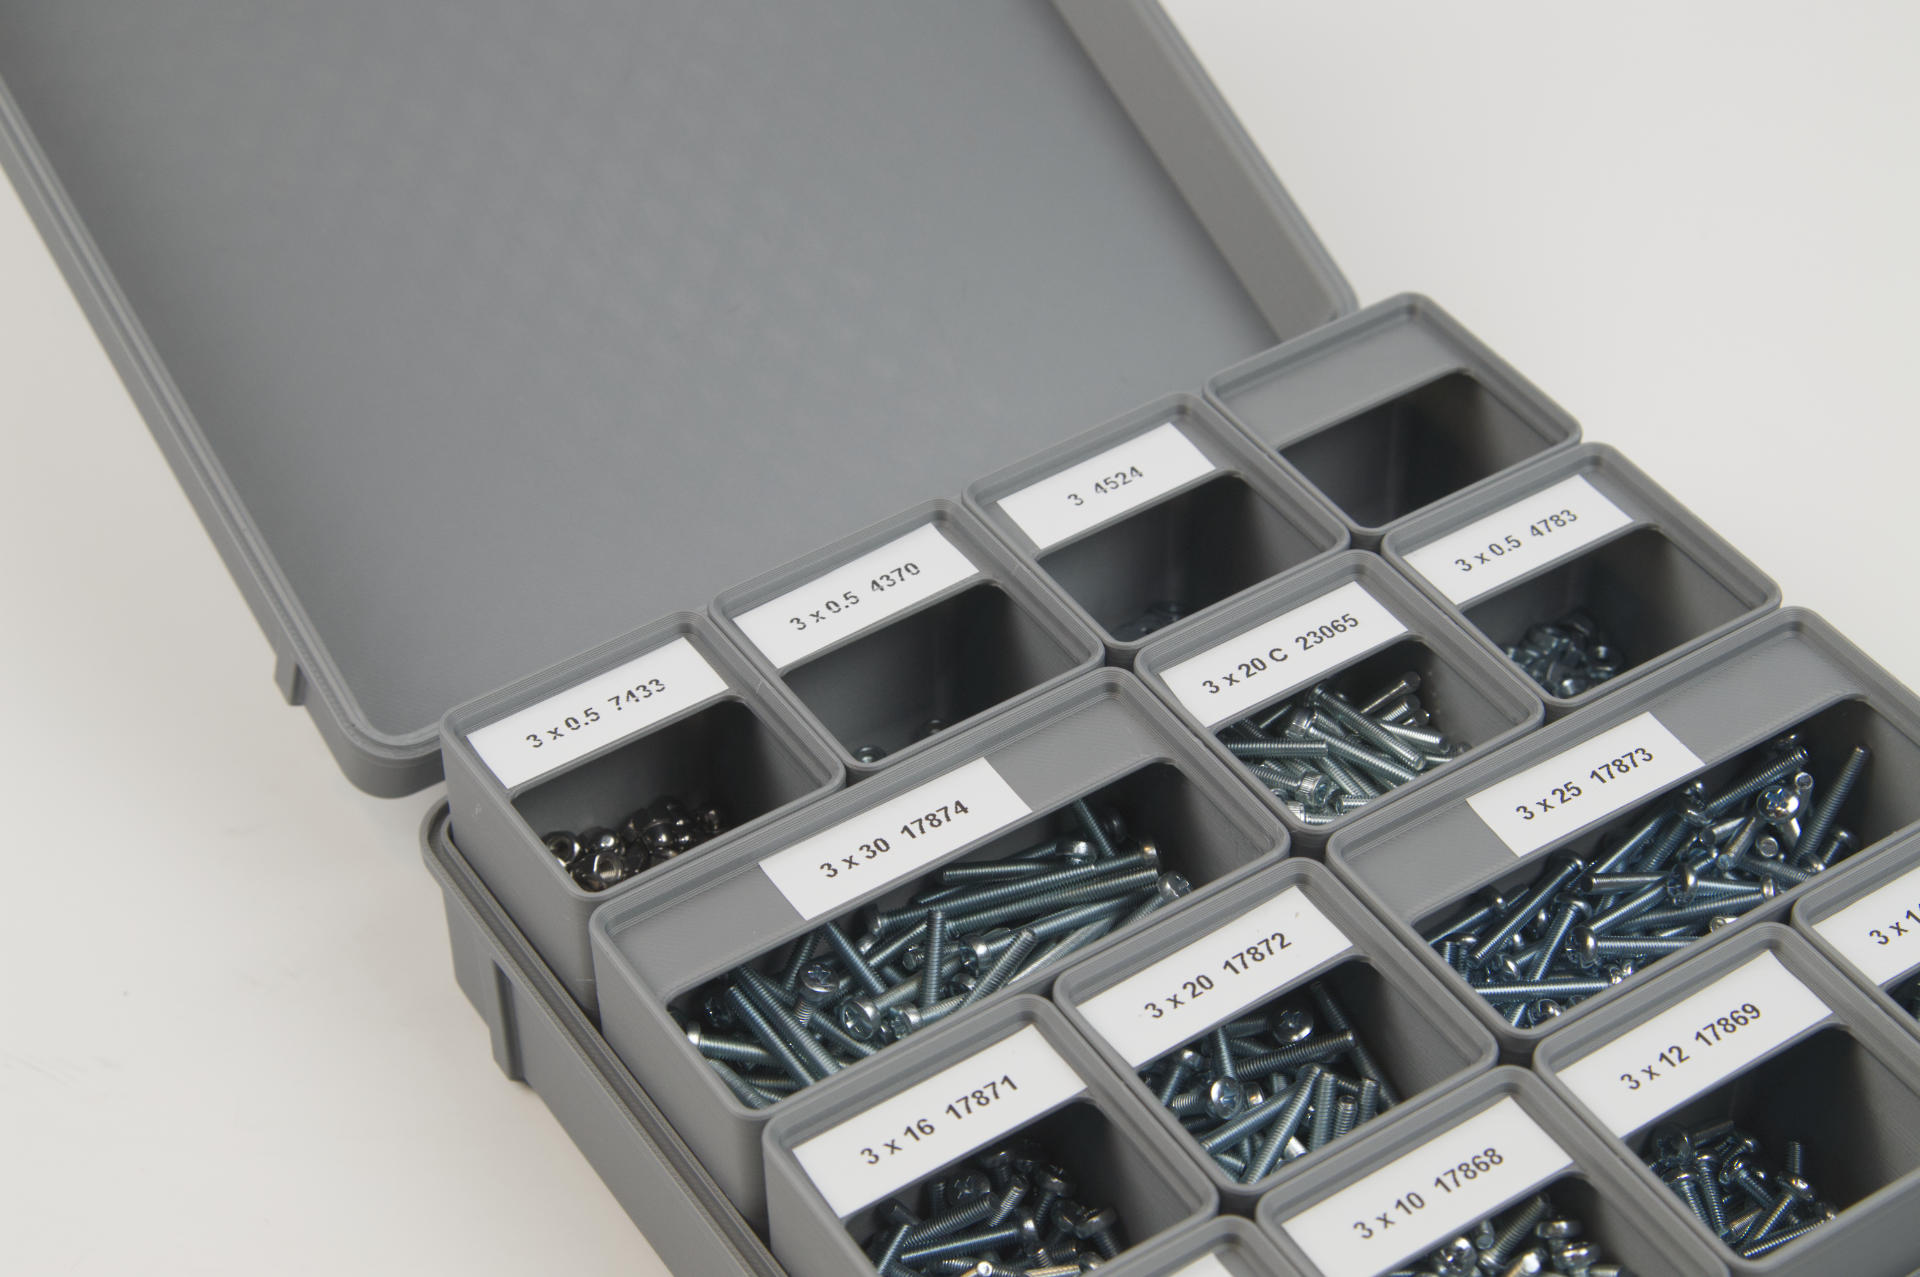
This really is a great way to store all of my 3mm hardware. As I’ve mentioned in other recent posts, I’m really trying to organize my shop and maximize efficiency. Before this I kept all the hardware in individual bags and then in a larger bag, which meant pulling out all the bags, grabbing the one I wanted, opening that bag, getting the hardware, etc. Again, let’s make this easy. I can also see how much hardware I have in each size easily, as compared to being stuffed into bags.

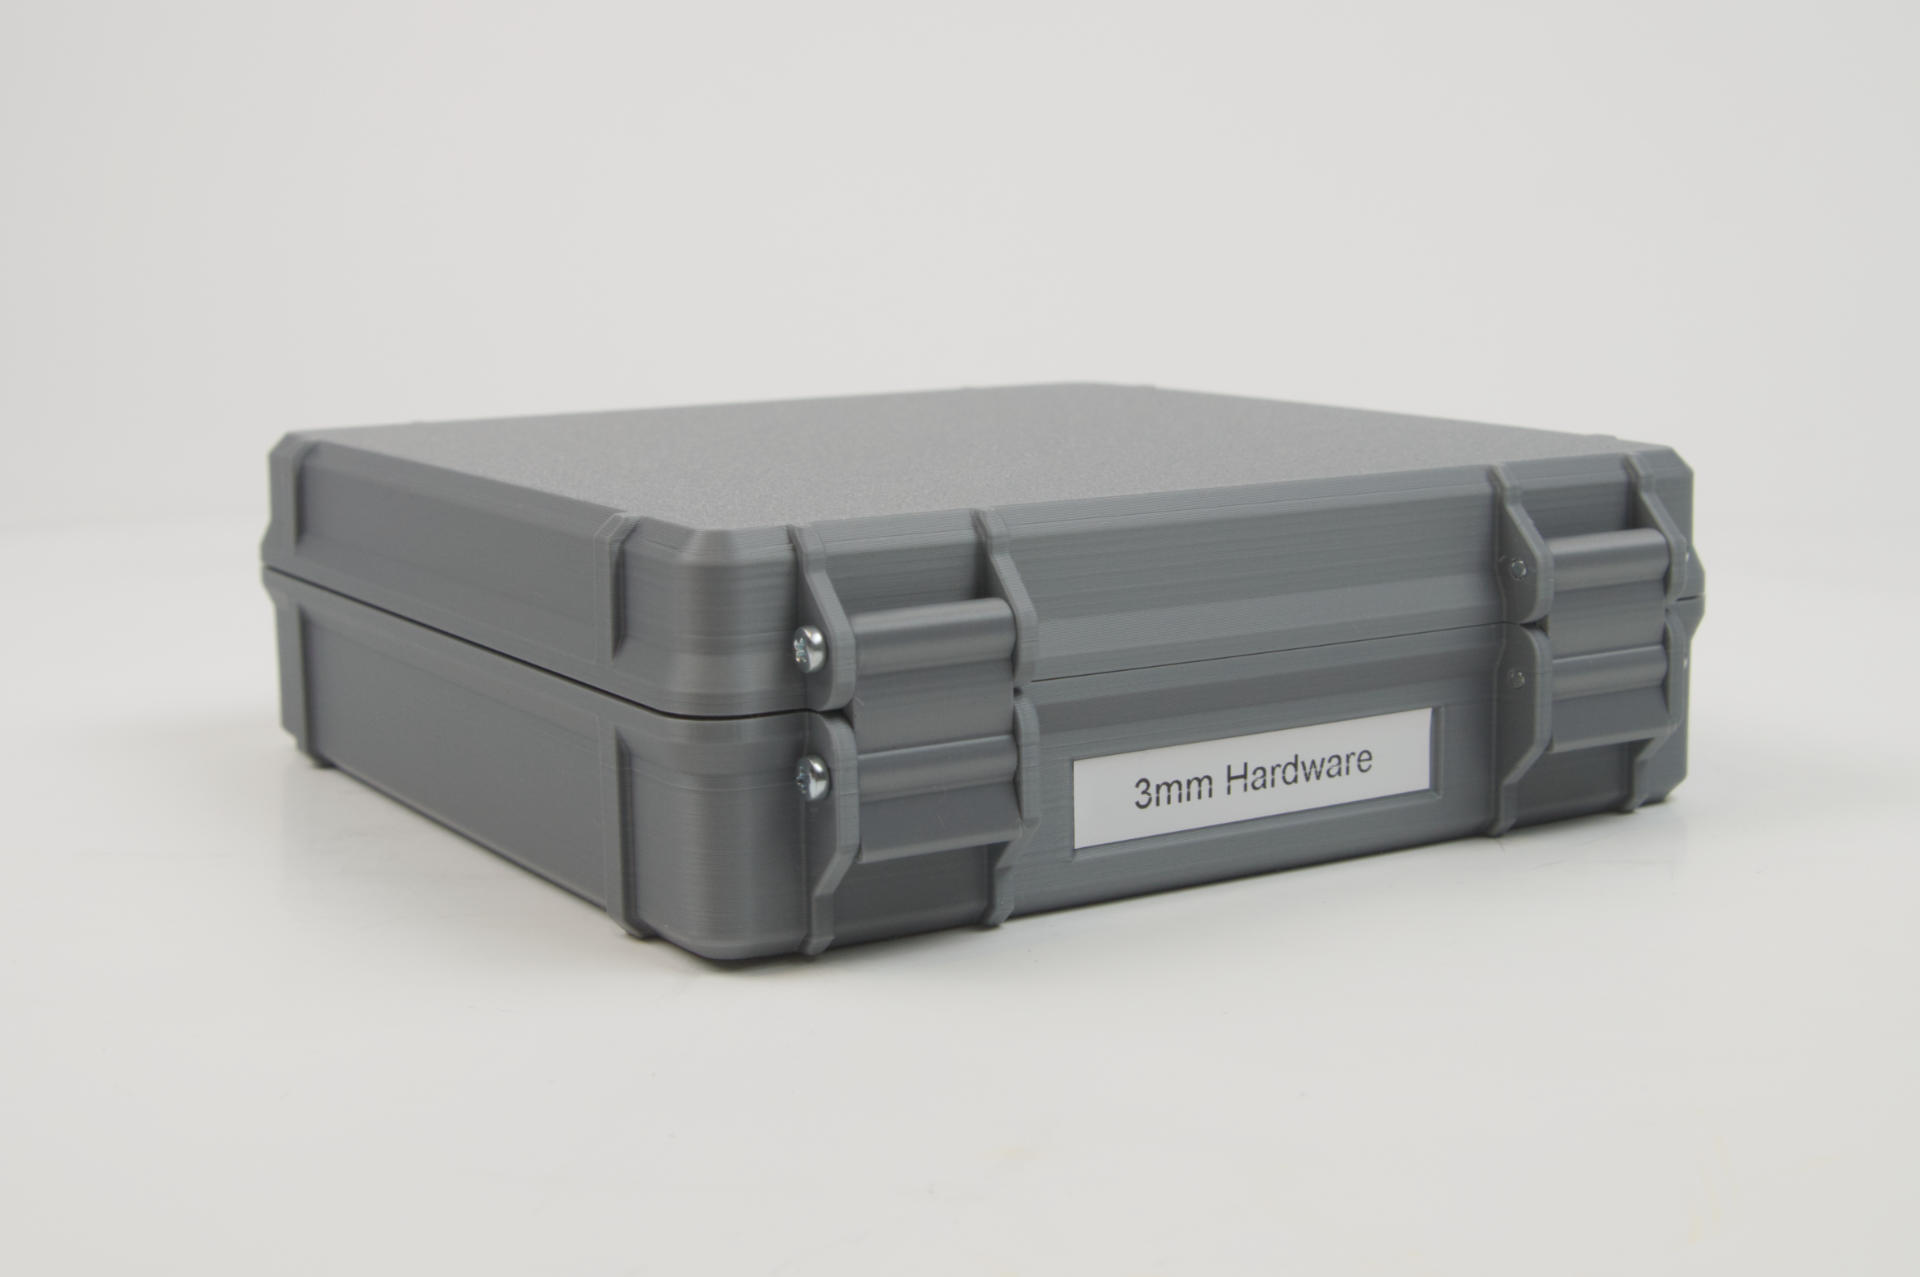
This Gridbox is a really nice design. I used the 4×4 version and will probably make another for my 2.5mm and 2mm hardware. There’s also a version that allows for a clear acrylic laser cut piece to fit into the top lid so you can see what’s inside. I don’t need that for my hardware, but it is a useful feature.

The model is based on the Rugged Box (Parametric) by Whity, which sadly is only parametric if you use Fusion 360. Sigh… I did find this Parametrizable Rugged Box (OpenSCAD) by Dochni but I don’t love it. I’ve started to try improving the code to do what I want but then I just started to write my own which I haven’t finished yet. (Note: See Rugged Parametric Box in OpenSCAD for a great new model!)

Besides a few things that give it away as 3D printed, this is another print that just does not look printed. The quality of the print is so good, and the design is top notch, so yeah… we’ve come a long way since 2011.

Anyway, the 3mm hardware is now sorted! That said, I have been using my Parts Tray with Sliding Lid for over a year now and I’ve been quite pleased with it. I may make a few changes to it though, as there are a few specific pieces of hardware I like to have at the ready.

Categories
Uncategorized

Don’t toss that old Wacom Tablet!

Back in 2010 I got a Wacom Bamboo Pen and Touch Tablet which connected to my computer via USB and allowed me to create digital drawings. I used it for a while, then used it sporadically, then a few years ago I found it in my office and tried to install the drivers to get it working and… Nope. Seems Wacom gave up on updating them to work with the modern operating system I use nowadays.

So I found it again last week and decided to see if there was a way to get it working, and… there is! Seems it just takes a software person to fix the drivers, and since Wacom didn’t do it, someone else did! And big thanks to that person! So what did I find?

I found wacom-driver-fix which… fixes the Wacom drivers!

Boom. Installed and I got my old tablet working, which mean it did not go in the bin. Of course, companies suck. When I looked on the Wacom site and realized it was no longer “supported” I checked pricing on new drawing tablets… Yeah, those bastards almost got me! Nope, we’re good for now.

I posted about this on Mastodon and at least one person immediately got their old tablet working as well.

To celebrate I drew this angry meatball. It’s angry at Wacom for sucking so bad.

(I also threw a few bucks to Nicholas Sherlock for providing the fix!)

Categories
Uncategorized

Development with Resistance

As you may know, I sell a variety of USB controllers (on Etsy and my own shop) and I accept custom orders where I work with the customer to build (and program) what they want or need. So last year someone got in touch with me and said “Your Dual Button looks great! I need it with a 2.5mm stereo jack though, and it’s going to control some [REDACTED] equipment.”

So this was not a USB controller, but they liked the form factor of my product. Well, no problem. I do custom. I got as much detail as I could about the device they had (which was not working anymore) and asked for photos. There was a resistor wired into one of the buttons, so I asked the customer to check it with a meter to get the value. He couldn’t quite figure it out, but we made some guesses based on the color bands in the photo and I came up with a solution.

With the 2.5mm stereo jack we determined which of the TRS (Tip, Ring, Sleeve) parts were ground, and each of the buttons, and which button had the resistor on it. One button supplied full voltage and the other a lower voltage. I didn’t find out too much about the extremely expensive equipment it was connecting to, but I didn’t need to.

I came up with an easy way for the customer to swap the resistor, and even sent spares of various values in case we didn’t guess correctly. I think it worked fine with our “guess” resistor, so maybe the equipment just looks for full voltage versus a lower voltage. Who knows? I don’t work in the [REDACTED] field.

I often find these projects fun and a little challenging. I probably don’t always cover the time I put into them, but often they’re a good learning opportunity and sometimes turn into a product or repeat business.

Categories
Uncategorized

Little Articulating Arms

little-hands-01

I’ve been prototyping a little helping hands thing using some 3D printed parts and miscellaneous hardware, mostly #8-32 nuts and bolts, and a few springs.

little-arm-model

The 3D part is pretty simple, a cube with two holes. It’s based on my Camera Accessory Mounting System (CAMS).

little-hands-00

First version… still figuring out how to connect everything…

little-hands-02

Springs for tension were added, but I might try using small wingnuts to adjust tension as well…

little-hands-03

Tiny zip ties hold the alligator clips in place. They can still rotate freely and are somewhat tight…

little-hands-04

Hard to see in this one, but I stacked two blocks on top of each other to allow rotation in both directions. I’ll keep working on this to see where it goes.

Categories
Uncategorized

Press Knobs

press-knob-model

You may remember that I recently printed a press. While the press works quite well, the one thing I didn’t like about it was the fact that I needed a screwdriver to adjust the tension. That was a quick fix though. You see, I am not a newbie when it comes to knobs.

I had one other issue when assembling my press. While it calls for M5 bolts, I only had M3 and M6 on hand, so I did what any Imperialist would do, and used non-Metric hardware. A #6-32 bolt is smaller than a 5mm bolt, but it’ll do.

You can see above the quick model I made in OpenSCAD. The idea was to build a knob in two parts around the head of the bolt. A nut tight against it would keep it from spinning loose. (We just need to finger tighten it anyway, not torque it down hard.)

press-knob-01

Here is out bolt, nut, and two printed parts ready for assembly.

press-knob-02

We put the bolt through the hole in the bottom. It needs to be screwed in as it’s meant to fit tight to give it a little more “bite” into the plastic.

press-knob-03

There! Screwed in all the way. (Not pictured: the power screwdriver I used to drive it in all the way.)

press-knob-04

Now we put the nut on. You can spin this all the way to the end so it’s up against the plastic.

press-knob-05

Once the nut is at the end I hold it with some pliers and gently tighten the screw by hand. (Not pictured: screwdriver I used to tighten the bolt.)

press-knob-06

Now we snap the top part in place and that’s about it. I was pleased that both the Prusa i3 MK3 at work and my Monoprice Maker Select at home did a great job of printing these parts and they fit together perfectly.

press-knob-07

That’s it! Tiny knob is assembled. That was pretty easy, and it works quite well. I am pleased.

press-knob-08

In my mind, the beauty of a 3D printer (like any tool) is that it can help you solve problems. This may not be world changing, but the fact that I can solve a problem by making a computer drawing of an object and then telling a machine to “print out” that object is still some sort of magic. But as the saying goes “Any sufficiently advanced technology is indistinguishable from magic.” So, yeah…