Categories
Uncategorized

HDR Photos [Photoshop and Luminance HDR]

HDR Photos

It’s been a while since I posted anything about HDR imaging, and I realized that I never put Adobe Photoshop CS5 to the test. I did try creating an HDR image with CS4, but was disappointed with the results…

In the image above you can see my final output of an image. On the left side is all Photoshop, and on the right side is Luminance HDR (formerly “Qtpfsgui” for you old timers.)

Now for both of these images I did the HDR+ thing I talked about a while back, where I blend an HDR image with a normal exposure. Personally, I like the way those turn out, so it’s pretty much how I do HDR.

Pewaukee Lake

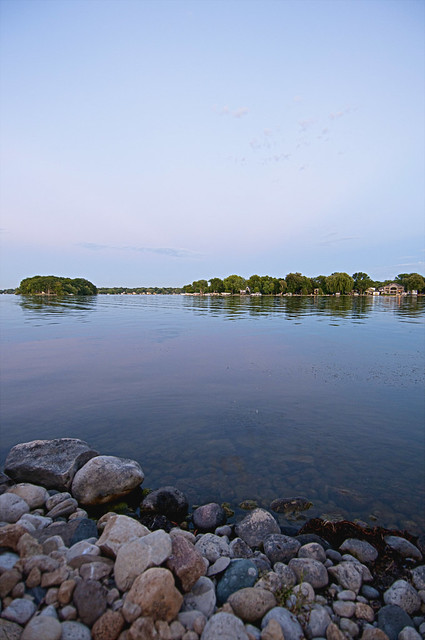
Here’s the image from Photoshop. (View it large at Flickr.)

Pewaukee Lake

Here’s the image from Luminance HDR. (View it large at Flickr.)

I think the Photoshop image looks better in the sky… it looks a bit cleaner, while the Luminance HDR image has a little bit of banding going on. You can also see some differences in the trees, and the water, but I think the rocks in the foreground really show the difference, and I prefer what Luminance HDR did.

This is only my first attempt at comparing the two applications, so it’s not entirely scientific. I did go into each file and tweak it a bit to try to match them closely as far as the color balance, but the detail is where the difference is most apparent. I also didn’t see any way to adjust the tonemapping in Photoshop, while Luminance HDR has a ton of sliders and options to twiddle with.

I suppose next time I could combine the two final images into a ‘final final’ image that would be some sort of SUPER HDR+ image. (I’ll add that to the ‘to do’ list.)

Categories
Uncategorized

Ringy Dinghy

Ringy Dinghy

This is a photo of the “Ringy Dinghy” taken at Lake Michigan in Milwaukee, Wisconsin…

I started with a single RAW image and created 3 different exposures by processing the NEF file in Photoshop. Once I had the 3 files, I loaded them into Luminance HDR (aka ‘qtpfsgui’) which combined them into an HDR image, and I then tonemapped the image.

This part won’t mean much to you unless you are familiar with qtpfsgui (aka ‘Luminance HDR’) but these are the tonemap settings for this particular image. (I tend to use Mantiuk the most.)

TMOSETTINGSVERSION=0.5
TMO=Mantiuk06
CONTRASTFACTOR=1.532
SATURATIONFACTOR=2
DETAILFACTOR=11.9
CONTRASTEQUALIZATION=NO
PREGAMMA=1

Once I created the tonemapped image, I saved that, and then combined it with the middle exposure shot in Photoshop, just slightly blending the layers. Then I saved that file as our final image.

This is pretty much the technique I described as HDR+ back in 2009, and the method I used for my Red Barn photo.

Categories
Uncategorized

HDR Process (Red Barn)

I love Fall… it’s probably my favorite season. Not too hot, not too cold, at least in Wisconsin…

Fall should be a great time for outdoor photography, what with the colors and all, but this year, I just didn’t manage to get out in time to capture the magic of the trees, but I did make it out to Lapham Peak (this sounds more pathetic if you know that I live about a mile from it) for a few shots. This is one of them…

Red Barn

For the nerds in the crowd, my workflow for an image like this is such: I use a tripod to shoot multiple exposures (all in RAW) and then when I process the shots I choose the one that is properly exposed, as well as one that is overexposed, and one that is underexposed, and run those three images through Qtpfsgui to create an HDR image (HDR stands for High Dynamic Range) and tonemap it. The thing about HDR is that you can achieve some really amazing things, but you can also create some really cheesy images, so the trick is to not overdo it.

HRD Process

Once I’ve got an HDR image that is tonemapped, and looks very… uh, HDR, I then output that image for later. I’ll then go back to my original properly exposed shot, open that in Photoshop, and bring the tonemapped HDR shot in, and place it on top of the normal shot. For this one, I ended up putting it at 50% opacity, but you’ll need to eyeball it. I also added another layer, consisting of the grass in the foreground. Grass tends to really stand out in HDR images.

HDR Photoshop

Once I’m happy with the image, I just save it out as JPG and call it a day. The purpose here it to get the detail that HDR gives you, without getting the “overdone” HDR look, so it’s really just enhancing an existing image with a little bit more dynamic range.

(Oh yeah, I sort of dubbed this technique “HDR+” a while back…)

Categories
Uncategorized

Delafield, WI

House

BTW, we moved to Delafield…

Categories
Uncategorized

HDR+

If you’re familiar with HDR (High Dynamic Range) photography, you’ll know the results can look otherworldly (good) or cartoony (bad) or somewhere in between. Sure, sometimes you want cartoony, or an image that appears more like a painting or an illustration, but other times you really want a better photo, so that’s what this is about. (I’m calling it HDR+ for now…)

So HDR+ is the combining of an HDR image with the original non-HDR image to get the best of both worlds.

December HDR/Original
Original Photo(s) by John December.

I asked John December if I could combine this HDR photo with the original photo to see what it would look like… and he agreed.

I layered the two images in Photoshop, with the HDR on top at about 25% transparency, and I added some Gaussian blur to the sky to get rid of some of the pixelation. I also did a bit of dodging and burning here and there.

Labelle Pool

This shot of some water at Labelle Cemetery in Oconomowoc, Wisconsin is also a combination of an HDR and non-HDR image. I wanted to get rich, vibrant colors, but not have it look like an HDR image. I think it turned out quite well.

For this one, I processed one RAW file into 4 separate (different exposure) TIFF files and combined those into an HDR image, then layered two of the original TIFFs with the final HDR to get the final image.

If you’re doing HDR photography, consider playing around with this technique to get a new perspective on things… HDR plus a little more, if you will.