Categories
Uncategorized

Milwaukee Makerspace Grand Opening Recap

Grand Opening
Photo by Michael Diedrick

The Milwaukee Makerspace Grand Opening & Mini Maker Fair was held on Saturday, April 9th, 2011 and wow, what an event it was! The photo above should give you a little indication of the crowd. It was “several hundred people” from the estimates I heard…

I’m mainly going to talk about my own experience, since I really didn’t get to experience much of the event, which is sad, and weird, but also cool.

Pete and Sam
Photo by Michael Diedrick

So, I got there around 10am and Matt was heard to say “Hey look, Pete brought BarCamp!” due to the amount of stuff I tend to bring with me, including projects to show, camera equipment, tripods, audio equipment, projector, tables, Time Lapse Bot, and other things. I got set up at a table and put out my projects. As usual, I was way too ambitious, and actually pulled back and didn’t show everything. This was a good decision, as there was just too much going on. The two projects that got the most interest were the Egg-Bot and the Friday Night Drawbot.

Egg-Bot
Photo by Brant

The Egg-Bot is just, well, it’s just cool. I had to explain a number of times that I did not “invent” it, but I built it from a kit. I gave a brief explanation of it (including open source software/hardware, Inkscape, etc.) to a lot of people. One kid was interested in it, and I told him how much the kit cost, and then he complained it was too much. I then described the parts used to construct it, and as soon as I said “laser cut” he was like “oh, yeah, laser cut, OK!” and then he was sold, and thought it was something he should have. (I did point out that it was all open source and he was welcome to get all the parts and assemble his own.)

Eggs
Photo by Brant

I ended up printing about 50 eggs throughout the day, pretty much non-stop. I ended up doing someone’s name on an egg, and then printing one with the word “VEGAN” on it, and then at some point a mom asked if I could print a monkey. A monkey!? Well, off to OpenClipArt.org to find a monkey. And a candy cane. And a rose. And a cat. And the Rebel Alliance logo… I somehow ended up being a one-off egg printing factory! (But it was a lot of fun, and I learned a lot more about Inkscape.)

We gave away a lot of eggs, and I (mostly) remembered to tell people they were raw eggs, and advised the kids not to squeeze them, put them in their pockets, or drop the on the car ride home. One very young girl suggested I should have got up earlier that day (maybe 4am) so I could have boiled them all. As my excuse, I told people it would be easier to preserve them by blowing out the insides since they were raw. One woman gave us a dollar for an egg. (We added it to the Makerspace Donation bucket.)

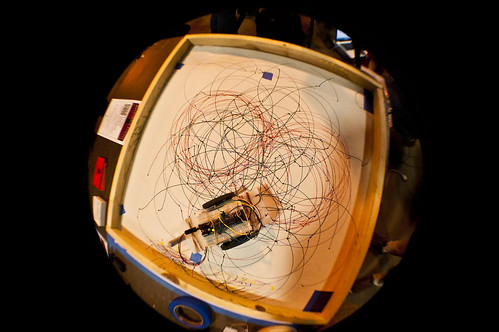
Drawbot Action

And what would the day have been without some Drawbot action!?

I don’t know, but I do know I’m lucky Sam showed up and took on a lot of the Drawbot maintenance. He also ended up exploring Drawbot in ways I haven’t yet, using the Ultra Fine Point Sharpies, and the results were pretty darn good. I’ll try to scan some of the drawing this week. I’ve also got some reprogramming of Drawbot I want to do soon.

Oh, and I ended up telling a lot of people about the Arduino, and how the Drawbot worked, and explained that it was pretty darn easy to build, and if they came down to the Makerspace on a Thursday night, someone could probably help them get started with Arduino hacking.

Now, as for the rest of the event… I missed most of it! I was at my table for nearly 8 hours straight, with just a few quick bathroom breaks here and there while Sam watched the table. I think I need a “Back in 10 minutes!” sign or something. But really, it was a blast talking to so many people and answering questions… but it was also exhausting. I didn’t feel comfortable enough to just leave the table unattended for any large amount of time, so I’m not sure what the solution is… except to have someone else work the table along with me.

I have almost no photos to share from the event, and no video (except for the stuff Time Lapse Bot shot) so head over to the Flickr pool to see some more photos.

Oh, and word from the makers is that they all loved it, it was a great/successful event, and they can’t wait to do it again. Well, they can wait about a year maybe. :)

Categories
Uncategorized

Makerspace Eggs

Milwaukee Makerspace Egg

As I mentioned previously, the Milwaukee Makerspace Grand Opening & Mini Maker Fair is coming up (Saturday, April 9th, 2011!) and since I plan to bring Egg-Bot, I figured I should have something to show…

So why not this Milwaukee Makerspace Egg!

If you want one, bring your own egg to the open house. (Or I’ll try to remember to bring a bunch of eggs.)

Stippled

It’s another stippled piece, as I wasn’t loving the way the line version was coming out (I think I need to play with the pen speed settings a bit more) so I figured the stippler would do for now… also, it takes a while to complete, so you get to watch the Egg-Bot in action.

Facebookers, you can RSVP if you’d like… I hope to see you there!

Categories
Uncategorized

Makerspace/Hackerspace Membership Costs

Hackerspaces

I wanted to do a bit of research on the cost of being a member of a hackerspace or makerspace (and by cost I mean, monthly membership fees.)

I started at hackerspaces.org and just looked at spaces in the United States.

Since the information is coming from a wiki, we can’t be sure it’s completely accurate, but I think it’s a good gauge of fees nonetheless.

Name Location Members Per Month
ATX Hackerspace Austin, Texas 41 25 to $75
Ace Monster Toys Emeryville, California 80 $80
Alpha One Labs New York, New York 37 $40
Arch Reactor Saint Louis, Missouri 23 $10 to $30
The Baltimore Node Baltimore, Maryland 18 $50
Bitsmasher Santa Cruz, California 33 $50 to $100
BrainSilo Portland, Oregon 20 $40
Bucketworks Milwaukee, Wisconsin 50 $75
Collexion Lexington, Kentucky 25 $5 to $60
Columbus Idea Foundry Columbus, Ohio 50 $25
Cowtown Computer Congress Kansas City, Missouri 30 $30
Crash Space Los Angeles, California 30 $37 to $108
DHMN Appleton, Wisconsin 23 ~
Dallas Makerspace Dallas, Texas 50 $50
Dayton Diode Dayton, Ohio 8 $50
HacDC Washington D.C. 42 $50
HackPittsburgh Pittsburgh, Pennsylvania 25 $30
HackerDojo Mountain View, California 183 $100
Hackerspace Charlotte Charlotte, North Carolina 30 $40
HeatSync Labs Chandler, Arizona 17 $50 to $75
Hive 76 Philadelphia, Pennsylvania 15 $15 to $100
I3 Detroit Detroit, Michigan 32 $39 to $89
Jigsaw Renaissance Seattle, Washington 50 $15 to $200
Midsouth Makers Memphis, Tennessee 20 $25 to $75
Milwaukee Makerspace Milwaukee, Wisconsin 17 $80
NYC Resistor New York, New York 27 $75 to $115
New Work City New York, New York 75 $300
Noisebridge San Francisco, California 80 $40 to $80
Pumping Station: One Chicago, Illinois 50 $30 to $50
Sector67 Madison, Wisconsin 21 $50 to $100
Twin Cities Maker Minneapolis, Minnesota 35 $50
Zero1 Nation Colorado Springs, Colorado 14 $13.37 to $35

I tried to include some of the spaces I was already familiar with, or ones in larger cities, which I thought would provide some good contrast.

I also included the number of members in thinking that the number of people involved would affect the cost per member per month.

Some of these are non-profit organizations, while others are not. Some have student or “starving hacker” rates, and most of them seem to have open times/events where anyone can come. Some allow guests (and some suggest guests make a small donation to the space) and many have tiered membership levels.

I talked to Bre at NYC Resistor and asked about their pricing, which says that if you teach classes your membership fee is $75 per month, and if you don’t teach classes, it’s $115. I had assumed this was to reward people who teach by giving them a discounted rate, but he suggested it was more along the lines of punishing those who are slackers and don’t do any teaching. Either way, it’s a neat idea. :)

Obviously the amenities or “what you get” for your membership will vary. Some of the spaces are meant for you to have a permanent desk, provide good Internet pipes, meeting rooms, and function as your everyday office, while other are more like workshops, with tools you may not have access to anywhere else. Prices obviously vary depending on geography as well. Of course you’d expect that In a bigger city you’d probably find more members, and that the rent would be much higher. In a place like Appleton, Wisconsin, it may prove hard to get enough people interested to build momentum to secure a space. (It took the Milwaukee Makerspace folks about a year to get their space.)

If I’ve got anything wrong, or your space was mentioned incorrectly above, please let me know… This was really just a quick look at the monthly membership fees of a bunch of different spaces.

Disclaimer: I am involved with Bucketworks, and I am friends with the folks in DHMN and Milwaukee Makerspace, and have a loose affiliation with Sector67, Jigsaw Renaissance, and Pumping Station: One. (The last three being members of the Space Federation.)


Categories
Uncategorized

Milwaukee Makerspace – Grand Opening & Mini Maker Fair

Join us Saturday, April 9th, 2011 at the Milwaukee Makerspace for the Grand Opening & Mini Maker Fair!

I’ll be there showing off some of my recent projects for the Mini Maker Fair, so if you’ve ever wanted some hands-on with the stuff you’ve seen on my blog, well, this is your chance.

You can visit milwaukeemakerspace.org for more info (and I hear they are close to launching a redesign) or you can follow them on the Twitters at @mkemakerspace.

You can RSVP on Facebook (and see who else is going) or just show up… I hope to see you there!

Categories
Uncategorized

Circuit-Bending with the Easy Button

Easy Button

I’ve had an easy button lying around the house for a few years now, and remembered reading about how “easy” it was to do a little circuit-bending with it, so I finally got around to doing that…

I did a quick search for some details and found this Easy! blog post, read the bit about a 1Meg pot and figured I’d give it a try. I didn’t have a 1Meg pot on hand (I’m sure the Milwaukee Makerspace probably has a boatload of potentiometers and other parts I could have used, but I built this thing at home) so I ended up going to Radio Shack, and while they don’t have breadboards or much other stuff, they do have a few electronic components on hand.

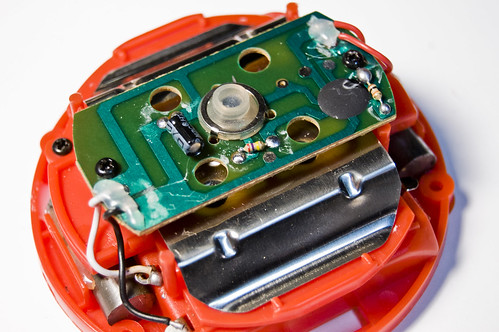
Once you open the Easy Button (screws are under the rubber feet) you can see the main resistor, right under the rubber switch. (It’s in the center in the photo below.)

Easy Open

Take that resistor out and then solder in the wires for the potentiometer. That should be about it for the electrical part of it… (I know, you also see a push-button switch in the top photo, I’ll get to that in a minute.)

Since I tend to just start on these things without any real thought as to how they will be finished—I fly by the seat of my pants a lot—it’s always a learning experience. I had a plan to mount the pot onto the big red button, so I Dremeled the heck out of one of the legs on the bottom side of the button to make it fit, and I then realized it just wouldn’t fit, so I thought I could mount it on the inside plastic housing with a hot glue gun, this worked well, but I took out the piece of metal to do this, and, well the metal piece is what makes the button pop back up, so when I reassembled it, the button didn’t work, as it got stuck. Oh, I also built it wrong, with the button turned 180 degrees, so things didn’t line up, so I Dremeled some more, and that contributed to making the button more useless, even though I tried to put half of the metal shield thing back in. (Hacksawing that thing was a nightmare!)

I had started to document the whole thing with photos, but when it was apparent I did so many things wrong, I abandoned the plan… that said, I’m pretty confident that if I did it again, I’d get it all right the second time. Despite all that, I came up with the idea of putting in the push-button switch, which worked great, as it is much easier to push, and you can use it while twiddling the knob. From the outside you really can’t tell that things didn’t work out the way I planned, so I’ll call that a win.

Here’s a video (Vimeo) of the Easy Button in action… It’s a challenge to get the knob in just the right position, so it’s become a game at our house to see who can get the best sound (or longest bend) out of it.

If you’re totally new to circuit-bending, the Easy Button is a simple project to start with… if you are totally clueless, swing on down to the Milwaukee Makerspace for one of their Electronics and Programming Nights when non-members are welcome, and I’m sure someone there can help you get started.