Categories
Uncategorized

Screen Printing Demo

ground tracking station

I did a screen printing demo class at Milwaukee Makerspace, so that other members can make use of the awesome equipment we have available…

I grabbed this fine piece of art titled ground tracking station from OpenClipArt a while back, and figured it would come in handy…

Krambo Industries

After a number of edits to make it “cut-friendly” and adding my own text, I used the Silhouette Cameo to cut some vinyl to use for the mask…

Vinyl prep

Since we’re going to stick the vinyl on the back side of the screen, make sure to reverse your image before you cut it! (You can do it right in the Silhouette software.)

screen back side

The vinyl gets attached to the back of the screen. I don’t have a photo of the transfer paper, but yes, I needed to use transfer paper. Getting the vinyl to stick to the screen can be tricky! Go slow, very slow, and make sure it transfers ok. It may not stick very good (yet) but it will work.

Once the vinyl it in place, tape it good on at all four sides, and then add more tape. (It’s clear packing tape, hard to see in the photo.)

screen front side

Flip the screen over, and press down on the screen, so it will stick to the vinyl better. Add more tape. Really, preparing screens involves a lot of tape. (The white thing on the screen is just the backing of the vinyl, which I used to save a bit of tape… It’s taped in place. Yes, more tape!)

Printed shirt

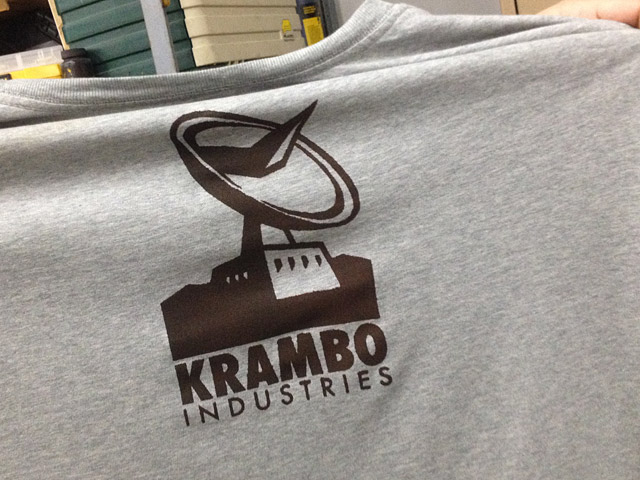
It was the first time screen printing for everyone who attended. Usually at least one or two people have had some experience (usually in high school) but this time no one had done it before. Here’s the shirt Asim printed. It turned out good!

Printed shirt

While I only talked about printing light ink on dark shirts, Andrea brought a black shirt, which we printed with dark red ink. She said she wanted to do a bleach treatment on the shirt, which should lighten up the fabric but not the ink. Hopefully I can get a photo of that when it’s done.

Sample print

I did a print on paper as well so I could add it to the “Wall of Stuff” at the Makerspace.

After I cleaned everything up I had a member ask when I’d be doing another demo/class. As usual, I don’t know the answer yet! Usually when enough people ask about it I do it. So, yeah, I’ll do it again, at some point.

(Here’s a blog post about a previous printing that I did.)

Categories
Uncategorized

Snowflakey

Tennis Man

Here’s a thing I’m calling (for lack of a better name) “Snowflakey”. The idea came from the Kimotion Arts store on Shapeways.

Kimotion Arts

Kimotion Arts has these neat 3D printed ornaments with an object arranged in a circle to make a snowflake-like thing. I dig it, so I decided to dig into it.

Bad Man

The first thing I did was fire up Inkscape and draw a really simple figure. It’s terrible, really, but I did it in less time than it took Inkscape to launch on Mac OS X. I created an SVG file, and then exported it as a DXF file, making sure I converted all the line segments into straight lines first. (Of course there were no curves in this drawing, but if there were, I’d convert them!)

Bad Man Flake

Once I had my DXF file, it was easy to pull that into OpenSCAD, and place six of them in a circle with the following code.


objheight = 4;
objcenterspacing = 20;
objrotate = -70;

for (i = [0:5]) {
  rotate(i*360/6, [0,0,1])
    translate([0, objcenterspacing, 0])
      rotate([0, 0, objrotate]) 
        linear_extrude(height = objheight, center = true) 
          import( "figure.dxf" );
}

The code is not the greatest… in fact there is probably much room for improvement, but it’s the first thing I got working, so I ran with it. My idea for the 3 variables at the top were so you could easily tweak them for different art. Sadly, as you change objcenterspacing and objrotate, they affect each other, so it’s a lot of back and forth between those two values. I also could not find a way to assign a filename to a variable, so your DXF will need to be named “figure.dxf” or you’ll need to edit the import line.

Tennis Man

Since my drawing was so terrible I wanted to try something else, so what better than Land recreation symbols 27, better known as “Tennis Man” by most people.

Tennis Man Flake

A few quick edits and I had this nice Tennis Man Snowflake for that special ball smasher on your list… (Notice the canvas size of 25mm wide by 35mm high. You can do what you want, but the OpenSCAD code will be expecting something close to that. Otherwise you’ll just have to tweak the numbers even more.)

Blobby Man Flake

I decided to try once again to draw something. This one took a little longer than a minute, but turned out just as terrible as the first one I did. Still, maybe you like “Blobby Man” as a snowflake.

Ant Flake

How about ants? This one is interesting. Maybe spiders would have been a better choice. (And yes, I know I could probably do the entire “6 items rotated” thing right in Inkscape, but that wasn’t the goal here.)

Horse Flake

What about the old nag? No, I’m not taking about your mother-in-law (kidding!) but this fine old horse from OpenClipArt.org, where I get many of the SVG files I use. Export this as an STL file and you’re ready to print it on your RepRap!

If you’ve got an improvement to this OpenSCAD code, by all means, let me know. I’m still very much in the learning phase with OpenSCAD, so I do these things to learn, and because of that I’m open to any suggestions.