Categories
Uncategorized

Nginx Proxy Manager

I recently setup Nginx Proxy Manager and here’s how I did it. Oh, first I’ll explain what it is. A proxy is a person appointed or authorized to act for another…. well, that’s for people, but with computers it’s pretty similar. One computer acts as a go-between for you and the computers/services on your network. Remember when I mentioned Jellyfin? Well to get access to my Jellyfin server running on my home network I poked a hole in my router using “port forwarding” which allowed me to connect to it from anywhere I had an Internet connection.

So if you’re at home and visit whatsmyip.org it will show you the public IP address of the router from whatever company provides your Internet service. (In some cases this address will change, but if you’re luckily it will remain the same. If it changes you’ll need to know about “Dynamic DNS” but I’ll skip that for now.)

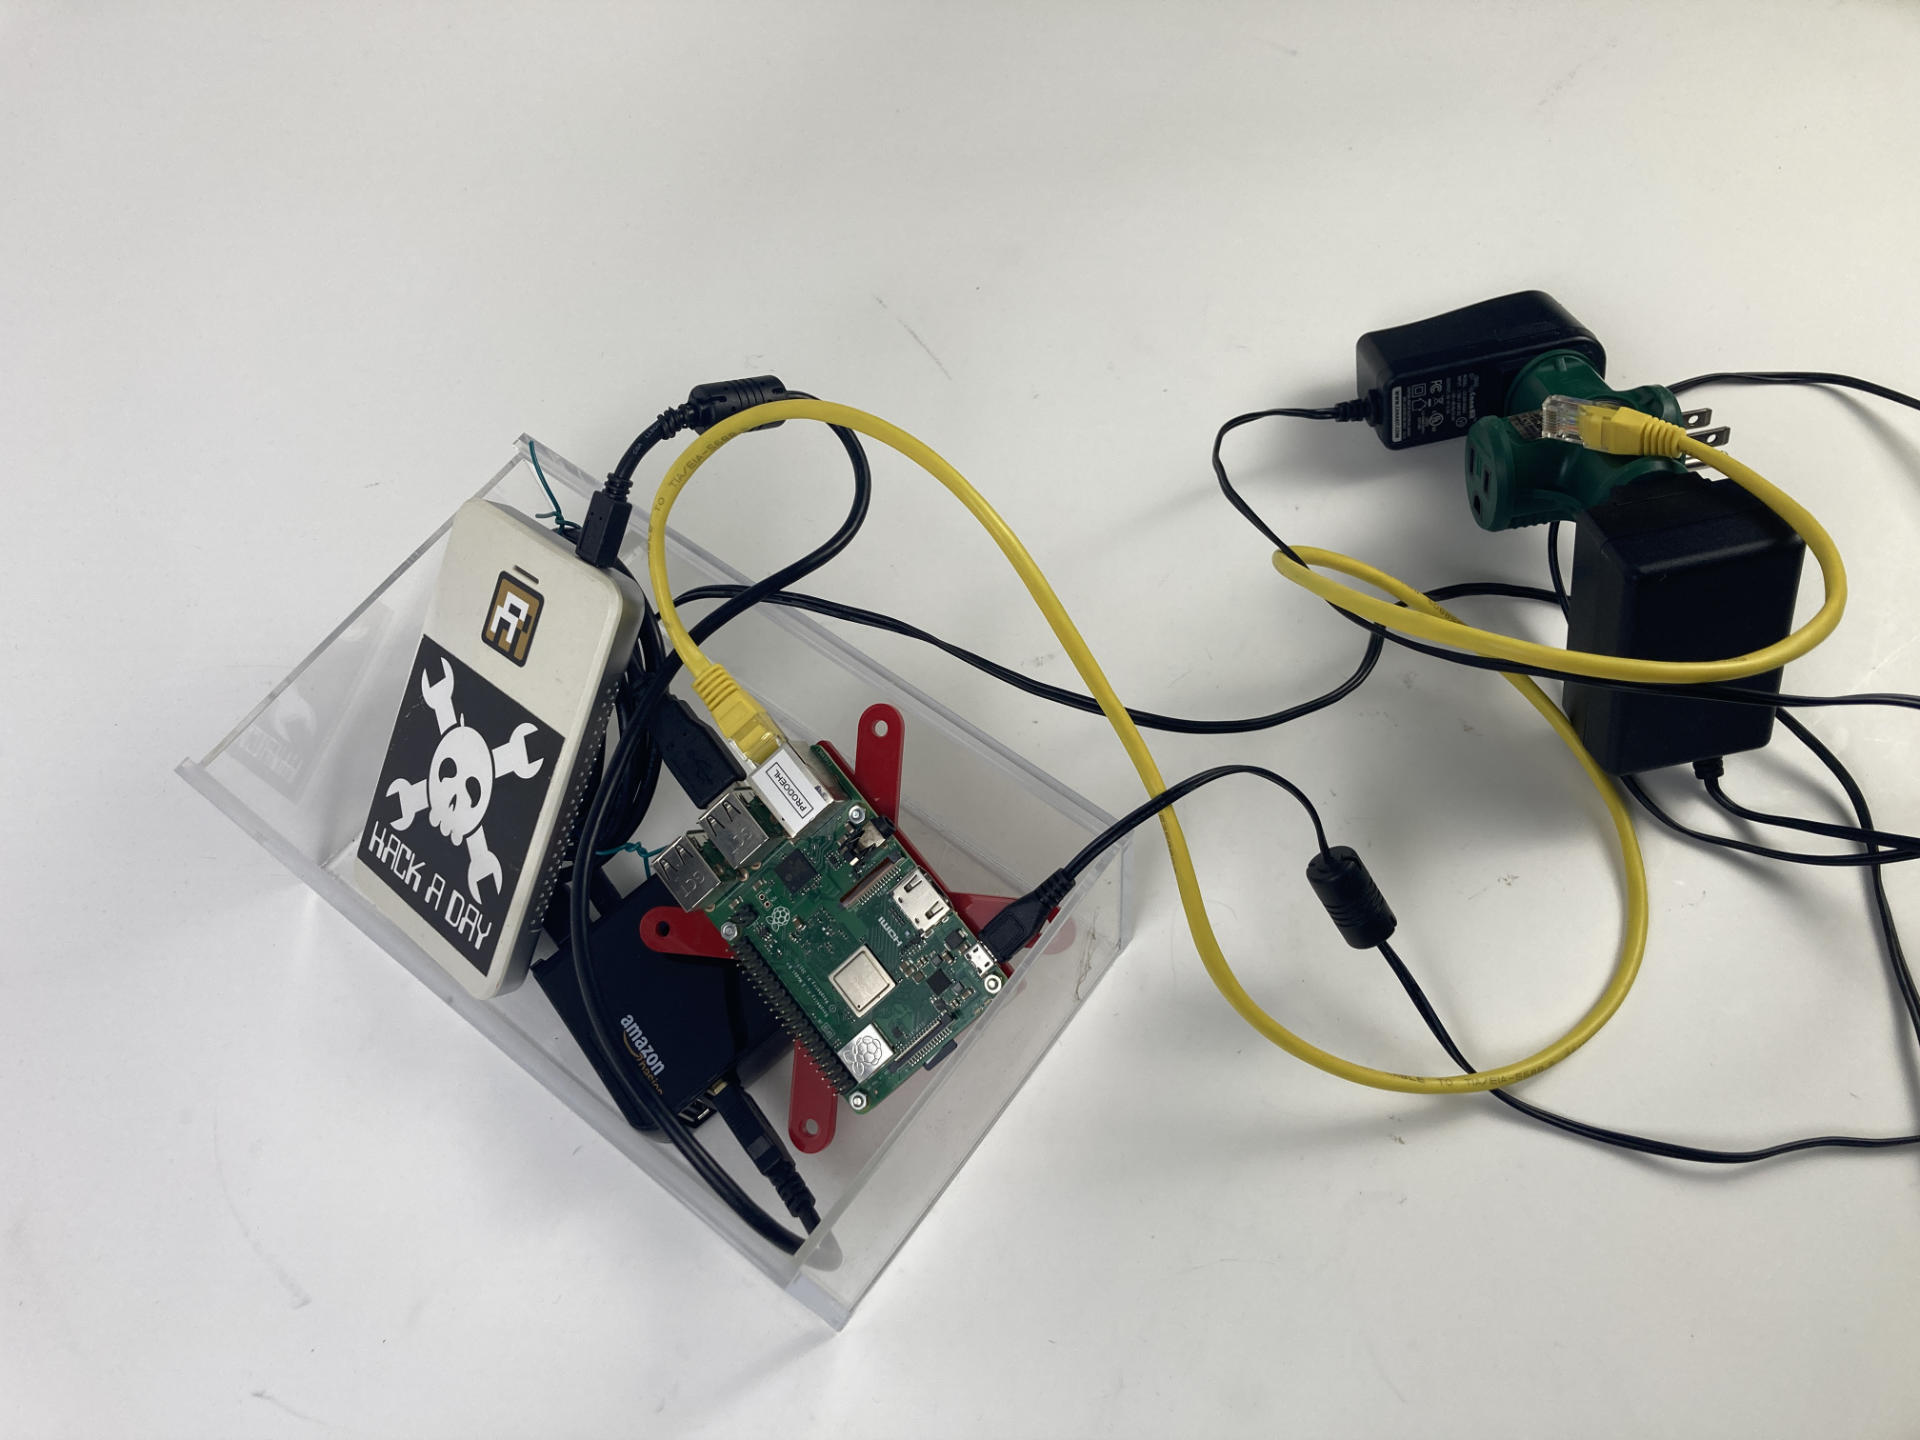
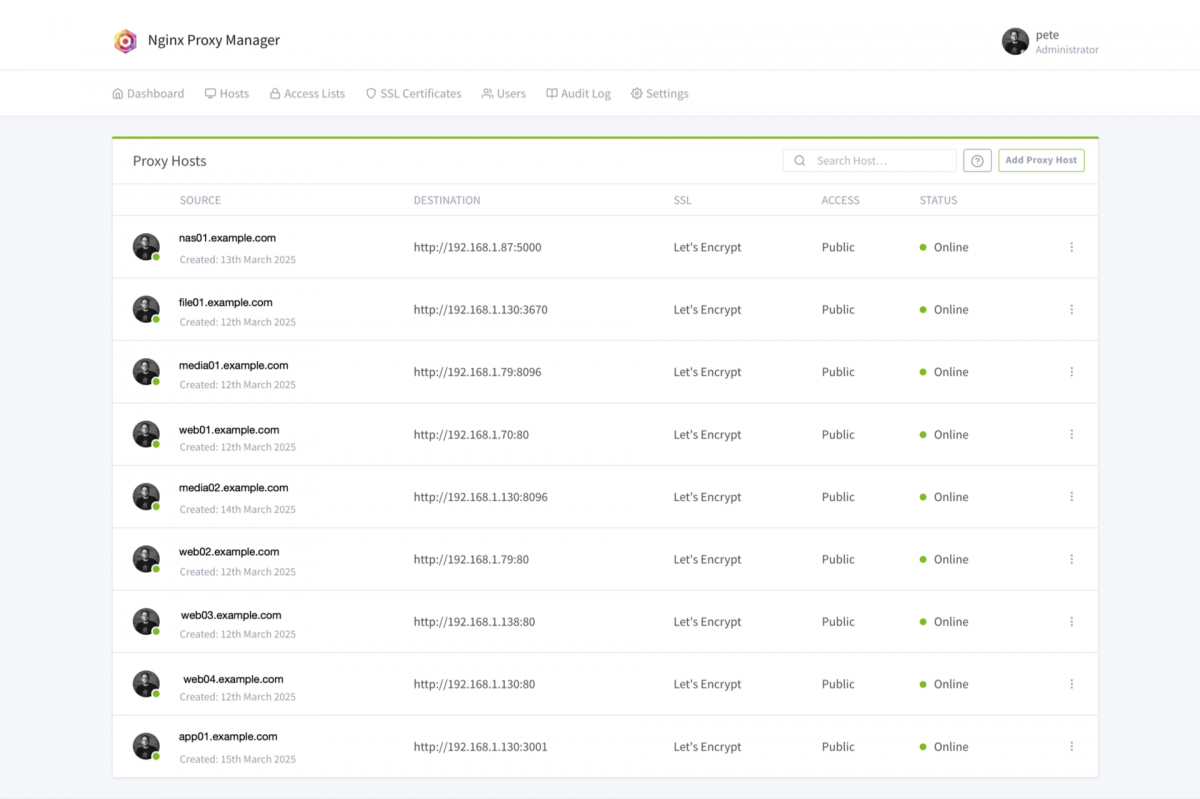
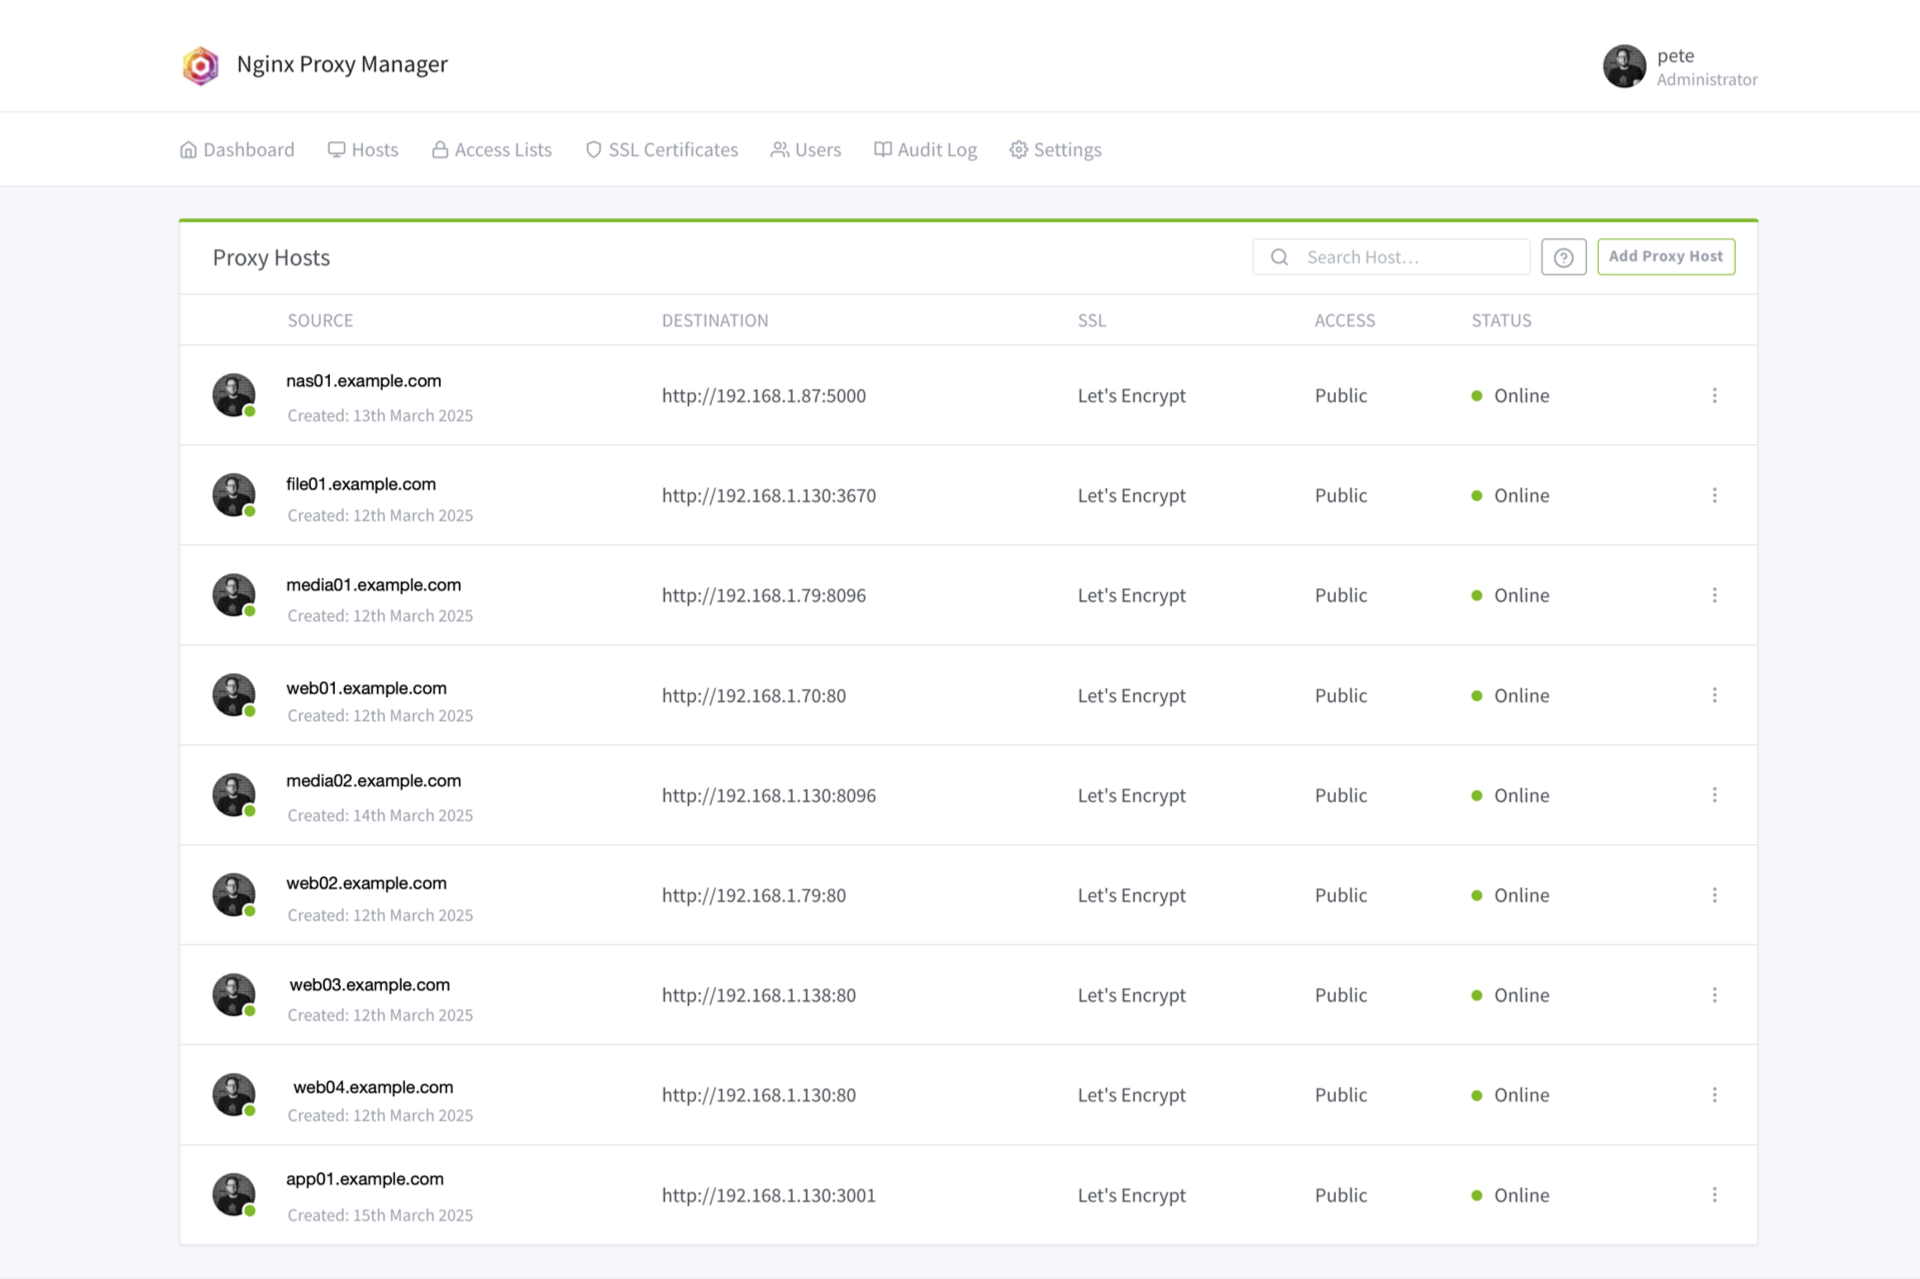
Anyway, I was using port forwarding for Jellyfin, but I wanted to add a few more things I could access and rather than faff about with a whole lot of port forwarding I just forwarded one thing (port 80) to Nginx Proxy Manager which runs on a Raspberry Pi at my house. This single little computer routes all the requests you see in the image above.

I used subdomains to determine what goes where, as I have multiple computers on my network, and some run multiple services on different ports. So if your home IP address is 1.2.3.4 and you normally connect to 1.2.3.4:8096 (ip_address:port_number) you can set up the proxy to accept requests from media01.example.com (on port 80, which is the default) to go to the internal computer at 192.168.1.79.8096 (assuming you own example.com, added a subdomain, and pointed it at your home IP address that is!)

I should note that when I did the port forwarding for the computer running Nginx Proxy Manager I got this scary warning about breaking things… and nothing broke.

Why would you want to use a proxy manager instead of just doing port forwarding? Well, besides making things clean (not having to worry about port numbers) you can use Let’s Encrypt with Nginx Proxy Manager and it’s extremely easy to add secure TLS certificates so your traffic is encrypted. Without this anything you log into on your home network is done via plain HTTP which is not encrypted, so it’s like writing your password on a postcard.

I mentioned I am running this on a Raspberry Pi. It’s an older one, a Model 2 or 3 I believe, but honestly its all that is needed. The nice thing about “Home Cloud” stuff is that you probably won’t have a lot of users. For my stuff it’s pretty much just me. Maybe a few family members might access things at some point but I’m not too worried about the Pi not being able to handle it. If the SD card dies and the Pi stops working at some point the worse that will happen is I won’t be able to access things from outside the house until I fix it. So failure isn’t catastrophic. Our (outgoing) home Internet connection will not be affected.

Categories
Uncategorized

OpenMediaVault NAS

I’ve been meaning to play around with setting up NAS (Network Attached Storage) device for a while now, and I’ve got a lot of old Raspberry Pi computers around so… I got openmediavault running on a Raspberry Pi and connected an old USB hard drive to it. It worked pretty well! I was mostly testing things and didn’t really have this plan to move all of my files to it, which is good because I killed it. I mean, it died. The hard drive, not the Pi.

I had to connect the drive to the Pi using a USB hub so the drive would get enough power. I honestly grabbed some old random hard drive enclosure not realizing at the time the drive inside was at least a decade old. A friend of mine gave me a pile of drives a few years back that were retired from a recording studio. Anyway, the drive died, I got some good lessons in drive repair on Linux, and I moved on.

While the Raspberry Pi seemed to do quite well running openmediavault I also had an old Dell OptiPlex lying around so I decided to use a “real” computer so I could explore things like running containers and more heavy load stuff on the NAS.

Overall I’ve been mostly pleased with things. It’s been quite an improvement since I last ran a NAS on an NSLU2 long, long, ago.

Right now I’ve got a recent SSD drive that is not total garbage as the primary drive, and another old “junk” drive as a backup drive. I used the openmediavault rsync tasks feature to setup a nightly backup to the junk drive. I am sure that junk drive will die at some point but I’ve got a lead on some larger replacement drives from a friend. (Also on the cheap, because that’s obviously how I roll things.)

I’ve got a friend who is a huge fan of Synology and I do admit their stuff is really nice, especially the management interface. If I had unlimited funds I’d probably run out and buy a Synology device (or two) and call it a day… But then again there is a certain appeal to rolling your own solution and learning a lot in the process.

Categories
Uncategorized

A Shorter Raspberry Pi Pico

Yes, I literally cut a Raspberry Pi Pico on a bandsaw. And… it works! It still mounts and it runs code as expected.

I noticed that the back portion of the Pico seemed to have no components, and just traces running to the pins, so it was worth a $4 test.

This makes the Pico a bit closer in size to an Arduino Pro Micro or a Teensy LC.

So why would you want this? You can get a Adafruit KB2040 – RP2040 Kee Boar Driver or a SparkFun Pro Micro – RP2040 but those both use USB-C instead of Micro USB and for specific cases, that may not be ideal.

(I originally posted most of this on Mastodon, but figured I should drop it here as well.)

Categories
Uncategorized

Raspberry Pi as USB MIDI Host

I’ve been building USB MIDI devices for a few years now, and in the past I’ve built a MIDI controller using a Teensy that controlled an Akai MPX16, but overall I’ve not had the need to connect things up for my own needs. But now that I’ve got a few things around that have MID inputs, outputs, and throughs, I need to expand my MIDI capabilities.

It seems there are a whole bunch of devices that just do MIDI over USB and don’t have MIDI jack for “true” MIDI output. I think this is just due to it being cheaper/easier to add a USB jack to devices instead of MIDI jack. (Even though there are TRS MIDI jacks, so size/price shouldn’t be much of an issue. It may be due to demand, since most USB MIDI keyboard/devices sold are just going to be connected to a computer.

If you want to connect your USB MIDI input device to a piece of hardware that has MIDI in but is not a computer you’ll need a USB MIDI Host device. There’s the DOREMIDI USB MIDI Host Box which is about $50 and appears to be USB 1.0. There’s also the DOREMIDI High Speed USB MIDI Host Box which seems to support USB 2.0 for around $60.

As usual, I’ve got a lot of stuff laying around from past projects, so I’m recycling/pulling from existing stock here. I’ve got a Raspberry Pi 3 B (which was probably around $35 when I got it) and then you need a power supply (add $9) and a Micro SD card (add $8) so we’re up to $52 right there… and we need one more thing. I’ve had this USB MIDI Converter Cable for years, and it was about $6 when I got it. So hey, we’re under $60 but just barely.

So what do we do with this Raspberry Pi and other stuff? Well, we grab the disk image from this post titled Raspberry Pi as USB/Bluetooth MIDI host and burn it to the SD card and boot it up. Now, I was convinced I’d need to configure things but… it just worked! There’s a complete install post as well which I perused, especially when I tried to add an OLED screen. (That did not work.) To be honest I was a bit surprised it just worked out of the tin. It even worked fine with one of my 8K Controllers programmed for MIDI output.

Categories
Uncategorized

PrintPi 01 at Milwaukee Makerspace

printpi01-browser

It’s hard to believe I’ve been working on “Time Lapse Bot” for almost 10 years… I mean, you’d think I’d be further along by now! ;)

But seriously folks, the Time Lapse Bot project(s) got much better once the Raspberry Pi camera module came along. It allowed for a small, low-cost, portable camera device with great capabilities. I’ve been using a version to monitor my printer at home for quite a while now, and I turned my old PowerBook version into the Milwaukee Makerspace Webcam long ago, but in recent times it’s seen the most use to… monitor prints at the space.

printpi01-setup

So Mark, our 3D Printing Area Champion, asked about building some Pi camera rigs for print monitoring. So I did. I haven’t really built a proper enclosure, or made it very adjustable, but so far it works.

Basically, it captures a photo every minute, which you can see by connecting to the Pi with a web browser while on the network at the space. If you are not at the space, you can visit a web page that will show a new image every five minutes. (There’s a script that does an SCP of the file to a web server.) The other fun thing it does is compile all of yesterday’s images into a time lapse video you can download. Oh yeah, you can browser through old images and videos on the Pi when on the network, though they get deleted after X number of days to save space on the inserted thumb drive.

printpi01-back

Some scrap wood gets it just about at the right height to see the print bed. (Well, we wedged it up a bit… new version coming soon!) I’ve also got a second one in the works, along with a few enhancements I won’t reveal quite yet.

printpi01-mobile

Since there’s no screen on the Pi you need to pull up a browser on a device and check that it’s pointing where you want it pointing. I had a screen working with one of these and then one day it just decided to never work again. Annoying, so that means no screen for now.

And yes, I really do love the Raspberry Pi.