Categories
Uncategorized

Neko: A Painterbot

Neko

While researching art robots, I stumbled upon Laura Lippincott‘s Neko, a painting bot.

Laura describes herself as such: “I’m an artist that teaches robots to paint. And the robots teach me to paint, it’s symbiotic.” (Well said!)

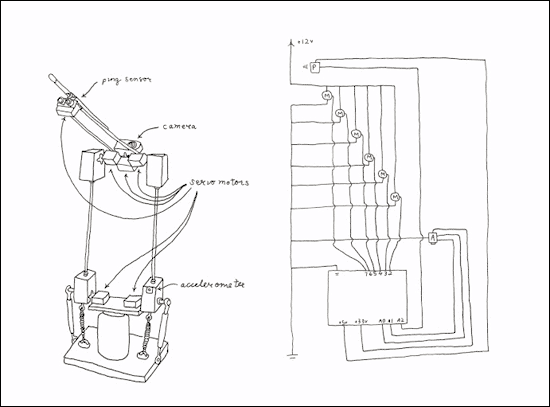
There’s some background info on Neko, and she’s also got a blog at painterbot.blogspot.com. That’s actually how I found out about Laura and Neko, as she had a link to my Arc-O-Matic project in a post.

Neko

Many of the old photos look similar to my early revisions of my rolling drawbots. There’s an element of being made by hand, and sort of hacked together with hot glue and zip ties. People have actually responded to this aesthetic in my own work quite positively, even now as I’m headed more towards refining a design that moves away from that look. (I can’t help it, I also love designing objects, and creating digital files that can be shared.)

Neko

I’ve been (sort of) challenged to introduce paint as a medium to my rolling draw bots. It’s something I’m considering, though it does have its own set of challenges, as a mobile robot doesn’t have the same properties as an arm. Still, I like challenges…

Neko

Laura managed to successfully fund a Kickstarter campaign for Neko last year. (I won’t deny I’ve considered doing a campaign to extend the reach of what I’m doing with my drawbots, though I’m also considering other options for expansion.)

While there’s multiple web sites to learn about Neko and the work Laura is doing, there’s also an occasional video on YouTube. Here’s one from summer 2014 showing Neko at work.

This is great stuff, and I’m learning that there’s a lot of information out there on “art robots”, and I’ll do what I can with the little free time I have to read up on other projects and artists. Feel free to drop me a line if there’s something I should see.

Categories
Uncategorized

FND Improvements

Friday Night Drawbot v1

There haven’t been a lot of updates to my Friday Night Drawbot project lately, but things are picking up again.

Pictured above is version 1, which was built back in 2011, on a Friday night, in my basement. It drew circles. (And that’s it.)

Friday Night Drawbot v3

The programming got much better, and I ended up rebuilding the chassis a few times. This is what I like to call “version 3” of the Friday Night Drawbot, and is still in use today.

FND

Let’s call this version 3.5. We’ve shed the old corrugated plastic in favor of a replacement designed digitally, and created with laser-cut wood.

The front plate that holds the pen can now easily slide forward and back, and is held in place by a pair of screws and wing nuts.

FND Drawing

I started the redesign process by taking apart the drawbot and measuring things with the calipers. I then used Inkscape to create (on multiple layers) the parts needed, which consists of the main plate, bottom plate, and pen extender plate.

FND Laser Cut

Here are the pieces separated out and ready to be laser-cut, or, cut in some fashion, I should say…

Old Plastic Body

I tore apart the old chassis which was hot glued to the servo motors, and held together with rubber bands. I had to heat things up to release the glue, so it’s a bit destroyed. No loss!

FND Paper Prototype

This is a paper prototype I created with the Silhouette Cameo, which does a fine job of cutting thick paper. I often prototype cutting things with the Silhouette because, well, it’s in my basement, so I always have access to it (unlike a laser cutter.) I could easily print on paper as well, but I find that with the cutter close by and easy to use, I use it a lot. It helps to have physical things cut and in front of you sometimes.

FND Bottom

Here’s the bottom view of the laser-cut version. There’s a lot of 8/32″ hardware holding things together, mainly because SAE is cheaper than Metric around these parts. (Drat!)

You can see that the two wing nuts hold the pen extender plate in place, so it’s easy to loosen the nuts and slide things around. (The slot could probably be a little narrower next time.)

There’s also some regular nuts holding the bottom plate to the main plate to hold the servos in place. The 3mm Baltic Birch flexes a bit though, and may not be the best solution.

Pen Holder (Bottom)

There’s a captive t-nut to hold the pen in place. It’s a good idea, but poorly executed here.

Pen Holder (Bottom)

The screw does hold the pen, but again, the 3mm wood is a little thin for this to work well. It’s also difficult to tighten and loosen the screw without a screwdriver. I really need a screw that allows you to use your fingers, like the one on the Egg-Bot. I’ll probably make a 3D printed screw-thingy for this.

Detour! I often wonder/worry about mixing laser-cut stuff with 3D printed stuff, and I’m not sure why. Maybe it’s due to the recent kit design work I’ve been doing where we try to make everything laser cut, mainly due to speed and efficiency of production. In this case though, I’d see the 3D printed screw-thingy as an “enhanced” piece, so it should be totally fine. Or I could, you know, use a wing nut. (End Detour!)

Pen Holder (Side)

As mentioned, I find the 3mm wood a bit thin. This whole design is really just 2 dimensional, or maybe 2.5 dimensional if you want to stretch things a bit. I want to have the next iteration be much more 3 dimensional. I may stay with laser-cut wood for most of it, but there is a lot to explore in the design for assembly aspect of things.

FND

I may play more with this version, introducing minor improvements, or just move on to the next revision, which will be much more box-like, and move away from the flat plates.

Since I like to build things really fast, it’s hard to know what will happen next.

Categories
Uncategorized

Birth of a Robot (Army)

Delta Robots

Sometime in 2013 I stumbled upon the blog of Sarah Petkus titled Robotic Arts. Probably because, you know, I occasionally build art robots. Sarah is a member at SYN Shop, a nice looking hackerspace in Las Vegas, and she’s been working on building delta robots for a while now. She’s got a great post about the journey from using household junk to designing and printing 3D parts to build her robots. Check out Robot Army : From Tupperware to 3D Printing.

Junkbox (Delta-style!)

She also been collaborating with Mark Koch at SYN Shop and turned this whole delta bot thing into a Kickstarter (successful!) that is going to help fund an art performance with an army of delta robots. And hey, while they’re at it, they’ll also be turning their robot into a kit through ROBOT ARMY, a new venture to manufacture robot kits for the do-it-yourself market.

I started working on a delta robot last year because I’ve got a project planned that requires one, but I still haven’t finished it. I might consider getting a kit if it makes sense to speed up my process and get to the “art” part of a future art robot I’ve got planned.

Categories
Uncategorized

Miltalkee (The Talking Robot)

Miltalkee

Wow, somehow it’s been months since I first mentioned my entry in the Great Robot Showdown, and it’s been another (or a few more) since I promised a write-up on said robot… so here it is.

Proposal

For the Flying Car Milwaukee 2013 event there were a number of competitions held, one of which was the “Great Robot Showdown” which tasks people to “create an energetic, entertaining robot that actually does what it’s designed to do.” And noted that the robots would be “unleashed at the Flying Car Gala to delight and entertain the crowd.”

How could I resist? I had already shown things like the Friday Night Drawbot and the Arc-O-Matic at previous events in Milwaukee, so I figured I needed something new, something specifically for this event.

Miltalkee

I wrote up a proposal describing what I planned to build, included a quick sketch, and some links to previous projects, and mailed it in. About a week later Dana and I were putting a bid on a house, and I got a call. I checked my voicemail later and found out I was selected, which was awesome, but it also meant I had about 30 days to build the robot, move everything I own, and also take part in a gallery night I had committed to. Fun!

Miltalkee

It was time to get to work! My plan was to cut all the pieces of the robot from 3mm Baltic Birch plywood. That stuff is great to work with if you’ve got a laser cutter handy, and we happen to have one at Milwaukee Makerspace! There was a lot of cutting to do. Basically the robot consists of 8 “boxes” of various sizes to comprise the body, head, legs, feet, and arms. After cutting and assembling everything (with glue and strategically placed magnets) the pieces were painted with grey primer, and then with metallic silver paint. All sprayed in my home-built spray booth.

Miltalkee

I ended up spending the majority of my time doing the physical build, all the time thinking the programming would be the easy part. I was (mostly) right. Since I was using a Raspberry Pi I was in my comfort zone. A bit of sudo apt-get for the right packages, some Perl, a text file, and we had a talking robot. I ended up abandoning the idea of a screen or LCD display of any kind due to time constraints, but it’s an idea for the future.

Miltalkee

There is a hole in the center of Miltalkee’s chest where a speaker goes. It’s a powered speaker, using 3 AAA batteries, which works well in a semi-quiet room, but in a large room filled with people and music, it’s not exactly loud. (I should thank Dori Zori for turning down the music a bit!) If I ever want Miltalkee to be extra loud, I can always run the output to an external amp I guess.

One of the neat things about Miltalkee is the construction. The faceplate and chestplate are interchangeable, and if I get ambitious in the future, I can swap them out for new ones. This should make upgrading to a screen fairly easily.

There’s a bunch of technical stuff I’ve not included in this post, mainly because I’ve already rambled too much. In future posts I’ll talk about the Raspberry Pi, the code, and a few other construction secrets.

Miltalkee

Enjoy!

Categories
Uncategorized

Flying Car – First Place!

Flying Car 2013

Well, it certainly has been a busy couple of weeks!

If you remember what was going on a month ago, I was selected to build a robot for the Flying Car Milwaukee event which took place on June 7th, 2013.

I actually finished the robot on time, presented it at the event, and won first place, which consisted of the lovely trophy you see pictured above, and $1,000. Sweet!

I’ll have a full write-up of the robot and the event soon, but just wanted to drop this post as a “whew!” mark to indicate, yeah, it all happened.

Oh, my friend Dena Nord also won first place in the design competition with her poster that featured an augmented reality component. Congrats, Dena!

In the last few weeks I also spoke at WordCamp, finished a series of paintings (post to come), took a FCPX class, filmed a TV commercial, and went to work nearly every day.

And oh yeah, I packed everything I own and moved! (Hence the boxes surrounding the trophy on the new mantle. We still need to finish unpacking.)