Categories
Uncategorized

Art Robot (It’s a thing.)

Havey Moon's Drawing Machine 1

Harvey Moon‘s been at this longer than I have, and he’s been an influence for years. This video is excellent, and says much of what I’ve been thinking about recently.

One of things I’ve said about my own drawing robots is that the “performance” they create while functioning is a part of the art.

From Harvey:

“When I show this machine it’s a performance. It’s the machine performing and generating the work, and that to me is the art.

Are the drawings the art, or a by-product of the performance, or documentation of the performance?

I’m also focusing on the design of the robots. This is the ‘Digital Fabrication and Design’ side of things. The robots are objects. I create them by using software to designing them, and then using CNC machines to create the various pieces, and then assembling them.

There’s sort of a lot going on, I just need to organize it all.

Categories
Uncategorized

FND Improvements v3.75

FND v3.75

A few weeks ago I designed what I like to call “version 3.5” of my main drawbot platform. The improvements were still mainly a two dimensional design, with horizontal plates sandwiching things together. I found two main faults with this design, so I started working on improvements.

The first improvement was in the tool holder. The one with rubber bands proved to not be strong enough to hold tools in place easily. The rubber bands were a pain to work with. (They did work well enough to hold clay carving tools though, and we ran the drawbot across some slabs of clay.)

I wanted to move to a new design where a screw could be used to hold the tool. I know that the Egg-Bot uses a screw, and for the unfamiliar, it looks like this.

Egg-Bot Pen Holder

This is a great design, but for various reasons I chose not to attempt to copy it. Instead I borrowed some ideas…

FND Pen Holder

The screw I’m using is a standard 8-32 screw with a wing-nut threaded on backwards to the head, and then a hex nut is added and tightened against the wing-nut. On the other end is another square nut to push against the tool, and again there’s a hex nut tightened against it.

In the above image showing the parts for the tool holder you’ll see the first and third pieces have holes for the screw to go through, while the second plate has a square hole to hold the square nut between them. So far it’s working quite well, and holds things without any slipping or wobbling.

Most of the rest of the plate is similar to the previous version, with the exception that now there is no bottom plate, as this mounts directly to the body.

The previous version relied on four screws and eight hex nuts to hold the motors between two plates. This was less than ideal for a number of reasons. First, there was no good way to align the motors and tighten things up. Alignment isn’t a crucial element of the drawbot, but it’s nice to have. The second issue was structural, as the 3mm wood was flexing quite a bit. I didn’t even try acrylic, but it probably would have been worse.

FND Servo Mount

The new version of the motor mount is much improved! I’m sure I’ll have an issue with some of the other servos I’m using, as they aren’t all the same size, but it should be as simple as printing two new parts with the properly sized and spaced holes. Again, there’s only three parts because this mounts to… the body!

FND Body

Here’s the new body platform. It’s got all sorts of mounting slots and such. The tool holder gets assembled and then attached to the body. (The “assembly” involves a lot of wood glue at this point.) The motor mounts are glued into place on the body as well. It’s nice finally having things rigid and not held together with hot glue and rubber bands. (Well, some things.)

At this point I’ve basically got a (semi-) generic platform with no specifics on electronics or components. You can fit any number of controllers and battery packs on it. That will probably change in the future as I choose the parts I plan to use.

FND 3.75 Plate

The whole plate fits in a 280mm x 100mm area. That’s just under 12″ x 4″, which means you could fit three of them on a 12″ x 12″ sheet of Baltic Birch.

On to the next revision!

Categories
Uncategorized

Drawbot Tool Holder

One of the issues I’ve had with the Friday Night Drawbot is the part that holds the tool has never been very solid. In early revisions I used corrugated plastic, and would just use an X-ACTO knife to cut a hole for a Sharpie, and it would work well enough, and when the plastic wore out, I’d replace it with a new piece. (The most recent body design failed miserably at producing a good pen holder.)

Since I’ve been using other things besides Sharpies, including pencils, charcoal, paintbrushes, clay tools, etc. I decided to design a proper tool holder.

Tool Holder Mockup

I typically use Inkscape to design laser-cut things, but often visualizing a 3D object, even if it will be made from flat pieces, can be difficult, so I decided to use OpenSCAD to model it in 3D. It definitely helped me picture how it would be assembled. I also had the idea of exporting the “plates” from OpenSCAD into DXF files I could then use for the final laser-cut design but that failed miserably.

Sizing

Here’s the start of my layout in Inkscape with the pieces laid flat. This let me get a good idea of the dimensions.

Tool Sizes

I wanted the tool holder to be adjustable, and handle tools from 8mm wide to 16mm wide. (In this top view, the blue circle represent the different sized tools, the yellow piece pushes the tool into a v-shaped piece to hold it tight.)

Layout

Here’s a top view of the layout with some guides to help align things. This is designed for 3mm Baltic Birch (though acrylic could be used.) The slots and tabs are all set for 3mm. There are no fasteners planned as I’ll be gluing it all together.

Layout

Another view from the top, this time with some pieces rotated 90 degrees to see how they will fit together.

Laser Ready

All of the pieces laid out flat and ready to be laser cut. I used 3mm Baltic Birch which worked well using the Epilog Zing 40 watt laser cutter at the DCRL. (I also ended up adding yet another laser cutting workflow to my list. I now have three different methods depending on which of the four lasers cutters I typically use.)

Tool Holder

Assembled with some wood glue, and using rubber bands to hold the tool in place. It works… sort of. I’m already planning improvements, so expect version 2 to arrive by next week. I may switch to a screw mechanism for tightening, which was my original idea, as the rubber bands aren’t working as well as I hoped.

Categories
Uncategorized

Neko: A Painterbot

Neko

While researching art robots, I stumbled upon Laura Lippincott‘s Neko, a painting bot.

Laura describes herself as such: “I’m an artist that teaches robots to paint. And the robots teach me to paint, it’s symbiotic.” (Well said!)

There’s some background info on Neko, and she’s also got a blog at painterbot.blogspot.com. That’s actually how I found out about Laura and Neko, as she had a link to my Arc-O-Matic project in a post.

Neko

Many of the old photos look similar to my early revisions of my rolling drawbots. There’s an element of being made by hand, and sort of hacked together with hot glue and zip ties. People have actually responded to this aesthetic in my own work quite positively, even now as I’m headed more towards refining a design that moves away from that look. (I can’t help it, I also love designing objects, and creating digital files that can be shared.)

Neko

I’ve been (sort of) challenged to introduce paint as a medium to my rolling draw bots. It’s something I’m considering, though it does have its own set of challenges, as a mobile robot doesn’t have the same properties as an arm. Still, I like challenges…

Neko

Laura managed to successfully fund a Kickstarter campaign for Neko last year. (I won’t deny I’ve considered doing a campaign to extend the reach of what I’m doing with my drawbots, though I’m also considering other options for expansion.)

While there’s multiple web sites to learn about Neko and the work Laura is doing, there’s also an occasional video on YouTube. Here’s one from summer 2014 showing Neko at work.

This is great stuff, and I’m learning that there’s a lot of information out there on “art robots”, and I’ll do what I can with the little free time I have to read up on other projects and artists. Feel free to drop me a line if there’s something I should see.

Categories
Uncategorized

FND Improvements

Friday Night Drawbot v1

There haven’t been a lot of updates to my Friday Night Drawbot project lately, but things are picking up again.

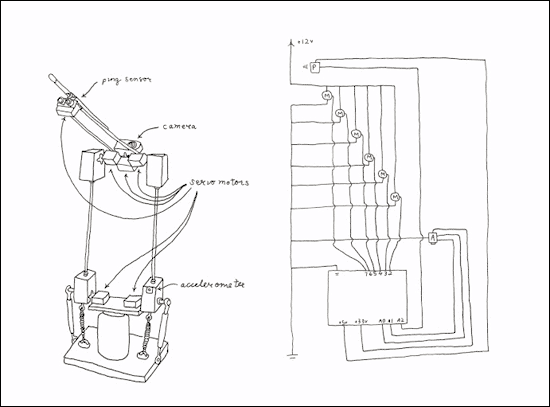
Pictured above is version 1, which was built back in 2011, on a Friday night, in my basement. It drew circles. (And that’s it.)

Friday Night Drawbot v3

The programming got much better, and I ended up rebuilding the chassis a few times. This is what I like to call “version 3” of the Friday Night Drawbot, and is still in use today.

FND

Let’s call this version 3.5. We’ve shed the old corrugated plastic in favor of a replacement designed digitally, and created with laser-cut wood.

The front plate that holds the pen can now easily slide forward and back, and is held in place by a pair of screws and wing nuts.

FND Drawing

I started the redesign process by taking apart the drawbot and measuring things with the calipers. I then used Inkscape to create (on multiple layers) the parts needed, which consists of the main plate, bottom plate, and pen extender plate.

FND Laser Cut

Here are the pieces separated out and ready to be laser-cut, or, cut in some fashion, I should say…

Old Plastic Body

I tore apart the old chassis which was hot glued to the servo motors, and held together with rubber bands. I had to heat things up to release the glue, so it’s a bit destroyed. No loss!

FND Paper Prototype

This is a paper prototype I created with the Silhouette Cameo, which does a fine job of cutting thick paper. I often prototype cutting things with the Silhouette because, well, it’s in my basement, so I always have access to it (unlike a laser cutter.) I could easily print on paper as well, but I find that with the cutter close by and easy to use, I use it a lot. It helps to have physical things cut and in front of you sometimes.

FND Bottom

Here’s the bottom view of the laser-cut version. There’s a lot of 8/32″ hardware holding things together, mainly because SAE is cheaper than Metric around these parts. (Drat!)

You can see that the two wing nuts hold the pen extender plate in place, so it’s easy to loosen the nuts and slide things around. (The slot could probably be a little narrower next time.)

There’s also some regular nuts holding the bottom plate to the main plate to hold the servos in place. The 3mm Baltic Birch flexes a bit though, and may not be the best solution.

Pen Holder (Bottom)

There’s a captive t-nut to hold the pen in place. It’s a good idea, but poorly executed here.

Pen Holder (Bottom)

The screw does hold the pen, but again, the 3mm wood is a little thin for this to work well. It’s also difficult to tighten and loosen the screw without a screwdriver. I really need a screw that allows you to use your fingers, like the one on the Egg-Bot. I’ll probably make a 3D printed screw-thingy for this.

Detour! I often wonder/worry about mixing laser-cut stuff with 3D printed stuff, and I’m not sure why. Maybe it’s due to the recent kit design work I’ve been doing where we try to make everything laser cut, mainly due to speed and efficiency of production. In this case though, I’d see the 3D printed screw-thingy as an “enhanced” piece, so it should be totally fine. Or I could, you know, use a wing nut. (End Detour!)

Pen Holder (Side)

As mentioned, I find the 3mm wood a bit thin. This whole design is really just 2 dimensional, or maybe 2.5 dimensional if you want to stretch things a bit. I want to have the next iteration be much more 3 dimensional. I may stay with laser-cut wood for most of it, but there is a lot to explore in the design for assembly aspect of things.

FND

I may play more with this version, introducing minor improvements, or just move on to the next revision, which will be much more box-like, and move away from the flat plates.

Since I like to build things really fast, it’s hard to know what will happen next.