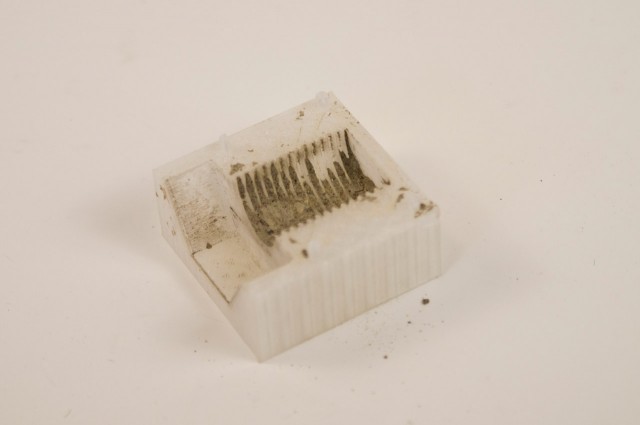
Categories
Uncategorized

The Fondoodler

Fondoodler

I picked up a 3D printing pen a while back, and yes, I should blog about it, but in the meantime I’ll just drop this post about the Fondoodler, which is a little like a 3D printing pen, but more like a hot glue gun for cheese… or chocolate!

When I got the Fondoodler (back in January) I tried it with some cheese, but didn’t really have time to experiment much beyond putting cheese on crackers, so I wanted to try chocolate, and since I had a camera at the ready, I documented the process.

choco-knife

I started with a bunch of little Hershey Chocolate Bars and cut them up up fit in the feeder tube. When I did this with cheese it was easy to jam it in tight, which was more difficult with the chocolate. Perhaps cutting it into smaller pieces would have helped.

choco-tube

Once the feeder tube is loaded up you drop it into the gun, er, “Fondoodler” and then put in the push-stick so it operates like a glue gun with the trigger that advances the glue, but it pushes the stick forward (and the stick has a little Silicone piece that goes on the front end.

And then you make messes! If you’ve ever used a glue gun, you know that the flow is pretty consistent as you feed the glue in. With chocolate, it was hard to keep an even flow/pressure while using it. Now, this may have been because I had large pieces of chocolate and did not cut them down smaller, which may have led to air pockets. I don’t know… first test, and all that.

choco-art

Here’s a few quick and dirty tests of running chocolate through the Fondoodler. Yeah, nothing too impressive yet. I made a few more attempts… (I used parchment paper as my “printing surface”.)

choco-pile

…and I got this awesome “chocolate pile” as I’m calling it. This could make a nice topping for a cake or some other dessert. Maybe. If anything, it’s abstract art. In chocolate. That you can eat. The best thing about the Fondoodler may be that you can eat your mistakes.

choco-mess

Cleanup was, a bit of a mess. (“Mess” seems to the operative word for this experiment.) The chocolate got all over the Fondoodler, and required quite a bit of cleaning! I ended up spraying a lot of water over everything, which should be fine, as long as it all dries out before I plug it in again. (The Fondoodler does come with a special cleaning brush for clearing out the tip. It works well, for the tip.) When I tried using cheese I did not have these problems.

choco-pete

Probably my best piece… “Pete” in chocolate, which sounds amazing, if I do say so myself!

I’m sure I’ll try a few more Fondoodler experiments now that I’ve got some idea what’s possible and how it works (and doesn’t work.)

Categories
Uncategorized

Maker Faire Milwaukee Needs You!

Hello Friends, I’m here to tell you about Maker Faire Milwaukee, and to ask for your help. If you’re not familiar with Maker Faires, they are events that happen around the world, and are part science fair, part county fair, and part something entirely new. We call it the Greatest Show (& Tell) on Earth.

Most of the Maker Faire are smaller in scale, typically a one-day or even half-day event with a dozen or so people sharing their passion for making things. Here in Milwaukee we decided to go big. We did a two-day event which grew into a three-day event by the third year (the third day being a Field Trip Friday for disadvantaged youth in our community) and we also hold the distinction of being the largest FREE Maker Faire in the North America. In 2015 we had over 50,000 attendees see amazing things, and experience hands-on making. Many attendees were kids, but Maker Faire is not just for the young, or the young at heart, we’re for anyone who likes to learn and loves to see new things.

henry

This is Henry. When he was 6 years old he came to Maker Faire Milwaukee, and when he left he told his dad that he wanted to make a robot for Maker Faire, and in 2016 he brought his creation to show it off and share it with others. We love this kid! We want everyone to be inspired by Maker Faire and leave wanting to create new things.

bill

Here’s Bill teaching a young girl how to use a nail gun to build a shed. Bill works in the Be A Maker space at the Betty Brinn Children’s Museum and spends his days teaching kids how to build the world they’ll inherit. He probably showed a few hundred kids how to properly use a nail gun over the course of the weekend.

r2d2

Oh yeah, not just for kids! We’ve got plenty of adults who live normal lives and have jobs and families and spend their free time building things, like props or robots or costumes from their favorite films, books, and TV shows. Droids, Daleks, 3D Printers, machines that etch wood with electricity, you name it!

jenie

There are also professional artists and art instructors who take the time to teach people about their art, and how to make it, and how to clean the ink off of your hands after you’ve make your first block print. You might discover that something you’ve never done before is fascinating, and you can talk to someone who can tell you all about it.

jake

Or maybe you’ll see a college kid playing with 20,000 watts of power flowing from a home-built Tesla coil while wearing a suit of armor he made himself at Milwaukee Makerspace. Who knows?

Now, I did say that Maker Faire Milwaukee Needs You, and we do. To make this incredible event happen for our community, including field trips for disadvantaged youth, and a professional development conference for teachers that happens during Maker Faire, we need you. We need help from sponsors, we need help from volunteers, we need help spreading the word, and we need you and your family and friends to come to Maker Faire Milwaukee and see what we are trying to do for the Greater Milwaukee Area.

Find out more at milwaukee.makerfaire.com

Categories
Uncategorized

The July Update

beach

Whew! Hey folks, I’m back. It’s been over a month since my last post, but don’t worry, things are going good, they’re just going a lot, or there’s a lot going on, or something like that. I’ll just update everything.

First of all, I spent a week at the beach. The ocean beach! We went out to Maryland and I was actually out of the office for five whole days! I barely worked at all, besides a phone call and a bunch of emails to keep thing moving for Maker Faire Milwaukee.

Oh yes, we’re just 60 days out from Maker Faire Milwaukee and there’s a heck of a lot of things to do this year. I’m also headed to Maker Faire Detroit this week. (And there’s a chance I’ll hit up Pittsburgh and/or Orlando as well.)

One of the projects I’ve been working on for Maker Faire Milwaukee is called NoiseMaster 3000 which will consist of a bunch of DIY noise making devices. Here’s a few in progress.

A post shared by Pete Prodoehl (@raster)
on

A post shared by Pete Prodoehl (@raster)
on

A post shared by Pete Prodoehl (@raster)
on

I’ve been combining 3D printed parts with scrap wood and really enjoying the process. I’ve been thinking a lot about how the two materials fit together, and I’ll probably write up some thoughts on that later.

Oh yeah, I also went to Kansas City with a Wienermobile. That was exciting. Find out more! Meanwhile, we’re still working on our no-weld vehicle, sometimes using wood where maybe wood doesn’t belong. Oh well! Also, photos from Kansas City!

I saw Wonder Woman and The Big Sick and they were both great movies. I’ve also been trying to get caught up with Doctor Who, but besides that I still don’t watch very much TV. (I haven’t seen Game of Thrones or House of Cards or Breaking Bad. I hear there’s a new Star Trek showing coming out soon!?)

I’ll be speaking at the Inventors & Entrepreneurs Club of Kenosha & Racine next month on the topic of Arduino. I should probably prepare for that. Also, the mayor of South Milwaukee wants to meet with me, because of something I posted on Facebook. (Don’t worry, I’m not in trouble!)

Okay, well… that’s all I can think of for this update. You can follow me on Instagram for previews and peeks at my current projects, and I sometimes post things on Facebook, as well.

mfbuttons

Categories
Uncategorized

Wheels of Improvement

In our last post about the Power Racing Series which was aptly titled Wheels of Fail, we talked about the crappy Harbor Freight wheels and how they sometimes explode (not really) and ways to strengthen them. This time we’ll focus on adapting them to a 1″ live axle setup.

If you’re not sure what a “live axle” is, it describes a setup where the entire rear axle spins and (at least) one wheel is attached to the axle to spin with it. Here’s a good description.

Let’s get some parts! Over at BMIKarts there’s a 1″ live axle at around $25 (depending on length) and you’ll also need a 1/4″ Keystock that is used in the Keyway of the axle to hold the wheel in place.

Harbor Freight Wheels

Okay, let’s get some wheels! Sadly, the $4.99 Harbor Freight wheel now seems to be $5.99. With a 20% off coupon it comes in around $4.80. You’ll need two wheels for this setup, so budget $9.80 for our drive wheel. (But you’ll have a spare tire and inner tube.)

Harbor Freight Wheels

Here’s our Harbor Freight wheel. It’s got (poor quality) bearings and ready to fit on a 5/8″ axle, but since we’re using a 1″ axle we need to make some modifications. Oh, make sure you let the air out before you take it apart!

Harbor Freight Wheels

Remove the four bolts and throw them away. Well, you can save them for something, but on one wheel there were the thinnest washers I’ve ever seen, and the other had no washers. The bolts are too short so we won’t be using them. You’ve got the tire and inner tube and two rims…

Harbor Freight Wheels

Get rid of the rim with the extension tube on it, and use the shorter rim from the second wheel. You got two, remember? Did you take them both apart? Good! You did it right!

Harbor Freight Wheels

There’s one more thing we’ll need. The Galvanized Wheel Hub with (4) 5/16″ Bolts on a 2-13/16″ Circle (1″ Bore) for $13. You can get the version with no hardware. I got the version with 5/16″ jam nuts, so I had to knock them out with a hammer. (A few light taps were all that were needed.)

Depending on your setup you might want a different solution. The Harbor Freight wheels work with a 2-13/16″ hole pattern, so use that. And if you don’t use a 1″ axle, choose what matches your axle.

Harbor Freight Wheels

I put some 1/4″-20 bolts on the hub along with some washers and nuts. (You might want grade 5 steel or something a bit stronger than your typical hardware store bolts.)

Harbor Freight Wheels

Put it all together! Take that hub, stick it through the rims, and don’t forget the tire! You’ve got a drive wheel all ready to go on your 1″ live axle.

Harbor Freight Wheels

Make sure you put the air stem on the right side. You can’t access it (and it won’t fit) on the side with the hub. (Which is why we needed two of the short rim pieces from two different wheels.)

Okay, so we’ve now got a drive wheel for a 1″ live axle that was under $25 to build, and required no drilling or cutting or specialized tools. We’ve also got a spare tire and inner tube. We’ve still got to modify the other rear wheel, which will (hopefully) spin freely with some bearings, but that’s a post for another time. (Also, we still have to figure it out!)

Categories
Uncategorized

Square Thing, Round Hole

Meter in Mount

What do you do when you have a square thing and want to mount it in something but don’t have the ability to make a square hole? (Okay, I know it’s a rectangle in this case…) Well, you put the square thing in a round thing and then make a round hole.

With some current projects I’ve been thinking a lot about how things can be done using specific tools, or a limited set of tools. For instance, if you’ve got a 2-1/2″ hole saw you can make a round hole and then drop this into place and hold it down with two screws.

Circle

I started to model this mount before I even had the meter. I drew up a rectangle of the dimensions specified on the eBay listing for the item (hoping they were accurate) and I then drew a circle around it to enclose the meter and rounded it up to 2-1/2 inches as that’s a hole saw size you can actually buy.

meter-05

From there modeling the mount in OpenSCAD was pretty simple. It’s about 25 lines of code, and the panel press fits perfectly. I added two ears to put some #4 screws through to hold it down to the panel.

Meter and Mount (Back)

I’m not totally jazzed about the open back. I supposed I could pour a lot of hot glue in there… Actually, at a minimum I may add some hot glue to the wires to act as strain relief so they don’t get pulled loose. (I supposed modeling some sort of strain relief mechanism into the mount would have been a good idea.)

Meter and Mount

And of course while this version is expected to mount (nearly) flush with the panel, I could easily make that mounts on top of the panel and just has a small hole drilled through it for the two wires. So… many… options.

Meter in Mount