Categories
Uncategorized

Decagon Light

decagon

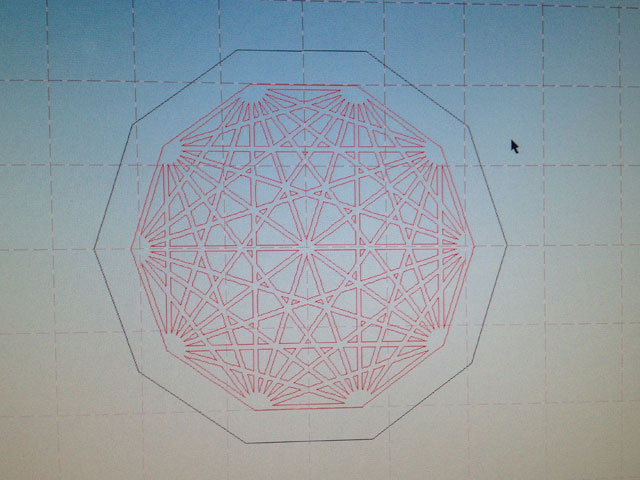
One of the projects I’m working on for Maker Faire Milwaukee is something I call the “DecaLight” which will (hopefully) consists of a decagon-shaped structure with ten light bulbs that are controlled by a set of relays and can turn on and off in pre-programmed sequences. For those unfamiliar with the Decagon, it’s a 10-sided polygon (sometimes called a “10-gon”) and this specific model is a 9-simplex.

Design

Etched Wood

While I started with building a quick and dirty prototype I also decided to build a scale mode. I used the laser cutter at Brown Dog Gadgets to etch and cut a piece of 3mm Baltic Birch plywood.

LED bulb

While the full-sized version will use light bulbs, the scale model will use 10mm LEDs. I just drilled holes for the LED leads since I never got around to adding holes to the laser cutting file.

Painted

Sometimes printmaking techniques come in useful when not making prints. I spray painted the wood and after it dried I rolled on some black ink to make a pure black and white version. For the full size version I’ll be using a CNC router to cut grooves (pockets) and then paint those white while the top surface will be black.

Wood

Here’s the bigger prototype I worked on, which just has a piece of plywood with lamp sockets attached. I got the sockets for cheap from ebay, but they’re terrible.

Sockets

I later spotted some nice ceramic (rather than plastic) lamp sockets at Menards that were just a bit more than the crappy plastic ones, so I’ll probably switch to those.

Hopefully I can get the prototype working in the next week or so. I’ve still got plenty of time to complete the full-scale version, but even with 174 days until Maker Faire Milwaukee, that time will go fast!

A video posted by Pete Prodoehl (@raster) on

Categories
Uncategorized

Body and Machine (and Clicking!)

Make it Move

I’m pleased to announce that for the second year I’ve had a piece selected for Body and Machine 2016: Kinetic and Interactive Art. This year my piece Click Whir Squee will be on display. (The show runs from April 2nd, 2016 to Aoril 23rd, 2016 at the Northrup King Building 3rd Floor Gallery in Minneapolis, Minnesota.)

Click Whir Squee

Since Click Whir Squee involves abusing a piece of hardware that is close to 20 years old, I can’t guarantee it will keep doing what it’s supposed to be doing for the entire run of the show. That’s part of the excitement of kinetic art… and it’s actually integral to the statement this piece makes.

Tape!

I may try to dig up a few more of these TR-1 Minicartridges to swap in when the one in the machine gets destroyed. That might be enough to keep it running, but would rely on someone involved with the show doing maintenance. (Which I’m fine with.)

Cat!

If you’ve already seen the video, you can just enjoy the photo of a cat that has been provided above. (It is called Body and Machine, after all.) Otherwise, here’s a video.

Make it Move

Categories
Uncategorized

Converting DigitNow! BR120 Videos

Digit!Now

During the holidays my uncle asked me about converting old VHS video tapes to digital versions, and he showed me a converter he had found. Knowing that the specs on such things are usually not very specific, but that I’d find a way to make it work, I told him to order it. (The device is a Werecord BR120 Video & Audio Grabber Box from Digit!Now)

It’s simple to use. You just plug in some RCA cables coming from your VCR or old analog video camera, and press the “record” button on the device. It saves a digital file to an Micro SD card.

AVI Format

Oh, yeah… it’s an AVI file. If you don’t know much about AVI, it’s a ‘container format’, which means it could use any of a long list of encoding schemes, and you may have problems reading the file. Since I’m using Mac OS X in 2016 and AVI was introduced by Microsoft in November 1992, I had some problems.

QuickTime Player 10

The first attempt was to open it using Apple’s QuickTime Player 10. No dice. The “Tell me more” button takes you to a page explaining that QuickTime Player 10 sucks, and you should try QuickTime Player 7.

QuickTime Player 7

QuickTime Player 7 opens the file, but there’s nothing there… at least nothing it can decode properly. (You’ve let me down again, QuickTime Player!)

MPEG StreamClip

That’s enough fun with Apple’s offerings… on to the more powerful Swiss Army knife of transcoding video; MPEG StreamClip. There hasn’t been a new release for over three years, but it still works wonders on changing videos from one format to another.

Well, no better than QuickTime Player 7. Unless you like a white screen better than a black screen. Let’s move on…

Miro Video Converter

Don’t worry, I’m not even half way through my list of the video conversion software I have on my hard drive. (Yes, I have hundreds of applications on my hard drive, not in some damn cloud somewhere!)

Our old pal Miro Video Converter was willing to accept the AVI file and give me an MP4, which is what I want, because it will probably play fine on any device I want to play video on…

Converting

Hey, look at that! Miro Video Converter is using FFmpeg under the hood. Excellent… especially since ffmpegX hasn’t been updated in many years.

Raspbian Boot

As for the video, since I didn’t have one of my VCRs handy, I grabbed a old Raspberry Pi with a composite video output and used that for the test. I know, it looks terrible here, partly due to it being a GIF, but mostly due to it being a computer output scaled down to a 640×480 standard definition display. I’m going to assume actual video footage from 25 year old VHS tapes will look much better. (Sort of.)

Categories
Uncategorized

A Big Big Keyboard

Big Keyboard

If you happened to see a post titled 8 Crazy Keyboards That Will Trick Out Your Typing over on the Make Blog, you may have seen the big keyboard I worked on last year.

It was for a graphic design station we built for “Word Headquarters” at the Betty Brinn Children’s Museum. (I did this project as a contractor, before I worked at the Exhibits Shop.) Here’s a bunch of images that show the building of the keyboard.

Concept #1

This is the concept Mike came up with, which was to use lots of different sized pieces of wood, CNC’d to look like letterpress type (though obviously not reversed, as they would be unreadable.) This was definitely a fun design, but things always change along the development path…

Layout

Layout

While Mike was working on a design, I mocked up a drawing showing the spacing I thought would work using arcade buttons and how close together we could get them. This helped determine the overall size of the keyboard. Things could obviously get more spaced out, but this was the tightest we could go.

Teensy++ 2.0

I’ve built plenty of keyboards over the years using Teensy development boards so there wasn’t too much new happening on that front. Still, it’s always good to breadboard things up for testing.

Concept #2

We ended up going with a simpler and cleaner key layout than the original concept. As you’ll see later, we added variations elsewhere in the piece.

Teensy++ 2.0

Did I mention the keyboard would have 46 keys? Well, 46 is the number of digital inputs you can get on a Teensy++ 2.0 board. That’s every single input. (And yes, there was an issue using pin 6 which eventually got solved.)

Buttons!

Here’s a big piece of HDPE that’s been milled out for all of the buttons. Yes, that’s a lot of buttons! (There are 47 buttons because we used two for the spacebar.)

Wiring!

Here’s the back of the big piece of HDPE. That’s a lot of wires! We used slip-on connectors rather than soldering wires to the buttons (for ease of maintenance) and the other ends of the wires all go to screw terminals.

Teensy++ 2.0

All wires run to screw terminals on an Adafruit Perma-Proto board. It’s not the cleanest thing, but the deadline was tight on this, and the impending launch date meant we had to get it all done and working, even if it wasn’t the prettiest under the hood. (And yes, this is mid-wiring… not everything is connected yet!)

Wiring!

More wiring, more wiring, labels for everything… And testing as we go.

More Wires!

Here’s the piece of Alupanel attached to the top of the HDPE. It also serves to hold the wood keys in place. Each key has a lip at the bottom to hold it captive and is held up by the spring in the arcade button. (At some point I did weight tests to determine a safe weight for each key so that it wouldn’t press down on the button too much.)

Wood Keys

Since we went with a uniform size for the keys, we added some variety in the choice of woods used. You may notice there is no return key. We eventually replaced the exclamation point with a return key. (We honestly didn’t think we’d need one due to the way the application allowed the use of text, but like all exhibits you put on the museum floor, things change over time as you learn how they are used.)

Wood Keys

I think the nice, clean, readable type turned out great. I’d still like to see the really varied version that was the first concept some day, but this works for now!

Wood Keys

There’s about 650 lines of code running on the Teensy, including code for handling the shift key with every key, so even though you don’t see the exclamation point anymore, you can get one by holding down shift and typing the number “1” key. With the letters you get lower case and upper case, and with the numbers and other non-alpha keys you get whatever would normally show up with the shift key on a standard US keyboard.

In the end, this was an awesome project to be involved in. Thanks to Kathy, Mike, Sam, and Dom for contributing to the entire thing.

Categories
Uncategorized

Documentation Wiki

BBCM Wiki

I’ve mentioned before my love of wikis as a documentation platform, and I helped start the Milwaukee Makerspace wiki and grow and maintain it over the years…

Since I started working at the BBCM Exhibits Shop last year one of the biggest challenges has been locating needed documentation. Sometimes it existed, but was difficult to find. Other times knowledge existed only in someone’s head, which isn’t the best thing for an organization.

Even though I launched the wiki late last summer, things didn’t really start to get populated until December when I got a chance to pours lots of data into it, and then Sam joined us as the Exhibit Floor Coordinator and jumped completely on-board the wiki train. We’ve added over 150 pages in the last four months, and some of them are pretty extensive.

(We’re doing a small bit of integration with our ticketing system as well. Not as much as I’d like, but there’s a few weird issues with MantisBT that make things a little difficult.)

There are still more extensive pieces of documentation that exist in other formats, things that make sense as static documents, and those are often linked from the wiki so they are easy to locate as well.

In the building of this knowledge base, I like to think of it as an easily searchable manual that multiple people can update at any time. It’s not a bunch of Word documents or PDFs on a file server, it’s a living resource, meant to be used (and updated) constantly. It should serve as a useful tool not just to the people who have access to it now, but the people who join the organization in the future. A new team member should be able to sit down on the first day and dig through the wiki to get a good overview of what we deal with. (That’s my hope anyway!)