Categories
Uncategorized

Instructables + Laser = ????

VOTE!

So here’s the deal friends… Ben Nelson, fellow maker, DIY enthusiast, and Milwaukee Makerspace member, has won his fair share of contests over at Instructables, and it’s prompted me to give it a try as well, so I present to you my first Instructable: Creating Random Art for Puzzles.

And I’ll be totally honest, the main reason for me publishing it was to enter this contest to win a laser cutter from Hurricane Lasers. (I have no shame in telling you that!)

Ever since the Makerspace got a laser cutter, I’ve fallen in love, and it’s become my favorite tool, possibly even surpassing the RepRap. (Shhh, don’t tell the RepRaster 5000 that!) You’ve probably seen a few of my posts about things I’ve laser cut. Of course lately the laser cutter seem to break down every other week, so getting time to go to the space when it’s working is tough. Luckily, my friends at Lovesick Robot Studios helped me out with this project.

Laser-cut puzzle coasters

When I started on this project, I wasn’t even sure where it would go, but I wanted to explore the concept of introducing random elements into my art and see where it would take me. Well… this is the first stop: puzzles created with random art.

Puzzle: Solved!

Of course if you know me, you know I also love making coasters… so I made puzzle coasters with random art in addition to a normal puzzle. (The “normal” puzzle was made with a printer, some board, and an X-ACTO knife. All the details are in the Instructable.)

Puzzle? Coasters? Both!

So here’s the deal friends… I’d really appreciate if you vote for me in the contest, because if I win, I’ll get my own laser cutter… but rest assured, I won’t just keep it to myself. If you need something etched or cut, well, I may be able to help you out. I mean, if I win this contest. So yeah, I’d appreciate your vote.

So go to the page to vote. See the image at the top of this post which shows where the “VOTE” button is.) Also, since I took my sweet time, we’ve only got two days…. Voting ends the 20th, so don’t put it off… vote now! Don’t see the vote button? Make sure you log in. Don’t have an account? Create one!

Thanks!

Update: As of 2012-09-28 I have not been chosen as a finalist. Oh well.

Categories
Uncategorized

Fixing the Fixture

Adapter

I (somewhat) jokingly posted something the other day about how my wife asked me to 3D print something, and was totally serious this time and not sarcastic about it. To be fair, she’s heard me say “I’ll just 3D print one!” about 100 times this summer, and was probably sick of it, but when you live in the future, it’s pretty damn exciting.

Or story begins back in 2009 when we moved into our current house. The light above the front door was just a bare bulb, with nothing around it. I’m assuming there was a glass ball at one point, and it must have broke, or been stolen, or dematerialized. No matter, we can fix it.

3D Printed Part

While at Home Depot the wife found a cheapie plastic majigger that would fit over the light bulb, so we bought it. This is also when she suggested I could “make it work” and thus, I agreed.

I ended up using OpenSCAD to design a simple ring that would press-fit the new piece, and have the needed holes to fix the fixture… and adapter, if you will.

It fits!

It worked! As you may notice, there are no mounting holes. I often don’t bother making holes in the objects I print because I’ve got a drill press, and it makes much more precise holes than the RepRaster 5000 can. (And just to be clear, the clear piece is not what I printed. I printed the black piece. Got it?)

Holes for screws

Here’s the piece after I drilled the holes and secure it into the fixture with two small bolts. Sadly the small bolts are a little long, and stick out the top, but hey, it’s still an improvement.

Fixed!

So now on the front of the house is this lovely cheapie plastic majigger instead of just a bare light bulb. Home Improvements FTW!

This is one more thing where I really don’t know how I could have done this as elegantly without a 3D printer. Using open source software I designed the needed adapter and then printed it out using open source hardware, and the total cost of materials (ABS plastic) was probably less than 50 cents. As I said… living in the future and all that.

Categories
Uncategorized

Stipple the Hoan

StippleGen2 from our friends at Evil Mad Scientist Laboratories is a great little application for creating line art from graphic images. The docs on their wiki will give you a good overview of what it does.

When I first got my Egg-Bot I used an application called “Voronoi Stippler” to play around with stippling, but sadly the code for the application was taken offline. StippleGen2 takes the place of Voronoi Stippler quite well!

Hoan Bridge Graphic
Original Hoan Bridge Graphic

I started out with this graphic of the Hoan Bridge, a Milwaukee Landmark, and converted the small color image to a larger grayscale image. (Why the Hoan Bridge? Because someone on Facebook suggested it!)

Hoan TSP
TSP Artwork

Here is the result of generating the TSP art. What is TSP you ask? Basically, it’s a path with a single line. It’s great for generating toolpaths used by things like CNC machines, engravers, routers, lasers, etc. (Find out more about TSP!)

Hoan Stipples
Stipple Artwork

I wasn’t convinced the TSP art would come out great, so I went to the circular stipples. Here’s the final version, which is incredibly hard to see rendered properly at this size, so look below for some zoomed in versions.

Hoan Stipples Zoomed
Stipple Artwork Zoomed In

Hoan Stipples Zoomed More
Stipple Artwork Zoomed In More

Hoan Stipples Zoomed Even More
Stipple Artwork Zoomed In Even More!

As you can see, the circles overlap, which means if we were to etch this with a laser, and use the vector setting (as opposed to raster) it would see each circle as a distinct object, and etch each one. (Etching as raster would most likely just etch it all as one single blob, no individual circles.)

So because each circle will be etched individually, and they overlap, we’ll end up with different heights/layers, as it were, due to some areas of our material being hit with the laser more than once. In other words… texture!

Laser-eched Hoan
Final Laser-etched piece

Here’s our final piece of laser-etched Baltic Birch plywood. Below you can see some zoomed in shots showing the surface. Notice how the circles are so small they essentially looks like dots. (You can click each photo to see the large version on Flickr.)

Laser-eched Hoan
Close-up of stipples

Laser-eched Hoan
Texture in upper-right corner

Laser-eched Hoan
Texture in the letter “N”

Categories
Uncategorized

3rD Times The Charm!

Three Motor Holders

While I usually describe 3D printing to people with something like “you can make beautiful things that are art, or functional things like parts” I’ve been printing a lot of parts lately (thought I still print pretty things!)

The parts I’m printing are of my design, for things I am building, and they often have to fit existing real-world objects. The process usually involves measure thing with calipers to get dimensions, and then designing things in 3D software. (I’m leaning more towards OpenSCAD latley, as opposed to Sketchup.)

If you’re just downloading and printing objects from Thingverse, they’ll (hopefully) work on the first try, but if you’re doing everything on your own, it may take a few tries.

I wanted to print a small motor mount for this DC motor that Adafruit sells. So I got out the calipers and went to work.

Motor in the second holder

For the first attempt (see top photo) I completely screwed up by using the inside dimensions (where the motor should fit) as the outside dimensions. Stupid mistake! On my second attempt I got it right, and the motor fit almost perfectly.

Motor in third holder

On the third iteration I made minor adjustments to the outer walls, and I also added an “air hole” on the top. The motor has two slots in the body which I assume draw air into it to prevent overheating. (You can see I know very little about motor design right now.)

Motor and holder

Back in June when the guys from MakerBot stopped by Milwaukee Makerspace, I talked to Skimbal, and asked how many revisions he went through when designing things, and he said about two or three. I was impressed by this because last year I tried designing a real-word replacement part and I think I made about ten versions of it. Of course part of this was my lack of 3D skills, and part of it may have been issues with the old CupCake I was using.

Motor in the holder

So I’m pretty happy with the fact that I can get a good version of a part in just a few tries now. (Though I should admit that I’m not happy with the slots for the screws, and may end up tweaking things a bit more, which is pretty darn easy in OpenSCAD.)

When I was talking to someone about 3D printers this summer, they didn’t see the point of having one at home when there were so many companies that allowed you to upload a design and would print it and ship it to you. Here’s where a home 3D printer shines; I can measure a part, get a prototype printed, test it, and print another version all in a single afternoon. Now that’s rapid prototyping!

And a mirror holder!

Oh yeah, I also printed a mirror holder. It took just two revisions to get one that worked well.

Categories
Uncategorized

Poundin’ Sand – Complete!

Poundin' Sand

In my last post about my Nerdy Derby car, all you saw was a bunch of laser cut wood pieces… well, here’s the final car.

Poundin' Sand

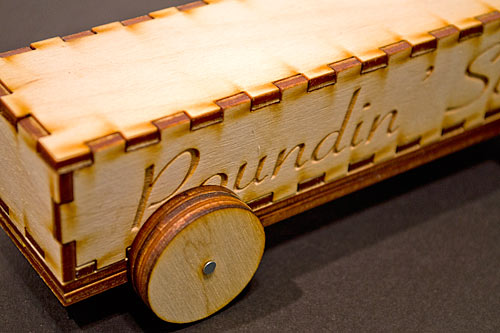
It’s almost dimensionally the same as a standard Pinewood Derby car. The body is constructed out of panels that were laser cut rather than a block of wood. Because it’s hollow inside, I filled it with sand. Why not lead? Well, someone else is already doing a car out of lead. I also though about marbles or something else that would roll around inside. I also thought about making one with acrylic and filling it with water.

Poundin' Sand - Wheel

The bottom has two pieces of wood attached so I’d have something to pound the nail into to attach the wheels. I glued the two piece together and then drilled a hole between them. (The wood is just 3mm thick, so layering made sense.)

Poundin' Sand

I spaced the wheels the same for the front and back, so there really is no front or back… it’s the same either way. You’ll also notice I did a terrible job of placing the lettering. I just added it to the side panels without thinking about how the wheels would get in the way.

Poundin' Sand - Wheel

The wheels are also 3mm wood, and I’ve sandwiched three of them together to make each wheel 9mm wide. I was going to glue the layers together but I figured I’d just put them on and allow them to spin independently (if possible.)

If this car wins nothing besides the “laser cut wood filled with sand” category, I’m fine with that. I learned quite a bit in the process of building this, and if I build another car, I have some experience to build on. (I also managed to cut a big pile of wheels and have nails to fit them, so we can have supplies for people to make cars on the spot.)

Update: Files are now on Thingiverse.