Categories
Uncategorized

How to give an Egg-Bot Demo

Egg Egg

So you’ve got an Egg-Bot… Congratulations! You may want to share with others what this amazing machine can do. Here’s what I’ve learned since I built my Egg-Bot and demoed it at a number of events.

What you’ll need:

This is the most basic list of things you need to get the Egg Bot drawing on eggs. I’ll also offer up a few items I’ve found useful later in this post.

And of course you don’t have to draw on eggs, but I tend to prefer them for a number of reasons. Plus, it is called the Egg-Bot.

Rebel Alliance Egg

We’ll assume you’ve already got the Egg-Bot up and running, connected to a computer with a USB cable, and Inkscape and the Egg-Bot extension is installed and working. If that’s not the case, visit the Egg-Bot wiki and get it all working. We’re mainly going to cover an actual demo.

So… You’ve got a working Egg-Bot. Where do we begin?

Eggs!

You’re gonna need some eggs. I tend to buy white eggs at the nearest grocery store. The cheaper the better. If it’s an all day affair, I may buy 48 or more eggs, and if it’s a smaller affair, a dozen or two will suffice.

Raster Eggs!

Raw or Hard-boiled?

The first time I demo’d the Egg-Bot I ran to the store, bought 54 eggs and headed to Milwaukee Makerspace to get set up. I ended up printing almost every egg, and I gave a lot of them away. To kids. I kept telling kids to not drop them, put them in their pockets, or leave them in their parent’s cars.

Raw eggs seem to work fine in the Egg-Bot, but you have to be ready for when they break. Breaking while in the machine can be messy. Egg on your plunger is no fun.

Pro-tip: Bring some napkins or paper towel! Great for cleaning up broken eggs, and useful to get the ink flowing from a Sharpie.

The good thing about raw eggs is, if you get one that turns out totally awesome, you can try to hollow it out and save it, which is something you can’t do with a hard-boiled egg.

As for Hard-boiled eggs? They are much more compatible with children. Almost every time I’ve done a demo, there are kids involved, and they are not gentle with eggs. Hard-boiled eggs also mean less-mess if they break. The downside is that you need to boil them. When’s the last time you boiled 48 eggs? It takes some time… (I still haven’t tried the oven method yet, but it’s on my list!)

First Plot with the Egg-Bot

Start Early!

If you’ve decided to use hard-boiled eggs, you need to allow time to boil them, but even if you are using raw eggs, you’ll want to start early. Like, a day or two early.

I like to show up to a demo with a bunch of eggs already printed. So at least a day before the event, spend some time printing some awesome eggs. Now’s the time to try those designs that may take a long time to print. Also, experiment! The eggs you print before the demo will be put on display while you print other eggs.

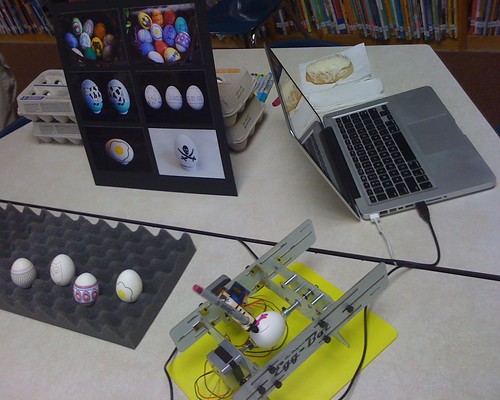
Pro-tip: If you’ve got an iPad or some sort of digital picture frame device, set it up to do a slide show of your best eggs. I’ve also showed some of my eggs with a simple display board and a bunch of photos attached. This is the kid-friendly way to do it.

Give Them Away!

It seems to happen every time… someone wants an egg. What to do? Give them an egg! usually during an event I end up printing more than one of a specific design, so once I have two or more, I don’t mind giving one away. Half the fun of the Egg-Bot is seeing it in action, and the other half is seeing the final product. If you give away too many at first, you’ve got nothing to show, so balance it appropriately.

Pro-tip: Keep a bunch of plastic baggies on-hand for people to put eggs in, especially if they are raw!

Egg-Bot at Higher Learning Day

Show Them Off!

Sure, you can just use egg cartons to hold your eggs, but I like a nice piece of “egg crate” foam which is practically made for holding eggs! It’s easier to pick up and set down the eggs as compared to an egg carton, and it looks much better. As a bonus, it actually goes in the box that holds the Egg-Bot, so it serves a dual-purpose. Sure you can use a basket, but this tends to put egg against egg, which could lead to cracking.

Talk It Up!

I usually let people know what I like about the Egg-Bot. I tell them what it does, and mention that it’s a kit (they often ask if I “invented” it) and they can buy they kit, or download the instructions and build one themselves. I usually say “The Egg-Bot is an open source art robot” or something along those lines. I tell people that you can do Christmas ornaments, ping-pong balls, and other “roundish” objects with it, and that there is even an engraving attachment. If you’re excited about it, people tend to take interest it in. Most people walk away smiling and talking about how cool it is.

Light Bulb Egg

I Need Art!

Hopefully you’ve got some SVG files on hand… if not, get some! You can check out Thingiverse for Egg-Bot-able designs, or you could make your own, or you can scour the public domain repository at OpenClipArt.org looking for things that work. Depending on your Inkscape skills you may be able to grab things from OpenClipArt on the fly, edit them for the Egg-Bot, and print them all during the event while talking to people. It’s not easy, but yeah, I have done it. Oh, you can also just design your own art if you have those kind of skills. :)

In Conclusion…

Did I forget anything? Probably. Oh yeah, bring a power strip and an extension cord! You never know where you might be in relation to an outlet, but those two things always come in handy. Don’t do any crazy software updates just before a demo. Test everything the day before to make sure it works, then leave it as-is. OK, that’s all I can think of… Egg-Bot on my friends, Egg-Bot on!

Categories
Uncategorized

RepRap (almost there!)

MakerGear Prusa Mendel RepRap (In Progress)

My project list has had RepRap 3D Printer on it for a long time… way too long. There are a few reasons for this. One reason is that I just don’t get large chunks of time to work on it. Working two jobs, having a family, and doing “other things” keep me pretty busy. Another reason is that I get involved in other projects. Most of the other projects are short-term, quick ones. Like the Arc-O-Matic, or another Drawbot, or some weird art, or small things that take maybe a day or two (or three) but not months.

But one of the other things that may have slowed me down in this project is… fear. With so many of my projects, they tend to be within my comfort zone, or just slightly outside of my comfort zone, but not way outside of my comfort zone. The RepRap has been (at times) outside of my comfort zone. I tend to like visual instructions. You know who excels at great visual instructions? Adafruit does, as does Evil Mad Scientist Labs. That’s why I love getting kits from them, and supporting them their work.

So this fear I mentioned… at some point I think I got too wrapped up in making sure I did everything right, but here’s the thing about a RepRap, even if it is a kit, you won’t do everything right. Nope, try as you might, you’re going to screw something up. Even if you’ve built other kits, and follow all the instructions, and use the mailing list, and blog posts, and IRC, and Google+… unless you’ve done it before, you will screw something up. (Hell, you might even screw things up if you’ve done it before.) But here’s the thing to remember: part of building a RepRap is learning, and that includes learning from mistakes. Building it up from a box full of parts does one thing, it ensures you can (probably) tear the whole damn thing apart and fix it. With all these new 3D Printers coming on the market that are fully assembled, that may not be the case. That’s one of the big questions I have. Let’s say you buy a 3D-A-Ma-Jig (yeah, I made that up) from 3D-A-Ma-Jig Incorporated, and it breaks… what do you do? What about repairs? What about warranties? Do you ship it back? Take it in… somewhere? This is part of the reason I went the RepRap route, so I would know every part of the machine.

So this past weekend I got a lot done. I probably put in close to 10 hours, and I learned a lot in that 10 hours. Sure, I read blog posts, Google+ comments, and lots of poorly explained “instructions” with no images, but hey, if things blow up, I can replace them. I’m saying goodbye to fear and forging on. I may earn my Magic Blue Smoke Badge, but dammit, that’s a badge of honor, not just among RepRap builders, but hackers and makers everywhere!

So what I’m really saying is, the RepRap is really close to being done.

Categories
Uncategorized

Spring City Launchpad

Spring City Launchpad

As regular readers may know, I’ve been involved with the Milwaukee Makerspace for some time now, and being a member has given me access to tools and equipment I’d never have on my own, but more importantly it’s given me access to a community of makers who have assisted me with projects, some personal, and some business-related. I wouldn’t be selling products right now if it weren’t for the advice of Milwaukee Makerspace members.

So while Milwaukee is fairly close to Waukesha, it’s certainly not in Waukesha, and I’m excited to learn that there are some makers & hackers in Waukesha working towards a new group/space called Spring City Launchpad.

Spring City Launchpad hopes to assemble a group of interested people: makers, artists, creatives, builders, etc. and create a collaborative workspace where people can share skills, tools, and knowledge. Will it be exactly like Milwaukee Makerspace? No. It also won’t be exactly like Sector67 in Madison, or PumpingStation: One in Chicago. Each space evolves into what it is based on the members and the interests and activities of the members.

If you’ve got an interest in seeing a new creative space in Waukesha, you can sign up on the Atrium site, and if that’s not enough, join us on Saturday, May 12th, 1:00pm-2:30pm at the Waukesha Public Library, 321 Wisconsin Avenue in Waukesha.

Categories
Uncategorized

It’s not the Gear, it’s the Gear!

TWIP - Gear

In the latest This Week in Photo there was another round of the talk of gear, and how gear doesn’t make the photographer, and while I agree with this, I also disagree with this.

The photographers who tend to say “Gear doesn’t matter!” are the ones who have really good gear. I’m not saying that it’s not true, but that it’s partly true. Over the last four years I’ve shot with a Nikon D40 with the 18-55mm kit lens, and I’ve shot with a Nikon D3x with a 28-70mm pro lens. the D40 was the entry level DSLR from Nikon in 2006. The D3x was the top of the line model a few years ago. The 18-55mm lens is a cheap consumer-grade lens that costs about $100, and the 28-70mm is a professional lens that costs close to $2,000.

Enough with the specs… I’ve taken the same photo with both cameras, and the results from the D3x look better. And I’m talking about studio shots, I’m not even getting into low-light, event photography, sports shooting, and other comparisons.

They also talked about the Nikon D3200, which oddly enough, is what I’ll be upgrading to very soon. I’m not expecting D3x quality from it, especially since I’ll be shooting with cheaper glass, and I’m not letting that 24 megapixels number fool me. I’d be fine if it were 16 megapixels, or even 12. (The D40 is 6 megapixels, and yeah, I have come to find that a bit limiting.)

I’m not buying into the idea that to become a better photographer you need better gear, because I do believe that shooting and trying new things is the road to getting better, but I do believe that gear does play a part it helping you make progress, or holding you back.

So my upgrade from a D40 to a D3200 comes with a set of expectations. I expect to be able to get better results in low-light (6400 ISO versus 1600 ISO.) I expect to have more choices in focus points (11 versus 3.) I expect more megapixels (24 versus 6.) And I also expect to be able to shoot video with the D3200, which is something I can’t do with the D40.

That’s about it… I’ll let you know how it goes.

Categories
Uncategorized

Ping-Pong Ball Bot

Ping-Pong Balls in the Egg-Bot

Adam, one of the members at Milwaukee Makerspace, organizes The Amazing Milwaukee Race, and he asked for some help making customized ping-pong balls for this year’s event. He specifically asked about using the Egg-Bot to do it, so I volunteered to help… you know, being that I’m an certified Egg-Bot Operator and everything. ;)

Ping-Pong Balls for The Amazing Milwaukee Race

Here’s the end result, a whole bunch of The Amazing Milwaukee Race ping-pong balls. We originally tried to use the official logo, but at such a small size it just wasn’t as legible as we wanted, so I decided to go simple and just use text, but mix it up with all the different Ultra Fine Point Sharpies that I had available.

Egg-Bot Manual Control

I’ve almost always plotted on eggs, so doing ping-pong balls was new to me. I found the trick to doing them well (besides raising the height of the motor that holds the pen arm) was to put the ball in with the printed logo aligned directly upwards, and then using the manual control to spin the ball 180 degrees (1600 steps) so the logo is facing downwards so you can center your plot onto the backside where you’ll have the most room and (in theory) the artwork should be centered. Once you’ve done this, just plot as normal!

The other nice thing about using ping-pong balls rather than eggs is that ping-pong balls are all the same size (in theory) while eggs are all slightly different. Oh, ping-pong balls are also lighter, which means there should be less slippage, which sometimes occurs with eggs due to their weight.

So the next time you need some customized ping-pong balls for an event you’re putting on… give me a call! :)