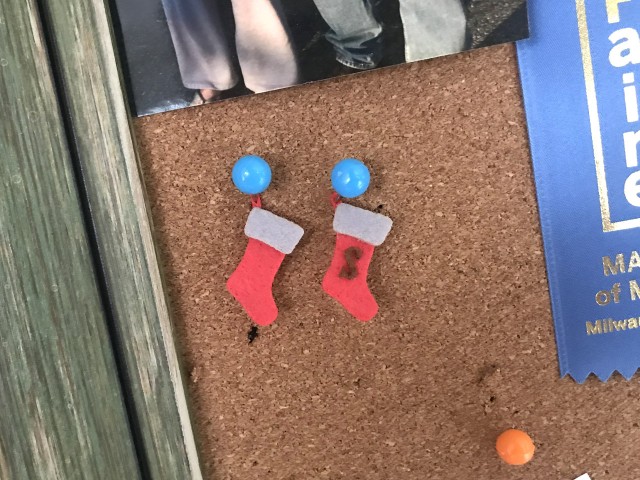
Categories
Uncategorized

Ceramic Makeys

clay-makey-06

My experience in ceramics is pretty limited. I took a few classes at UWM, but really didn’t do much outside of school. If I want to blame someone for my renewed interest in clay, it would probably be Bryan Cera. (Though Jeff the Ceramics Area Champion at Milwaukee Makerspace is also a great clay enabler.)

makey-and-cutter

One of the classic maker projects seems to be coasters, and there are many methods of making coasters. I’ve used laser cutting in the past, but I wanted to explore clay, so I modeled a Makey cookie cutter and press and 3D printed them in PLA plastic.

clay-makey-02

Jeff showed me how to use the roller to flatten out the clay to a consistent thickness and gave me some tips on pressing and cutting. (Thanks, Jeff!) I rolled out six of them, some turned out better than others, but I guess they are all unique, right?

clay-makey-03

Jeff gave me the lowdown on what to do next, but sadly he had a trip scheduled that would take him out of town before Maker Faire, which meant I would not be able to fire these before the event. No worries… I know other people who know things.

clay-makey-05

Luckily I work with Bill Pariso at Brinn Labs, and he’s got a Masters Degree in ceramics. I basically said “Bill, I need help!” and he took over and kept an eye on them while they dried out, then got them fired, and glazed, and presented them to me the weekend of Maker Faire Milwaukee. Awesome!

I may experiment more with clay. It’s a very inexpensive material, and I love exploring cheap things for art and making. It allows for a gentle learning curve with low stakes. Also, did I mention how cheap clay is!?

Categories
Uncategorized

Maker Faire “Space Invader” Shirt

mfmke-si-art

While taking a break from reading through all the applications for Maker Faire Milwaukee I had an idea for some art we could use this year. It ended up becoming shirt art after I shared it with the other event producers.

The art consists of an 8×8 grid with 64 items, yes, as always, I try to make these numbers mean something. 8 bit, 64 bit, you get the idea… The color pallet comes from what we used previously for our kaleidoscope design.

The most difficult part was the typeface. I tried many existing fonts but nothing was working. Makey the Robot is (almost) square, so I needed the letters M, K, and E to be square. Stretching existing fonts did not work, so I ended up creating my own type.

mfmke-si-type

Once I had the M, the E was easy. I just rotated it 90 degrees! The K was a bit more difficult, but the line width matches the parts of the M and E, and I then just aimed for the corners to make them end in 45 degree angles so it would all look even. It’s probably the best “MKE” I’ve ever designed.

mfmke-si-shirt

Here’s a terrible photo of the shirt. We still have some left, so if you want one, let me know, and I’ll get you hooked up for a nice price! (The original design was completely square and did not have the long “Maker Faire Milwaukee” logo on the bottom, but Stacie reminded me we should really add that.)

Categories
Uncategorized

Life-Size Pac-Man

pac-man-and-ghosts

Somewhere along the line of planning Maker Faire Milwaukee I came up with the idea to make some large video game characters, specifically Pac-Man and the Ghosts. Here’s my description of the project:

Pac-Man and your favorite ghosts, but life-size! How large is that? We’re not sure, because what is life? Probably 4 feet tall or more. Take a photo of yourself with Puck-Man! (Note: This is not a functional video game. It’s just fun art.)

Like many projects, I like to keep things inexpensive when possible. Maximum impact for minimum dollars and all that. The plan was to make them from half sheets of plywood, so it would take about two and a half sheets to make the characters and then what was left (and other scrap) could be used for the kickstands on the back. Stacie and I at Brinn Labs brainstormed it a bit, and she and her husband were going to do the cutting and painting, but time got tight so Jason kicked it out on the CNC machine and then got it all painted and assembled. The ghost eyes (both the black and white pieces) are cut and stacked pieces for a little 2.5 dimension (this was Stacie’s idea.)

puck-man-ghosts-outline

Did you know Pac-Man was originally going to be named Puck-Man? It’s true!

What’s visual art without an audio element? I also built a small black box named “Tripping Hazzard” [sic] because that’s what John called it when I showed it to him. Oddly enough I did trip over it two days later so I scrawled “Tripping Hazzard” on it with a black Sharpie marker. (Yes, I spelled it wrong. I blame the The Dukes of Hazzard.)

Oh, the box! It plays the audio from the video game Pac-Man! Wacka Wacka Wacka and so on. The weird thing is, about a week after I built it, I heard the sound at Milwaukee Makerspace and Arnold was playing the same video I ripped the audio from on YouTube! That’s weird, just like him.

pac-man-and-ghosts-bl

As for the cutting of the pieces, there was some discussion that Jason and I had about which style of ghosts we should use, and he won because he ran the CNC router. He was kind enough to send me his files so that I could make a miniature version on the laser cutter. I seem to have misplaced those, but I’ll find them soon. (Adrian was kind enough to paint the mini version which we used for a TV promo before the Faire.)

Anyway, in a lighter part of the Dark Room we set up some big Pac-Man and Ghosts and had a sound track for them which made it appear that Pac-Man was continually trying to get away from the ghosts, and I enjoyed that.

Categories
Uncategorized

Printed Circuit Boards from JLCPCB

jlcpcb-website

Musical maniac Hal over at Milwaukee Makerspace told me about JLCPCB and suggested I try them out. Since I had a coupon due to signing up as a new customer, I ordered 100 boards and chose the free shipping option. The boards were ordered on July 21st and as of August 8th I’m still waiting for them. Since I’m getting 100 printed circuit boards for about 13 cents a piece, I’m okay waiting for them!)

friting-pcb

Meanwhile, I had a project at work where I was trying to decide how to wire something and not create a messy rat’s nest of wires, so I decided a PCB would be the best solution. I whipped up a simple board in Fritzing (Yeah, I know… Fritzing is “garbage” except I know how to use it, can use it very fast, and it’s fine for simple boards.)

pcb-traces

One tricky thing with this board was that the traces had to be pretty thin to route around the solder pads. I exported the files as SVGs and took a look, and it seemed good. Since I needed these for a work project, and I needed them fast, I chose the expensive shipping option. The 5 PCBs were $2.00 and the shipping via DHL was $16.81, so in total it was $18.81 for 5 boards that I got in about 4 days! Seriously… I uploaded the files on July 25th at 04:40 (GMT+8) and got them delivered July 29th at 14:31 (GMT-5).

mux-epander-pcb

The first thing I did was pull out a meter to check all the traces… all good! The board looks great. I soldered header pins into three rows and now I need to solder 48 wires onto it. Wheeeee! (Oh yeah, the board is plugged into a Mux Shield II.)

Categories
Uncategorized

Laser Cutter Exhaust

laser-cutter-exhaust

Someone on the Milwaukee Makerspace mailing list posted an email with the subject line Laser cutter expert, so I could not ignore it. The person was specifically asking about exhaust systems. Above is a photo of what I built for the 40 watt laser cutter in my basement, and below is most of my reply.

laser-stock-exhaust

The exhaust from my laser cutter is a 4″ diameter vent hose, which I connect to a 6″ hose with an adapter I got from Home Depot. (In this photo you can sort of see the white plastic piece that attaches to the back of the laser cutter. It has a small and inadequate fan that came with it.)

laser-inline-fan

The vent hose coming out the back of the laser cutter connects to an inline fan that is mounted to the ceiling…

laser-exhaust-coupler

The output of the inline fan goes to another step down adapter and then a quick connector that twists to lock into place.

I’ve also got an AC Variable Voltage Converter which allows me to run the blower at lower speeds if desired. (I sometimes dial down for paper, thinner material, etc. to reduce suction and noise.)

laser-exhaust-mounting

I then have a basement window that I replaced with a piece of wood on the outside and pink foam on the inside which has a hole in it (covered with a laser cut screen) on the outside, and on the inside the quick connect that I connect up when I use the laser cutter.

This just gets all the fumes out of the tiny room the laser cutter is in. It doesn’t scrub the air. I am not cutting for hours at a time. My main goal was to not have my spouse come home and say “why does the whole house smell like melted plastic!?” and I think I’ve achieved that goal.

Here’s the list of all the components I could remember:

Oh, and if you want to see a real laser cutter exhaust system, or at least the details of building one over many years, check out lasercutterventingsystem on the Milwaukee Makerspace wiki.

Update: I did add a HEPA Air Purifier to this setup about six months later, just to help with any residual smells in the air.