Categories
Uncategorized

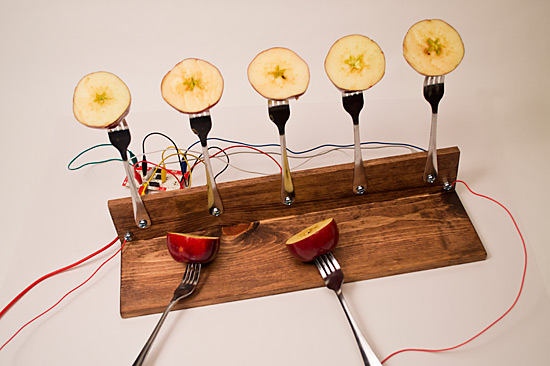
MaKey MaKey Apple Piano

A few months ago a bunch of us from Milwaukee Makerspace took part in Bay View Gallery Night, and jason set up the “Fruit Synthesizer” which was a Makey Makey with a variety of fruit, and some software combo of Max MSP and GarageBand. People really enjoyed it, and with the most recent Art Jamboree happening with jason out of town, I figured I would pick up the slack.

Makey Makey Apple Piano

With a simple base made with two pieces of wood, some dollar store forks, a few nuts, bolts, and bits of wire, we had the Makey Makey Apple Piano.

One of the issues with jason’s Fruit Synthesizer was that you had to touch the fruit. He did provide hand sanitizer, but with it being flu season, having dozens of people touch a piece of fruit seemed like a bad idea, and forks just seemed like the right thing to keep hands clean, and work like xylophone mallets.

Makey Makey Apple Piano

For a project like this it’s nice to have the controller board visible, so people can see it and you can easily explain how it works. The Makey Makey was sitting right behind the forky board thing.

Makey Makey Apple Piano

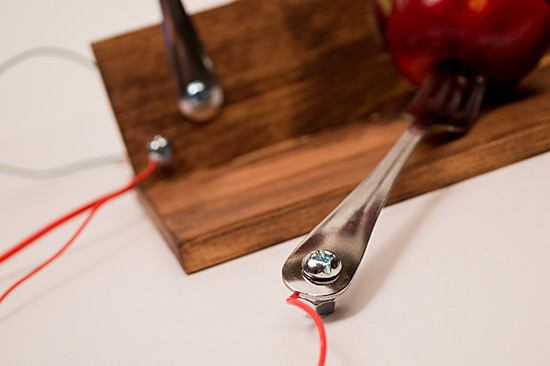
The bolts that hold the forks in place also doubled as terminal connectors that I could attach the alligator clips to.

Makey Makey Apple Piano

I added bolts at each end of the base for the ground connections. (And used red wires to match the Makey Makey, and the apples.)

Makey Makey Apple Piano

The wires running to the forks serve two purposes: they ground the forks to complete the connection that the Makey Makey needs, and they also tether the forks to the base to keep it all together. (Drilling holes through the forks was a lot of fun. I had to assure my wife I did not drill holes in our everyday dining forks.)

Makey Makey Apple Piano

But wait! You can’t just have a bunch of forks and apples and wires and expect something to happen… you also need a computer and some sort of software to do anything useful…

MakeyPlayer

I wrote a Processing application to play sounds and light up the specific apple you were hitting. (I got a good start on the code from this sketch.) I had a lot of fun(!?) with the Minim library. My original plan was to export the Processing application as a Windows executable and use an old netbook to run it. That sort of worked, but I don’t know if the Windows XP machine was up to the task, because when I set it up at the event (after extensive testing in the lab) the audio freaked out, so I ended up switching to my MacBook. An Apple Computer controlled by Apples… fitting, right?

(Processing isn’t the greatest thing for this sort of task, and MIDI really is the right way to go, but we’re already planning our next Makey Makey Monstrosity, so expect some improvements.)

So did it work? It worked! People had a good time playing with it. Here’s a few photos…

Makey Players

Makey Players

Makey Players

Makey Players

Makey Players

Pro-tip for using apples: Keep some lemon juice on-hand! I gave the apples a squirt every now and then to keep them moist and prevent browning. Over the course of 4 hours I did have to change out the apples that were used as the mallets after they got a little mushy. Some people were really pounding on them!

Update: Here’s a short video of the first test of it.

Categories
Uncategorized

Art Robots [video]

Here’s a video I put together to show how two of my art robots function. The video is playing right now in the gallery where some of the art is on display, as I mentioned previously.

Art Robot

Art Robot

You can do a lot with an Arduino, two servos, and a few other miscellaneous parts. ;)

Categories
Audio Channel

Plastic Sun on Lake Effect

Lake Effect

Remember last year when the Chipstone Foundation issued the Tool at Hand Challenge and I created a piece called Plastic Sun? Well, during the event I was interviewed by WUWM and the story aired on Lake Effect this past weekend.

You can check out the archive and if you want to hear my segment, here’s an MP3.

Enjoy!

Categories
Uncategorized

The Making of MAKE

One of the great things about Milwaukee Makerspace is the inspiration you get from other people. Kevin recently used our aluminum forge to create a piece he calls FEAR, which he said was an update of Robert Indiana’s LOVE.

I’m not one to give in to fear, and I figured that with a new year beginning we should focus on something a bit more positive, so I created MAKE.

I also figured I’d walk through the process of creating this piece.

MAKE in Inkscape

While MAKE is three dimensional, it’s really just an extruded two dimensional form (sometimes called 2.5 dimensional) so I started as I often do, with Inkscape. I used Georgia Bold, which is the font Kevin used in his piece, and typed up the letters for MAKE.

MAKE outlined

I selected each letter and combined them into one object via the “Union” command under the “Path” menu.

MAKE outlines joined

At this point we no longer have editable text but an outlined object. We still have curved lines though, and that just won’t do for 3D printing, as we need all straight line segments.

MAKE with straight lines

I selected all of the segments and inserted new nodes. Once you have more nodes, you can convert all of the segments into straight lines. No more curves! If you add enough nodes the short straight line segments will look like a proper curve. (Adding more segments can increase the complexity of the file, which can increase the time to process and print it, so don’t go too crazy.)

MAKE reversed

After I had my artwork outlined, I exported it as a DXF file and brought it into OpenSCAD to extrude it. Also, here’s a trick: I actually flipped it 180 degrees in OpenSCAD so that it would face down on the print bed. I wanted the “front” of the piece nice and smooth.

MAKE

Here’s what it looks like in proper perspective… What’s that? You’re already getting inspired to make something? Excellent!

MAKE in plastic

And here’s our final piece. MAKE… in plastic… for your desktop. I like the white, but I definitely need to get more filament colors… I think this would look great in orange or red!

MAKE it BIGGER

I made an attempt at a larger version, but the old RepRap went a little crazy and the print failed about 15% into it. Still, it’s a pretty good MAKE if you ask me. Perhaps this one is more suitable for the wall than the desk.

(Note: grab the file from Printables.)

Categories
Uncategorized

The Art of the Robots

Arc-O-Matic

The Beaver Dam Area Arts Association invited me to take part in a show titled “Beyond Your Imagination” which opens January 6, 2013 and runs through February 10, 2013.

So, you know, between the holidays, work, traveling, and other projects, I had to scramble to get Friday Night Drawbot and the Arc-O-Matic up and running again, with new code, and new parts, and create some art… with the help of robots.

So, consider yourself invited to the Seippel Homestead and Center for the Arts, 1605 North Spring Street, Beaver Dam, Wisconsin to view the show. If all goes well I will be there Sunday, January 13, 2013 for a live demonstration of the art robots.

Friday Night Drawbot

tl;dr: See robot art I created. With robots.

Update! Here’s a video of the bots in action.

Update! Here’s a photo from the show opening, courtesy of Jason Gullickson.

BDAAA