Categories
Uncategorized

Fixing the Fixture

Adapter

I (somewhat) jokingly posted something the other day about how my wife asked me to 3D print something, and was totally serious this time and not sarcastic about it. To be fair, she’s heard me say “I’ll just 3D print one!” about 100 times this summer, and was probably sick of it, but when you live in the future, it’s pretty damn exciting.

Or story begins back in 2009 when we moved into our current house. The light above the front door was just a bare bulb, with nothing around it. I’m assuming there was a glass ball at one point, and it must have broke, or been stolen, or dematerialized. No matter, we can fix it.

3D Printed Part

While at Home Depot the wife found a cheapie plastic majigger that would fit over the light bulb, so we bought it. This is also when she suggested I could “make it work” and thus, I agreed.

I ended up using OpenSCAD to design a simple ring that would press-fit the new piece, and have the needed holes to fix the fixture… and adapter, if you will.

It fits!

It worked! As you may notice, there are no mounting holes. I often don’t bother making holes in the objects I print because I’ve got a drill press, and it makes much more precise holes than the RepRaster 5000 can. (And just to be clear, the clear piece is not what I printed. I printed the black piece. Got it?)

Holes for screws

Here’s the piece after I drilled the holes and secure it into the fixture with two small bolts. Sadly the small bolts are a little long, and stick out the top, but hey, it’s still an improvement.

Fixed!

So now on the front of the house is this lovely cheapie plastic majigger instead of just a bare light bulb. Home Improvements FTW!

This is one more thing where I really don’t know how I could have done this as elegantly without a 3D printer. Using open source software I designed the needed adapter and then printed it out using open source hardware, and the total cost of materials (ABS plastic) was probably less than 50 cents. As I said… living in the future and all that.

Categories
Uncategorized

DIY Mouthpiece Puller

Last year my youngest daughter took up the trumpet, and shortly after she started she managed to get the mouthpiece stuck. This is pretty common, from what people in the know tell me. The problem is, the school used to have a mouthpiece removing tool, but it either broke, or it no longer has it, which means I had to take it in to the music store, get a loaner, wait for the repair, and then go pick it up and return the loaner… Hassle!

Pictured below is what a mouthpiece puller looks like. There’s also a more tooly/clampy version, which is the only kind I had seen at the time.

Mouthpiece Puller

The commercial version is $40 USD, and while taking her trumpet in for repairs is a pain, it’s free since we are on a rental agreement (for now anyway.)

After she got the mouthpiece stuck a second time (!?!?) I wondered if I could make my own tool, and it turns out I could.

DIY Mouthpiece Remover

It actually looks very similar to the commercial version above, even though I didn’t see that one until I started writing this post. I was using screws between wood for another project that needed an adjustable platform, and I borrowed the concept for this.

I originally put calipers on the mouthpiece to get the right size, and then drilled holes into the two pieces of scrap bamboo I had. At that point the project sat dormant, waiting for the mouthpiece to get stuck again… which it did a few days ago.

I ended up making some very inelegant rough cuts into the bamboo with my jigsaw, and got it so the thing would slide into place semi-tightly, and then started turning the wing-nuts to apply pressure and force the mouthpiece off. It was tricky! I didn’t want to apply too much (I am not a professional band instrument fixer!) but when I thought it was all the way, I tried twisting it slightly. I don’t think twisting it works at all, and in fact I think it’s the wrong thing to do, because of the possibility of damaging the instrument. (Again, I am not a professional!) So with just a little more turning of the wing-nuts, it popped off!

DIY Trumpet  Mouthpiece Puller

I was quite pleased, as this meant I didn’t have to make two trips to the music store, and my daughter would have a trumpet she could put back into the case again.

Two more things… If I designed a trumpet case, I’d add some sort of special door to the side so you can put the damn thing in the case when the mouthpiece is stuck. I know this might encourage people to not take out the mouthpiece, but it’s no fun carrying around a trumpet with a stuck mouthpiece and the case it won’t fit into.

The other thing… Every school that has a band program should have one of these. Heck, if there are at least 3 other kids playing trumpet, I’d see if they could all pony up $10 each to supply the school with one. Even if a band director couldn’t remove it every time, it would be a good first line of defense.

Categories
Uncategorized

Vivitar Foot Repair

Vivitar

So I got this Vivitar 285 flash last year, and it’s been working great, except for one thing… the little plastic foot is no match for the weight of this thing. Eventually, it broke. Argh… To be expected though.

I found a replacement metal foot on ebay for $6.99, and I watched some YouTube video that explained replacing it. Here’s the thing though… after I watched a damn advertisement, and then a 9 minute video showing how to do the replacement, I decided that I’d help people of the future by presenting the same info in a good old no-nonsense way, with words and pictures!

Broken Foot

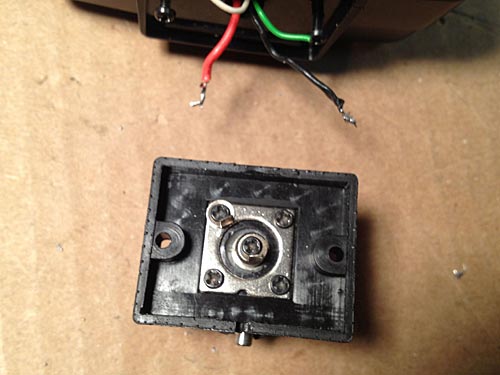
So here is our broken foot. Thin, old, cheap plastic. No good! Grab a tiny screwdriver and remove the foot. Don’t lose the screws, they are tiny! (Also, you will need them later!)

Remove Foot

Here is the broken one still attached, next to the new one. On the original unit, there are 4 wires. Two of them (white and green) go to the test button. You don’t need these! You just need the black and red wires. The button on the new one will work just fine with only the black and red attached.

New Foot

The black and red wires are short, so don’t cut them, you need to desolder them. If you don’t have a good soldering iron, and some soldering wick and a solder sucker, find someone who does. (Maybe your local hackerspace?) I did cut the white and green ones, and put a tiny amount of tape over the ends, just to be totally safe.

Soldered

Solder the black and red wires in place securely. It appears I put the black on in the center. I’m not sure that it matters, but YMMV and I make no guarantees. (See where I put the screws? Right where they belong, because they are so damn small I was afraid of losing them!) Also, don’t put the foot on backwards, as that would be stupid. (Disclaimer: I’m not even sure you can put it on backwards. I just like disclaimers.)

New Foot

With the soldering done, put the foot in place, put the screws in, and put the batteries back in (you did take them out before you started, right!?) and test it!

OK, there’s your short guide to replacing the hotshoe foot for a Vivitar 285 camera flash. Hopefully you read this in less time than it took me to watch that 9 minute long YouTube video.

(And yeah, the fact that this is a post about photography that has terrible photos is not lost on me. Apologies…)

Categories
Uncategorized

Another Sugru Repair

Sugru

After my first repair job with sugru, I remembered that I had this letter opener that was in need of repair. My wife had given it to me after she got sick of seeing me open letters with our kitchen knives. It’s a great looking letter opener, and the tape I had on it was not doing it justice.

I still had a package of black sugru, so I cut it open and fashioned a ring around the cracked part of the handle. I tried to get it smooth, as this repair was a lot more cosmetic than the last one. (And no, I didn’t have any white sugru!)

Sugru

Note that it’s really hard to get sugru smooth. This is better than my previous attempt, but I can still see my finger prints in the sugru. Maybe I need to wear some rubber gloves.

My main complaints about sugru? I wish it were easier to get, and that it lasted longer. I’ve still got a bunch of packets and now I’m starting to feel pressured to use them before they expire. It would be great if the local hardware store carried sugru so I could just go pick up a packet when I need one… of course they’d still have to deal with the expiration problem, which is something most things in the hardware store (besides the candy!) probably don’t have an issue with. I still think it’s doable, as sugru is pretty darn cheap, so even if it cost double what it does online, it’d be a good deal.

Besides the availability and expiration issue, sugru is pretty darn cool. :)

Categories
Uncategorized

My first sugru hack

sugru

I remember hearing about sugru last year, and looking through some of the ways people have used it, and thought I should get some of this magical substance to play with. What is sugru? Well, it’s a magical material that cures at room temperature, is self-adhesive, waterproof, flexible, and dishwasher-proof. See the blog for more info.

One thing that’s been broken in our house for a while is the electric griddle. I’ve had it for a long time, and it still works, and I’m a fan of repairing rather than replacing things, as it helps save money, as well as the planet. We’ve been using the griddle for years, but have always been annoyed at the cracked edge piece.

Griddle (before)

I ended up drilling a few small holes and twisting up some wire to bind the broken pieces together. Wire worked great for this. I didn’t want to mess around with trying to fit a small piece of metal, or any sort of screws in place. But the wire isn’t exactly pretty… and it’s got those pointy ends.

Griddle (after)

sugru to the rescue… I took the black sugru and molded it around the top of the crack, covering the wire. It’s still not the prettiest thing in the world, but it’s a big improvement.

My only complaint about sugru is that it has a shelf life of about 6 months, but then again… once you start using it, you start to see all the little things around the house that sugru could make better, so chances are, I’ll have used it all up 6 months from now anyway. :)