Categories
Uncategorized

Repairing a Nektar Panorama P4 Keyboard

I recently did repairs on a Nektar Panorama P4 Keyboard. A guy I know got in touch with me and said there was an accident involving someone stepping on a USB cable while it was plugged into the back of the unit. This damaged the USB connector and it no longer allowed the keyboard to show up via USB.

Here’s the main PCB in place. There’s a few ribbon cables that connect it to the rest of the keyboard. I removed them and pulled out the board. Oh, I should note that what took the most time in the disassembly process was removing all the screws holding the case together. I think there were about three dozen!

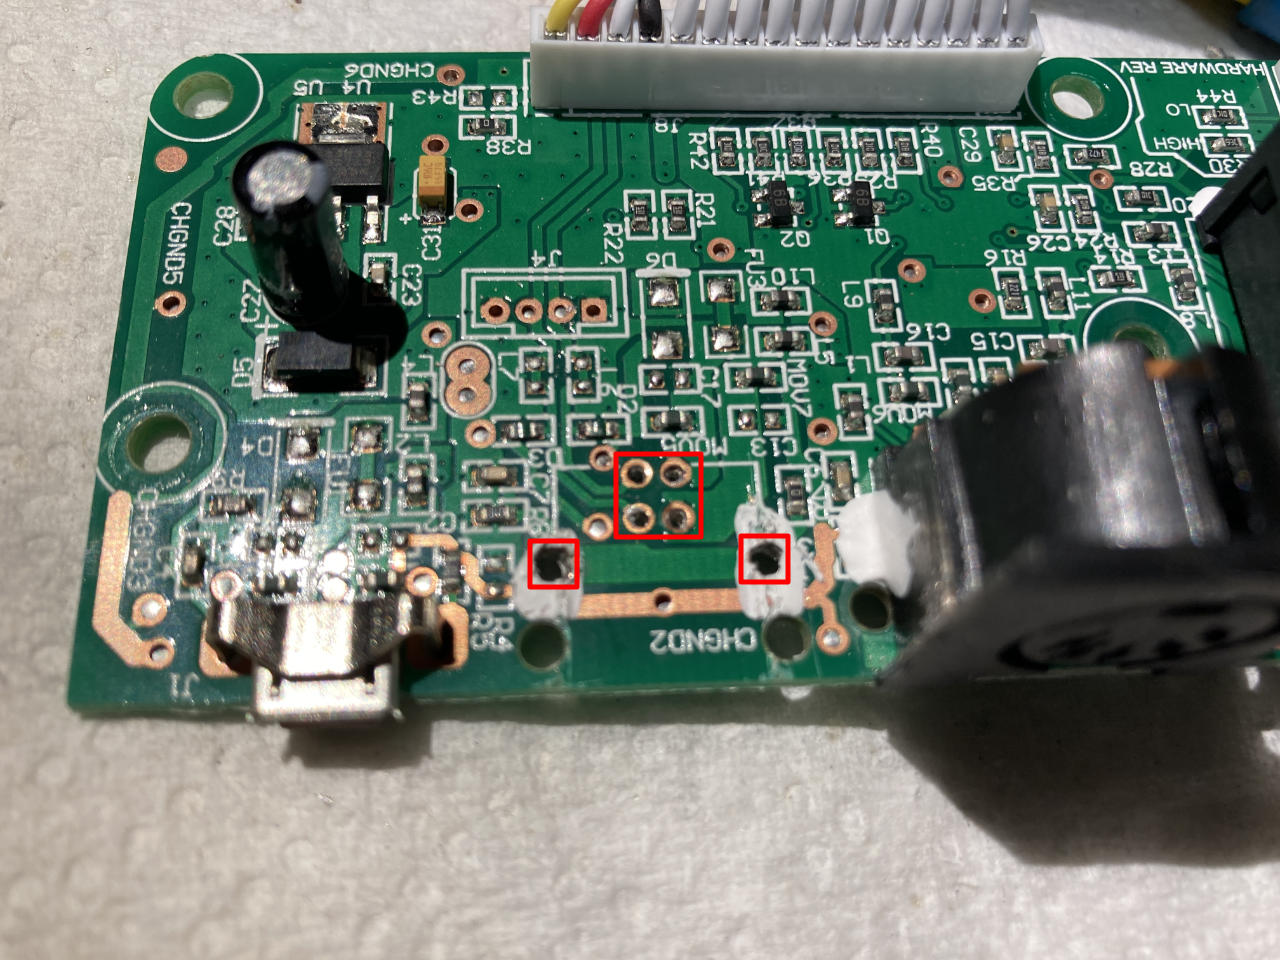
I had to desolder the broken USB jack. It was definitely damaged and pretty much crumbled when I got it off. Some of the holes still had solder in them, so I carefully drilled them out with an 0.8mm bit on my Tiny Drill Press. (The red squares show the holes. The white stuff around the large holes is not damage, but some sort of glue or epoxy that held the jack in place in addition to the solder.)

I grabbed some USB Female Type-B Jack as recommended in this reddit post. Also, take a look at the photo in that post. See how the USB jack has no plastic in the center? Yeah, they used jacks that just had the metal contacts hanging free in the air. Terrible choice! (Below shows the new jack.)

The owner also mentioned a USB plug protector support thing, from this blog post. So I modeled one up for him…

I measured a bunch of my USB cables and, well, they are not all the same. So I printed about four of these supports with different inside dimensions. I figured one might work. (Little did I know the cable for the keyboard was right in the case! Oh well.)

Once I had the keyboard repaired and put back together I fired up GarageBand and made sure it worked, and it did work. Hooray. I also charged next to nothing for the repair because the guy’s cat passed away the week before and I know exactly what that is like.

Categories
Uncategorized

micro:bit Powered Xylophone

A recent fun project over at Brown Dog Gadgets is this automated xylophone controlled with a micro:bit… Check out the build guide.

Full instructions including code and some helpful tips on choosing a (toy) xylophone that will work for this project. (There’s maths and angles involved.) We’re basically controlling two servos to move a mallet left and right and then down (and back up) to strike a bar.

You can control it by playing it like a keyboard, just press the buttons, or you can program and store songs for automated playback later.

The (toy) xylophone isn’t really tuned very well, so we may be working on a larger project that uses a larger instrument. Also of note is the fact that the micro:bit out of the box can only handle three servos (without extra hardware) so we might switch to another board for the next iteration.

As usual, and since we’re using LEGO compatible servos, there are LEGO bits involved, which made building things quick and easy. (And don’t worry if you don’t have the needed LEGO parts on-hand, we’ve listed the parts we used and linked to where you can get them for cheap.)

Here are a few slightly out of tune songs…


Categories
Uncategorized

DIY Mouthpiece Puller

Last year my youngest daughter took up the trumpet, and shortly after she started she managed to get the mouthpiece stuck. This is pretty common, from what people in the know tell me. The problem is, the school used to have a mouthpiece removing tool, but it either broke, or it no longer has it, which means I had to take it in to the music store, get a loaner, wait for the repair, and then go pick it up and return the loaner… Hassle!

Pictured below is what a mouthpiece puller looks like. There’s also a more tooly/clampy version, which is the only kind I had seen at the time.

Mouthpiece Puller

The commercial version is $40 USD, and while taking her trumpet in for repairs is a pain, it’s free since we are on a rental agreement (for now anyway.)

After she got the mouthpiece stuck a second time (!?!?) I wondered if I could make my own tool, and it turns out I could.

DIY Mouthpiece Remover

It actually looks very similar to the commercial version above, even though I didn’t see that one until I started writing this post. I was using screws between wood for another project that needed an adjustable platform, and I borrowed the concept for this.

I originally put calipers on the mouthpiece to get the right size, and then drilled holes into the two pieces of scrap bamboo I had. At that point the project sat dormant, waiting for the mouthpiece to get stuck again… which it did a few days ago.

I ended up making some very inelegant rough cuts into the bamboo with my jigsaw, and got it so the thing would slide into place semi-tightly, and then started turning the wing-nuts to apply pressure and force the mouthpiece off. It was tricky! I didn’t want to apply too much (I am not a professional band instrument fixer!) but when I thought it was all the way, I tried twisting it slightly. I don’t think twisting it works at all, and in fact I think it’s the wrong thing to do, because of the possibility of damaging the instrument. (Again, I am not a professional!) So with just a little more turning of the wing-nuts, it popped off!

DIY Trumpet  Mouthpiece Puller

I was quite pleased, as this meant I didn’t have to make two trips to the music store, and my daughter would have a trumpet she could put back into the case again.

Two more things… If I designed a trumpet case, I’d add some sort of special door to the side so you can put the damn thing in the case when the mouthpiece is stuck. I know this might encourage people to not take out the mouthpiece, but it’s no fun carrying around a trumpet with a stuck mouthpiece and the case it won’t fit into.

The other thing… Every school that has a band program should have one of these. Heck, if there are at least 3 other kids playing trumpet, I’d see if they could all pony up $10 each to supply the school with one. Even if a band director couldn’t remove it every time, it would be a good first line of defense.