Categories
Uncategorized

Ready for Pushing

Ready for Pushing

So I’ve been working on this button, and one of my “in progress” photos got a mention on Make, and that was cool, but I wasn’t quite done. :)

NOTE: Need a button? Now you can buy one! Visit our store or Etsy.

The button was just part of this larger project to build a photo booth, which is mostly done, as you can see by the photo below.

So basically, this button is ready for pushing. I’ve got a number of events I’ll be at in the few weeks, and this thing will accompany me to some of them. Oh, it can also automagically upload the photos to various web sites on the Internets…

Ready for Pushing

I ended up building a stand for it which places it at the correct height for the typical human being, and thanks to the button, the whole thing can be operated by a single press. No keyboard, no mouse, no muss, no fuss.

The first test is tomorrow… we’ll see how it goes!

Categories
Uncategorized

The Button

The Button

NOTE: Need a button? Now you can buy one! Visit raster.etsy.com.

I was in need of a button, but not just any button. A USB-enabled button that could emulate a single key being pressed on a keyboard. This is that button…

It consists of the following materials:

The Button

I used a Teensy as it’s a very simple (and cheap!) way to emulate a USB HID. I do wish the Teensy had mounting holes. I ended up not mounting it at all and letting it just hang loose, which should be fine, as it’s so lightweight. There’s a bit of electrical tape wrapped around the Teensy and the solder joints.

For the box, I wanted something metal, so it would be heavier and more sturdy than the typical plastic project box. Matt Gauger of Milwaukee Makerspace suggested I check out Mammoth Electronics, as they make boxes for guitar pedals. I ended up choosing their “tall” enclosure.

For the button, I really like this button over the one I ended up using, but it was too tall to fit in the project box. Unless you’re a “button snob” you probably won’t notice much difference between the two.

If you’ve got USB cables lying around, use one… otherwise, you can get one from Monoprice for less than a dollar. I pretty much buy all my cables from Monoprice.

As for the rubber feet, I picked some up at the local hardware store… as well as some black spray paint. (Note: If you are ordering the button from Sparkfun, just get the rubber feet from them too!)

The Button

There was one more item I needed. The button needs a 27.3 mm hole to fit into, which means I needed a hole that was 1.07480315 inches wide. Well, 1.07480315 inches is pretty close to 1.0 inches, so I ended up getting an Ace Bi-Metal Variable Pitch Hole Saw. (The link is not the exact one that I got. I ended up getting mine at the local Ace Hardware store.)

As for the process, the Teensy part took a small amount of time, (see the AWESOME Button) and the drilling was a little tricky, as the 1.0 inch hole was just slightly too small. A bit of creative drilling with a regular drill bit fixed that though. The spray painting was the real time consuming part of it all. As for the assembly, I originally envisioned mounting the Teensy on the bottom plate of the box, and having a hole where the USB connector would be accessible, but I ended up going with what you see in the photo. (I just used the Dremel to cut a small groove for the cable to fit into.)

And why do I need a yellow button that can emulate a key being pressed? Well, sometimes you just need a yellow button that can emulate a key being pressed…

The Button

Note: A number of people have asked for the code I used, and even though it is in the comments, I thought I should post it in here as well.

/*
 * Button.pde
 */

void setup() {
  Serial.begin(9600);
  pinMode(10, INPUT_PULLUP);
  delay(500);
}

void loop() {
  if (digitalRead(10) == HIGH) {
    delay(10);
  } else {
    Keyboard.print(" "); // we print a space
    delay(1000);
  }
  delay(10);
}
Categories
Uncategorized

Milwaukee Makerspace Grand Opening Recap

Grand Opening
Photo by Michael Diedrick

The Milwaukee Makerspace Grand Opening & Mini Maker Fair was held on Saturday, April 9th, 2011 and wow, what an event it was! The photo above should give you a little indication of the crowd. It was “several hundred people” from the estimates I heard…

I’m mainly going to talk about my own experience, since I really didn’t get to experience much of the event, which is sad, and weird, but also cool.

Pete and Sam
Photo by Michael Diedrick

So, I got there around 10am and Matt was heard to say “Hey look, Pete brought BarCamp!” due to the amount of stuff I tend to bring with me, including projects to show, camera equipment, tripods, audio equipment, projector, tables, Time Lapse Bot, and other things. I got set up at a table and put out my projects. As usual, I was way too ambitious, and actually pulled back and didn’t show everything. This was a good decision, as there was just too much going on. The two projects that got the most interest were the Egg-Bot and the Friday Night Drawbot.

Egg-Bot
Photo by Brant

The Egg-Bot is just, well, it’s just cool. I had to explain a number of times that I did not “invent” it, but I built it from a kit. I gave a brief explanation of it (including open source software/hardware, Inkscape, etc.) to a lot of people. One kid was interested in it, and I told him how much the kit cost, and then he complained it was too much. I then described the parts used to construct it, and as soon as I said “laser cut” he was like “oh, yeah, laser cut, OK!” and then he was sold, and thought it was something he should have. (I did point out that it was all open source and he was welcome to get all the parts and assemble his own.)

Eggs
Photo by Brant

I ended up printing about 50 eggs throughout the day, pretty much non-stop. I ended up doing someone’s name on an egg, and then printing one with the word “VEGAN” on it, and then at some point a mom asked if I could print a monkey. A monkey!? Well, off to OpenClipArt.org to find a monkey. And a candy cane. And a rose. And a cat. And the Rebel Alliance logo… I somehow ended up being a one-off egg printing factory! (But it was a lot of fun, and I learned a lot more about Inkscape.)

We gave away a lot of eggs, and I (mostly) remembered to tell people they were raw eggs, and advised the kids not to squeeze them, put them in their pockets, or drop the on the car ride home. One very young girl suggested I should have got up earlier that day (maybe 4am) so I could have boiled them all. As my excuse, I told people it would be easier to preserve them by blowing out the insides since they were raw. One woman gave us a dollar for an egg. (We added it to the Makerspace Donation bucket.)
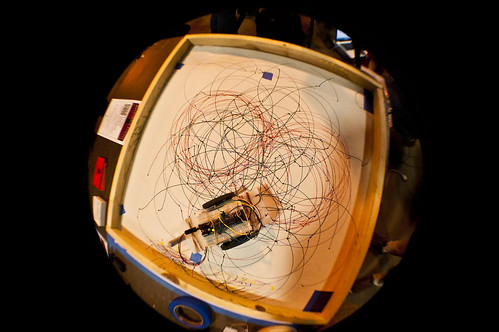
Drawbot Action

And what would the day have been without some Drawbot action!?

I don’t know, but I do know I’m lucky Sam showed up and took on a lot of the Drawbot maintenance. He also ended up exploring Drawbot in ways I haven’t yet, using the Ultra Fine Point Sharpies, and the results were pretty darn good. I’ll try to scan some of the drawing this week. I’ve also got some reprogramming of Drawbot I want to do soon.

Oh, and I ended up telling a lot of people about the Arduino, and how the Drawbot worked, and explained that it was pretty darn easy to build, and if they came down to the Makerspace on a Thursday night, someone could probably help them get started with Arduino hacking.

Now, as for the rest of the event… I missed most of it! I was at my table for nearly 8 hours straight, with just a few quick bathroom breaks here and there while Sam watched the table. I think I need a “Back in 10 minutes!” sign or something. But really, it was a blast talking to so many people and answering questions… but it was also exhausting. I didn’t feel comfortable enough to just leave the table unattended for any large amount of time, so I’m not sure what the solution is… except to have someone else work the table along with me.

I have almost no photos to share from the event, and no video (except for the stuff Time Lapse Bot shot) so head over to the Flickr pool to see some more photos.

Oh, and word from the makers is that they all loved it, it was a great/successful event, and they can’t wait to do it again. Well, they can wait about a year maybe. :)

Categories
Uncategorized

Thingiverse

Thingiverse

Update for 2022: Use Printables.com instead. — Pete

OK, so you’ve got your 3D printer, or your laser cutter, or your CNC machine (or even your Egg-Bot) up and running… but you need some files to feed these things… where do you go? Thingiverse… that’s where.

I’ve finally got around to putting some of my Egg-Bot SVG files up there. I’ve currently got the Jolly Roger and the Milwaukee Makerspace logo (stippled edition.)

You can check on the newest things being added (or follow @thingiverse on Twitter) and you can find awesome things, like this quickmount plate which matches the one we have at work! Or perhaps you need a hinge, or a coathook, or a whistle.

You can also keep an eye on the blog or the featured things, but really, the most important thing to do is to share, share, share…

Categories
Uncategorized

Here or There…

Here or There...

When you want to see things happen where you are, and they aren’t happening, or they aren’t happening fast enough… I think you have two choices:

1. Go to where things are happening, and try to join in with the people making things happen, and be a part of the things that are happening.

2. Make things happen.*

* Option #2 may require you to work your ass off. Don’t let that stop you.