Categories
Uncategorized

Handheld 5 Button MIDI Controller

Here’s another recent build. A five button handheld MIDI controller. This one is not USB MIDI but has a 5 pin DIN MIDI connector to go directly to an instrument. (This one will control a BOSS RC-505 Looper.) A musician got in touch with me about this, asking for a “small detonator style device” and that’s what we designed and built.

I’ll do a quick walk-through of the process for this project with some notes and illustrations.

This was the sketch the client sent, so I could get some idea of what they had in mind. My first question was about the dimensions of the unit, since finding an enclosure would probably be the largest challenge for the project.

Here’s the second client sketch showing dimensions. (You’ll also notice six buttons, though we knocked it down to just five for this iteration.) With the dimensions in hand I started looking for enclosures. Metal would have been preferable, but plastic would be acceptable.

Sadly I did not find any good enclosures the desired size, so I suggested using a 3D printed enclosure so we could make it custom and the exact size we needed. The client agreed to that and I started designing.

Here’s my first design sketch. It’s got some transparency because I often want to see how things fit inside the enclosure to ensure we’ve got enough space for everything. This one shows a rocker style power switch on the top.

A quick change moving the power switch to the side of the unit instead of the top, per the client’s request. This increased the length of the unit a bit.

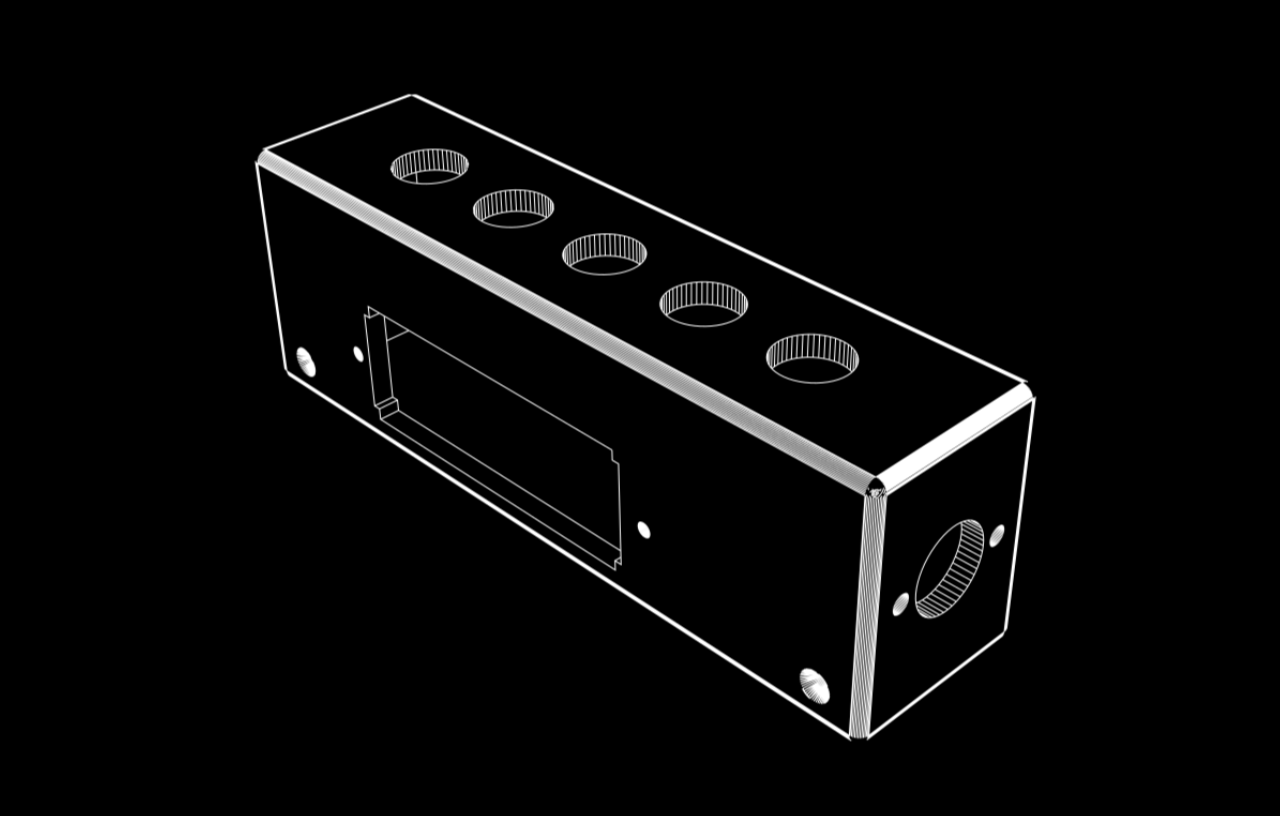
Here’s the final sketch for the device. We switched to a power button with a built-in LED so it could also serve as a power indicator since this is battery powered. This sketch got final approval which meant I could start designing the 3D model and putting together the electronics.

Since durability was important the walls for this enclosure are 4mm wide and the infill is at 30%. The print came out great. I printed it on an upgraded Creality Ender 3 with black Hatchbox filament.

I was really pleased with how this came out. Rather than design a battery compartment I used an off-the-shelf battery holder for an electric guitar, which I think worked well.

This project took a lot of time, but it was a fun challenge, and it feels good to be able to help a musician expand their performance capabilities.

Categories
Uncategorized

Raspberry Pi as USB MIDI Host

I’ve been building USB MIDI devices for a few years now, and in the past I’ve built a MIDI controller using a Teensy that controlled an Akai MPX16, but overall I’ve not had the need to connect things up for my own needs. But now that I’ve got a few things around that have MID inputs, outputs, and throughs, I need to expand my MIDI capabilities.

It seems there are a whole bunch of devices that just do MIDI over USB and don’t have MIDI jack for “true” MIDI output. I think this is just due to it being cheaper/easier to add a USB jack to devices instead of MIDI jack. (Even though there are TRS MIDI jacks, so size/price shouldn’t be much of an issue. It may be due to demand, since most USB MIDI keyboard/devices sold are just going to be connected to a computer.

If you want to connect your USB MIDI input device to a piece of hardware that has MIDI in but is not a computer you’ll need a USB MIDI Host device. There’s the DOREMIDI USB MIDI Host Box which is about $50 and appears to be USB 1.0. There’s also the DOREMIDI High Speed USB MIDI Host Box which seems to support USB 2.0 for around $60.

As usual, I’ve got a lot of stuff laying around from past projects, so I’m recycling/pulling from existing stock here. I’ve got a Raspberry Pi 3 B (which was probably around $35 when I got it) and then you need a power supply (add $9) and a Micro SD card (add $8) so we’re up to $52 right there… and we need one more thing. I’ve had this USB MIDI Converter Cable for years, and it was about $6 when I got it. So hey, we’re under $60 but just barely.

So what do we do with this Raspberry Pi and other stuff? Well, we grab the disk image from this post titled Raspberry Pi as USB/Bluetooth MIDI host and burn it to the SD card and boot it up. Now, I was convinced I’d need to configure things but… it just worked! There’s a complete install post as well which I perused, especially when I tried to add an OLED screen. (That did not work.) To be honest I was a bit surprised it just worked out of the tin. It even worked fine with one of my 8K Controllers programmed for MIDI output.

Categories
Uncategorized

S1 Rotary USB Controller

You may already know that I’ve been building (and selling) USB controllers for the last 9 years or so. Most of them have been for photobooths, tradeshows, exhibits, museums, etc. Well, the pandemic blew things up, in a bad way, with no events happening, so I’ve tried to keep going, and occasionally do custom development, and then turn custom things into products, so here’s the S1 Controller.

It consists of a rotary encoder, meaning it can turn forever in either direction, with a built-in button. Just like the scroll wheel on your mouse! So, what can it do? Well, what do you want it to do? The first one I built was for an audio nerd who didn’t like spinning the scroll wheel on his mouse and then clicking the left mouse button to set the dials in their audio software, so this gives a real-world analog to turning knobs and setting values. I can appreciate that!

It could also be programmed as a volume control and play/pause button, or some other custom thing. I never really know what people will come up with, but 99% of the time I can program what they want. Maybe you want one of these? If you do, you can grab one from Etsy. (Update! Lots of people have wanted these for MIDI related applications, and that works too. If you need a special MIDI controller, we can do that.)

Update: There are now two new versions: S1D Controller and S1A Controller.

Categories
Uncategorized

Slide Advance Alert System (with MIDI)

Here’s a project I did a while ago, but never documented here… At Brown Dog Gadgets we do a lot of video streaming for workshops, and our setup includes one person on camera and another person as the producer who runs the software, monitors the chat window, and does the camera switching and advances the slides.

We started talking about an easy way for the person on camera to let the producer know when to advance to the next slide without having to say “Next slide, please” 20 times each session. Our video software can easily control the slides by using the left and right arrow keys, so we thought about just making a small USB controller the presenter could use to send those key commands, but that only works if the video streaming software has focus as the frontmost application, and since we’re running multiple pieces of presenting software as well as a browser we can’t rely on key commands to work.

So what I came up with is a simple controller that sends MIDI signals to a custom application that plays a sound which the producer can hear through their headphones, and know that it’s time to change the slide. (The application also has a small window that displays “Waiting…”, “Forward”, or “Back” depending on the state of the controls.)

The great thing about MIDI is that it doesn’t rely on a specific application being frontmost… Yes, we could have used serial communications, but we’d need to then select the correct serial port, which changes depending on which USB port you use, hubs, computer, etc.

We’ve got a guide in the Brown Dog Gadgets Project system, and we also dropped it onto Instructables if you want your own Slide Advancement Alerting Device.

This is a niche solution to a niche problem, but that seems to be what I’m good at, so I’m just gonna go with it.

Categories
Uncategorized

8K Controller with Quicksilver

You may already know that I’ve been building (and selling) USB controllers for the last 8 years or so. Most of them have been for photobooths, tradeshows, exhibits, museums, etc. Typically these have been very durable devices meant for use and abuse by the general public. They tend to do one thing, and do it well. Well, 2020 came along and all events and public gathers sort of… stopped, and with it, people wanting specific use USB controllers. I still sold a few, but it became apparent that lower-cost more consumer oriented devices were desires. That’s sort of what the 8K Controller is. I’ve sold about a half dozen, and I’m considering another run if people are interested in it.

Yeah, so what is it? Well, it’s a USB controller. By default, it’s programmed for function keys F13 through F20 (which are not found on most keyboard) but it can be programmed for any keys, or key combos, or even as a MIDI controller. So yeah, what can it do? Well, with specific custom key commands it can serve as a controller for Zoom, Google Meet, or Microsoft Teams to mute your mic, disable your camera, and other things. As long as there’s a key command, it can do it.

If you just want the default F13-F20, you can use macro/automation software to do all sorts of other things, and I’ll write about these in the coming weeks. In fact, we’ll start right now!

Quick Disclaimer! By default the controller is recognized as a USB HID device, no drivers needed on modern versions of macOS, Windows, or Linux. In future posts I’ll jump into Windows and Linux, but I’ll start with macOS.

Today we’ll look at Quicksilver, which is open-source/free and can be found at qsapp.com Quicksilver can do a lot of neat things, and falls under the category of “productivity software” as many of these applications will.

Quicksilver allows you to create triggers that respond to key commands, which is perfect, because we’ve got 8 key commands just waiting to be put to use. I created a bunch of actions to open up specific web sites, and then for each one, clicked Edit for the Shortcut and pressed the button on the 8K Controller I wanted to assign it to. (I should note that I’m not a long-time user of Quicksilver. I downloaded it tonight and got this basic functionality figured out in less than an hour.)

I’ve now got seven buttons right behind my keyboard which will pull Firefox to the front (no matter what application is running) and load a specific web site. I can have Twitter or Facebook on my screen in a matter of seconds! (Those probably are not the best choices though!)

These are really just examples though. I’ll be changing them to things I actually need every day for work. Admin interface for the online shop, a few accounts I need to keep an eye on, etc. Sure, it’s not too difficult to command tab through the open applications, get to Firefox, click a button in the bookmark toolbar, but… this is one press of a dedicated button, so yeah, it’s quite a bit faster, and I dare say more satisfying.

The view from the Raspberry Pi that has a camera pointed at my 3D printer is now just a mere button press away! (Hmmm, looks like it’s ready for a new print to get started.)

Oh, and one more thing… You may notice I used F13 through F19, but not F20. It seems Quicksilver does not support F20. I did find an issue about the higher numbered function keys, but no mention of F20. Maybe I’ll file an issue about it, but for now 7 out of 8 with a piece of free software isn’t too bad!