Categories
Uncategorized

The Week in Photos

Cat x Cat

We started the week off with the cats sleeping. They do that a lot. They get more use out of the couch than the people who paid for the couch, so really, I guess we bought a couch for the cats.

Milwaukee Wave

We went to the last Milwaukee Wave home game of the regular season, and it was Fan Appreciation night. Here’s Jonathan Santos signing Dana’s jersey.

Mac x Mac

Had a heck of a time battling with a MacBook that wouldn’t boot… not even from external drives or the optical drive. Only ‘Safe Mode’ would work. Still working on this…

Chroma Green

At work we painted the cyc wall green for a big green screen shoot we’ll be doing this week…

Cat Top

You walk away from your MacBook for 5 minutes, and this is what happens…

Desk

The desk is a bit crazy right now… Besides the two displays of the Mac Pro, the MacBook is also there, and way over on the left is the Eee PC which may be brought into service with an Arduino attached for some remote monitoring…

R2D2

And lastly, I’d like to thank Dana for allow this to hang in the kitchen. I just hope George Lucas doesn’t show up and try to duct tape a jet pack onto it.

Categories
Uncategorized

Processing PhotoBooth

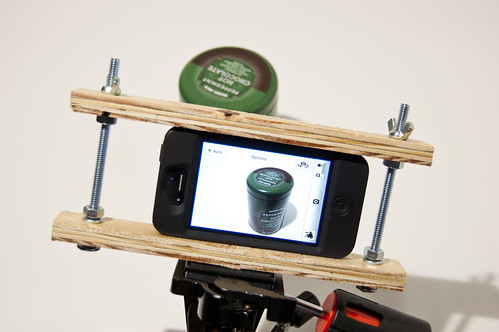
You probably know I’m a fan of Photo Booths, and while Sparkbooth is awesome software, you might want something free (and open source) so here’s “PhotoBooth” written in Processing.

This is all the code you need for the most minimal photo booth application:

/**
 * PhotoBooth.pde
 */ 
 
import processing.video.*;
Capture cam;

void setup() {
  size(1280, 720);
  cam = new Capture(this, 1280, 720);
}

void draw() {
  if (cam.available() == true) {
    cam.read();
    image(cam, 0, 0);
  }
} 

void keyPressed() {
    if (key == ' ') {  // space bar
      saveFrame("picture-####.jpg");
    }
}

Once you’ve got that, you can export it as an application from Processing.

(Note that I’m using a Logitech C910 webcam, so I’ve set the resolution to something that makes sense for that camera. If it looks weird with your camera, try 640×480 or something else.)

PhotoBooth Export Application

I generally use Mac OS X, but other operating systems are supported. This is one of the great things about Processing.

PhotoBooth Application

Over in the Finder you’ll see a standalone application named “PhotoBooth” that will run fullscreen when launched. (You can exit it by hitting the escape key.)

Spazz!

Once you launch it you’ll see some spazzy dude, wait, that’s me! You’ll probably see yourself instead.

Hit the space bar, and it’ll save a photo. Hit the space bar again and it’ll save another one. And on, and on.

PhotoBooth Photos

The photos will show up in the same folder as the application. They will have a random number in the name. It’s not sequential, but you can view by date created if you need them in order.

Here’s a more full version of the Processing code with a few extras commented out. Uncommenting them may prove useful for debugging or camera set-up.

/**
 * PhotoBooth.pde
 */ 
 
import processing.video.*;
Capture cam;

void setup() {
  size(1280, 720);

  // If no device is specified, will just use the default.
  cam = new Capture(this, 1280, 720);

  // To use another device (i.e. if the default device causes an error),  
  // list all available capture devices to the console to find your camera.
  //String[] devices = Capture.list();
  //println(devices);
  
  // Change devices[0] to the proper index for your camera.
  //cam = new Capture(this, width, height, devices[0]);

  // Opens the settings page for this capture device.
  //cam.settings();
}

void draw() {
  if (cam.available() == true) {
    cam.read();
    image(cam, 0, 0);
  }
} 

void keyPressed() {
    if (key == ' ') {  // space bar
      saveFrame("picture-####.jpg");
    }
}

And hey, I know that hitting the space bar ain’t cool… so you might want to use an awesome button instead.

This is a super-simple application, which basically takes some example code that ships with Processing and adds a bit to it. I hope to have a few more posts that talk about some changes you can make to this application. Stay tuned!

Categories
Uncategorized

The iPhone 4S Camera

I’ve been meaning to do some iPhone 4S camera tests for a while now, and rather than wait and wait while I come up with a scientific method, I thought I’d just do a few shots and post them here. Early and Often, right?

Each photos links to the Flickr version you can view it at various sizes. None of the photos have been retouched at all.

iPhone Test 01
Normal iPhone 4S photo with direct light.

iPhone Test 01 (HDR)
HDR iPhone 4S photo with direct light.

iPhone Test 02
Normal iPhone 4S photo with soft light.

iPhone Test 02 (HDR)
HDR iPhone 4S photo with soft light.

For each shot the iPhone was on a tripod, and an overheard light consisting of a single bulb was used. (It’s a large high wattage bulb from an old photostat machine.) For the soft light shots, I put an umbrella in front of the light. I used Apple’s default Camera app that comes on the iPhone. All were shot on the white sweep I use for all my tabletop stuff. (If you’ve seen my Flickr stream, you’ve seen plenty of shots on that sweep.)

iPhone Tripod Mount
Experimental iPhone Tripod Mount

This photo of my “Experimental iPhone Tripod Mount” was taken (handheld) with my Nikon D40. If you wanted to compare the two, the iPhone 4S is supposedly an 8 Megapixel camera, while the Nikon is a 6 Megapixel camera. Size isn’t everything of course. Well, the Nikon does have a bigger lens, so that helps quite a bit. The Nikon also shoots in RAW, and yes, this shot has been edited quite a bit, but hey, that’s what I do with RAW photos. (And I mainly took this shot to show the set-up I used.)

When I get ambitious again, I’ll set up two tripods, one with the iPhone, and one with the Nikon, and do duplicate shots of various objects. Until then, enjoy these… I’m off to work on my Experimental iPhone Tripod Mount Version 2.0

Categories
Uncategorized

Beach Bike

Beach Bike

I shot this bike at Rehoboth Beach, Delaware using my Nikon, and then after I synced the photos to my iPad I used Trey Ratcliff’s 100 Cameras in 1 to do a little processing.

I was quite pleased with how fast the iPad processed the photos in comparison to my 3G iPhone (but that’s to be expected I guess.) The images came out at 600 pixels wide/high. I’m not sure if there’s a way to adjust that, as higher resolution would certainly be nice. I should also mention that I have the iPhone version of 100 Cameras in 1. (There’s also a separate iPad version, though I didn’t feel like plunking down more money for it… yet. Of course, this may be why the images came out at 600 pixels wide/high.)

At first I was sort of overwhelmed with 100 Cameras in 1, because, hey, that’s a lot of cameras! But I’m slowly getting used to it. It’s quite a difference from Plastic Bullet, one of my favorite iPhone photo apps, but it’s growing on it.

Categories
Uncategorized

HDR Photos [Photoshop and Luminance HDR]

HDR Photos

It’s been a while since I posted anything about HDR imaging, and I realized that I never put Adobe Photoshop CS5 to the test. I did try creating an HDR image with CS4, but was disappointed with the results…

In the image above you can see my final output of an image. On the left side is all Photoshop, and on the right side is Luminance HDR (formerly “Qtpfsgui” for you old timers.)

Now for both of these images I did the HDR+ thing I talked about a while back, where I blend an HDR image with a normal exposure. Personally, I like the way those turn out, so it’s pretty much how I do HDR.

Pewaukee Lake

Here’s the image from Photoshop. (View it large at Flickr.)

Pewaukee Lake

Here’s the image from Luminance HDR. (View it large at Flickr.)

I think the Photoshop image looks better in the sky… it looks a bit cleaner, while the Luminance HDR image has a little bit of banding going on. You can also see some differences in the trees, and the water, but I think the rocks in the foreground really show the difference, and I prefer what Luminance HDR did.

This is only my first attempt at comparing the two applications, so it’s not entirely scientific. I did go into each file and tweak it a bit to try to match them closely as far as the color balance, but the detail is where the difference is most apparent. I also didn’t see any way to adjust the tonemapping in Photoshop, while Luminance HDR has a ton of sliders and options to twiddle with.

I suppose next time I could combine the two final images into a ‘final final’ image that would be some sort of SUPER HDR+ image. (I’ll add that to the ‘to do’ list.)