Categories
Uncategorized

GoPro Hero3 Frame

GoPro Hero3 Frame

I like the acrylic housing that comes with the GoPro Hero3, but I tend to run some pretty long time lapses, and the battery doesn’t last long enough, so I made a lightweight frame, and it’s over on Thingiverse.

GoPro Hero3 Frame

I’m (slowly) getting better at OpenSCAD, thanks to projects like this. I’m sure I’ll get even better in 2013.

GoPro Hero3 Frame

I’ve got plenty of long USB cables and USB power supplies, as well as a Minty Boost from Adafruit to provide power for shooting hours and days at a time.

Here’s a quick time-lapse test I shot before I had the frame. I ended up balancing the GoPro on a book on top of two water bottles, which was silly, and just one more reason for this thing.

GoPro Hero3 Frame

The frame has a bit of flex to it so you can easily wrap it around the camera. I may play around with some thicker housings, but for now, it does the job.

I ended up printing about 6 versions before I got one that was good. I should probably do more paper prototyping, but with how easy it is to 3D print things, sometimes you just hit “print” and hope for the best. If it doesn’t work out, you tweak things and try again. It’s just the way it works.

(Note: I guess GoPro also sells a frame for the Hero3. Go buy it from them if you want a really nice one and have $40.00 to spend. If you just want this cheap plastic one, print it yourself.)

Categories
Uncategorized

New Slider Ends

New Slider

If you saw my post about a Motorized Camera Slider, this is a bit of an update, but it’s really more about the process than the end product, so if you’re interested in that, read on!

Slider End (Original)

I was originally using the improved camera slider V2 from our pal Marcus, and it worked well enough, but I wanted something different, so I tweaked what he had.

Slider End sliced

Marcus created his original file (I think) with Alibre Design, and since I couldn’t open it, I just worked with the STL file he provided. I loaded that into OpenSCAD and grabbed a slice of it using this method.

Slider End outline

Once I had a line drawing of the original slider end, I could use it to make my own. I imported the DXF File into Inkscape, my standard for 2D (and 2.5D) illustration.

Slider End outline

In reality, the only parts I really used from the original were the approximate size of the piece, and the two holes for the rods. I could have measured things, but loading up a file as a template was easier. I guess I could have got all fancy at this point, but I just kept it simple.

New Slider End

Once I had my SVG done in Inkscape, and exported a DXF file, it was a matter of doing the old linear_extrude method, like I did for my snowflakes, etc. I saved out an STL file and I was ready to print.

Nw Slider End

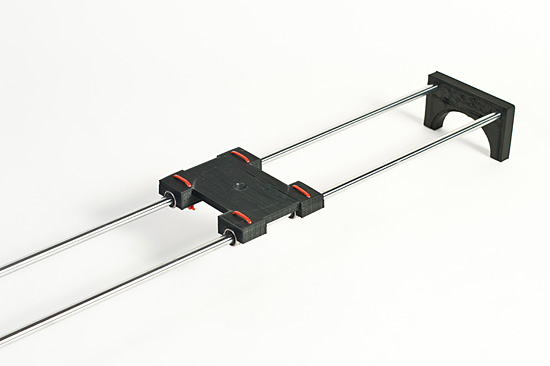
Here’s what the final piece looks like. One of the issues I had with the design Marcus created was that the rods only went part way into the plastic. There were screw holes to tighten down some screws onto the rods to hold things in place, but I never put any in. They might have also helped with the twisting issue this design has, but I may explore the idea of a two-piece design that clamps tight with the plastic. Or not… the nice thing is, it’s easy to experiment.

If I wanted to, I could probably make these ends out of wood, which would require just a drill press, or maybe out of a nice heavy metal, which might require drilling, or maybe milling. Both processes are a little messy, potentially more expensive, and require equipment you might not have. The nice thing about 3D printing these is that I can iterate a design quickly, and at a very low cost. I can even make them mostly hollow to save on time and materials during testing, and then make stronger, more solid versions when desired.

Nw Slider End

You may notice the carriage has some zip ties on it. Those are holding the LM8UU linear bearings in place. My original carriage was way too stiff, and without exact alignment (which you may not get with DIY plastic parts) it didn’t slide without some binding. The bearings were 58 cents each (I got a 10-pack from an ebay seller.) The bearings are a little noisy, so if you plan to shoot video with sound, you might have some issues. (Maybe more expensive bearing would make less noise?) As for the rods, they were about $15 each (pricey compared to the other parts) from VXB.com. There are cheaper alternatives depending on length, size, quality, etc. I went with 8mm because those are standard RepRap sizes.

At some point I may play with carriage designs as well. I actually did an early version that used felt instead of linear bearings (another trick from the RepRap world) which makes things cheaper and quieter, which may be desirable in some cases. And of course, I need to revisit the whole “motorized” part of this thing.

Until next time!

Categories
Uncategorized

Happy Hannukah

Dreidel

Happy Hannukah, everyone! Here’s the dreidel I made. It’s not made out of clay, or even “brey” (which is lead) but it is made out of ABS plastic. You know, the same plastic that LEGO are made of. You can make your own, just grab the file from Thingiverse and print it on your home 3D printer. Don’t have a 3D printer at home? You could always swing by Milwaukee Makerspace, or maybe the next MKE3DP Meetup.

Dreidel

If you’re wondering why the top of the dreidel is a funky black while the rest is white, it’s due to switching filament colors from black to white before printing, but not bothering to clear out all the black. I do this on purpose sometimes, because it causes this interesting effect.

Also, if the handle looks weird, it’s because I broke it and then re-attached it with acetone, but did it upside down. It still turned out very nice, in my opinion!

Categories
Uncategorized

Fixed: GPS Mount

3D Printed Fix

The part of my GPS mount that snaps onto the ball thingy broke, but it was a pretty easy fix with the RepRaster 5000 3D Printer. I started with this Parametric Ball Caster from Thingiverse, which I’ve used before. A quick measurement or two with the calipers to get the ball diameter and width of the caster.

GPS Mount

I printed it in orange instead of black because I was too lazy to change the filament, and on the original mount I just ran a drill bit through what was left of the broken part to give me space to jam the new one in there… a bit of hot glue, and it’s not quite good as new, but it’ll work for now!

Categories
Uncategorized

RepRap Report #2

End Stop

Somehow I can’t believe it’s been four months since my last RepRap update! I’ve got a lot to report…

In July I took the RepRaster 5000 to 3D Printing Camp in Madison, and that didn’t work out too well. The first problem was that I couldn’t get the bed up to temperature (and yeah, I print with ABS.) I didn’t notice the ceiling fan directly above me. I moved. I also managed to knock the Z end stop out of place, which made the extruder crash into the bed. No real damage from it, but I decided I needed a new end stop solution. The new one is way more solid. No easy way to bump it out of alignment.

I also took the RepRap to the Milwaukee 3D Printing Meetup. Once again something went goofy, but I did get it working fairly quickly after the first fail. (Just a few weeks ago I took the RepRap to BarCampMilwaukee7 and had no issues at all. Success!)

Power

At some point I got sick of all those damn wires coming from the ATX power supply, so in the process of making them shorter, I hosed something up good and ended up with a power supply that supplied no power. I finally got a smaller (and more powerful!) power supply. I’m not 100% happy about the mains not being totally covered up, so I should make a case for it at some point. It works very well though… much better than the ATX supply did.

Spools

My great spool experiment was a bit of a failure. I mean, at least I don’t use soup cans, and while I still think my idea was good (or at least looked good) trying to wind a coil of filament onto a spool is damn near impossible. Just ask my daughter, who had to hold back from laughing when the power drill kept slapping me in the head with filament. I’ll probably move to one of those adjustable filament holders you can easily get a coil onto. At home I end up just hanging the filament from the ceiling, so that works fine.

QU-BD Extruder

I ended up getting an extruder from the QU-BD Kickstarter campaign, and I haven’t bothered to assemble it yet. My original plan was to donate it to the DIY 3D printer we were going to build at Milwaukee Makerspace. Since we ended up getting a Replicator, we didn’t build a printer. It’s a 1.75mm extruder, and since I use 3mm now, I may end up switching to 1.75mm in the future, so it could come in handy.

Netbook

My best RepRap hack was getting my MacBook out of the picture and making good use of my old Eee PC 701. This was the first netbook ever released, way back in 2007. I’ve struggled with how to make it do something useful, and now it does. I’ve connected an old LCD display I got for free to it, and it sits on the shelf near my workbench. It does one thing… control the RepRap. It’s plenty powerful for that. I do all my modeling and slicing on my MacBook, so the Eee PC just runs Pronterface. And for traveling I can just bring the Eee PC and it doesn’t take up much room.

Mr. Pumpkintatohead

Hey look, it’s Mr. Pumpkintatohead! Nothing amazing, but I’m getting better at using OpenSCAD. I managed to design all the parts (minus the knobs) for my Laser Kaleidoscope in OpenSCAD (no, they are not parametric, but hopefully I’ll get better as time goes by.) I also managed to complete a home repair thanks to OpenSCAD and the RepRap. Hooray!

I’ve still got some challenges. Now that it’s getting colder out, and I’m printing bigger objects, I’ve got some warping issues. As winter comes, this may be my biggest problem. Besides that, things have been working really well. One thing I’ve found is that I’m not happy with my z height. It’s just 75mm, and I’d like to see a bit more. Oh, I also switched from Sprinter to Marlin, so I may be able to get a few more millimeters of height by just updating the firmware. (I was a little conservative at first.) I can probably gain a few more millimeters with a new piece of plywood under the bed. There’s always something to tweak with a RepRap…

I think the biggest change from June to October is that I am now confident enough that I can hit ‘print’ and leave the basement and I’ll come back to a successful print. I used to just stare at the bed as the skirt went down, and that first layer went down… in part because I was fascinated, but also in part because I always assumed something would go wrong. Things tend to go right almost every time now… it’s almost like having 3D printer at home is a normal everyday thing. :)

(You can see some photos of my prints over on Flickr. I’m way behind in taking photos of my prints, but there’s a few interesting ones in there.)