Categories
Uncategorized

QWERTY Prints

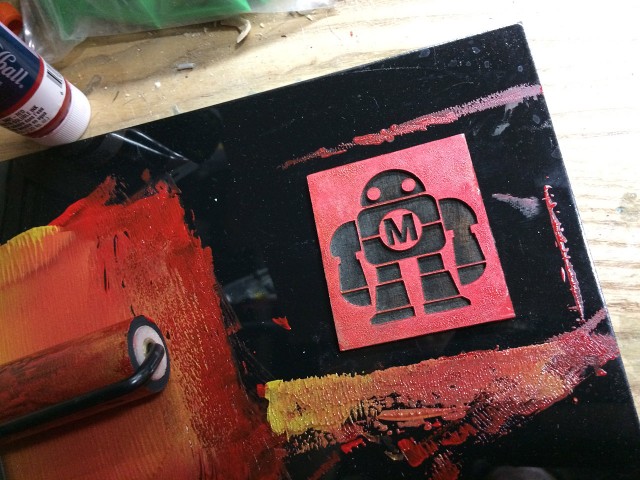
Since I got the press up and running I figured I should put it to good use. I made a plate and made a few prints. One of the things I used to do when I did screenprinting was to do a print, add more ink of a different color, print again, and keep it going. In the end you have (usually) brown ink you can’t really put back into a can since you’ve mixed it all up, so I’d usually have a “brown” can of ink.

Anyway, this is a similar process, where you add more ink with each print. Luckily with this type of printing there seems to be less waste.

Since I recently posted about The Process I’m going to take some time with this post to talk about that…

Of course if you like these prints for their visual qualities, cool. That’s great! You can like them for that, but with everything, there is a story… a narrative… and there’s a process.

Often for me, creation is a exploration. I am extremely lucky that a good amount of the art I make does not need to be commercial art. I don’t have to rely on selling it to survive. I often make things, create things, or attempt to bring something into existence because I am curious. I ask “What if…?” and every now and then I have the means to find out. So let’s go for a journey!

I had attended a meeting for QWERTYFEST MKE, which will be an event focused on typewriters, writing, books, and all that stuff. (If you want a diversion, check out this post about my QWERTY Keyboard.) After the meeting I was thinking about typewriters and how back in the 1990s before we had easy access to computers we would go to Kinko’s and use the IBM Selectric typewriters to create type. This was our primitive method of typesetting: Use a typewriter to type, then blow it up on a copier until you had it large. We used this method to make flyers, and zines, and sticker and t-shirt art, or whatever. It was cheap and easy and fast.

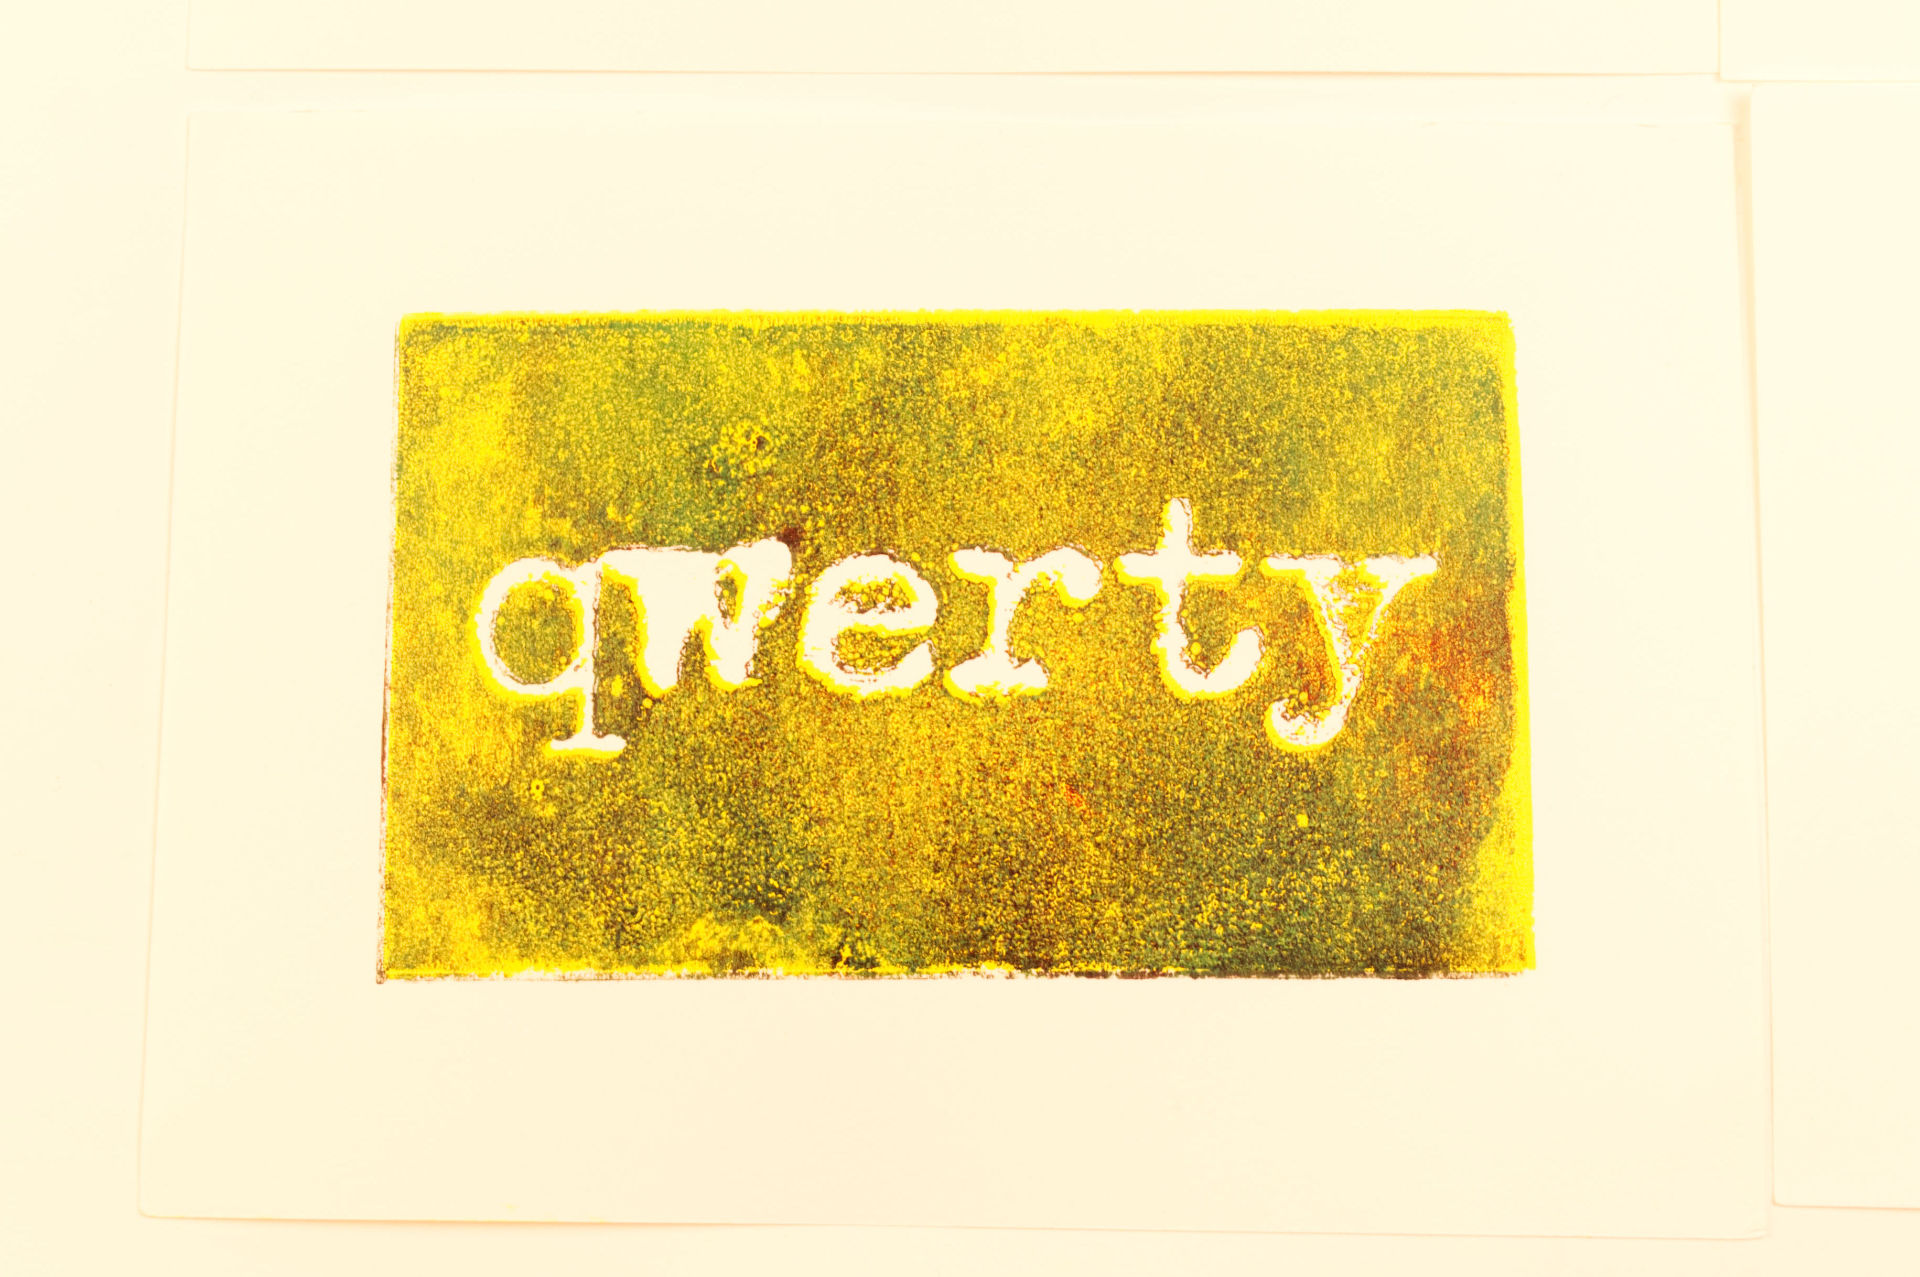
Above is the artwork I used for the printing plate. I got this by starting with the one functional typewriter in my house. An old Royal that sits on our mantle. The ribbon is a bit dried up, but I was able to bang out q w e r t y.

I took the paper I typed on and scanned it into my computer using a Brother MFC-L3770CDW Printer/Copier/Scanner. Sadly it’s a digital thing, and you can see scan lines. I did try to blow it up quite a bit. I may have even printed it and scanned it again. Either way I was not pleased with the outcome, so I did not use it. Maybe I can play with the scanner settings a bit? (Fun Fact: I used to do a ton of scanning at my first internship and then job.)

After the poor performance of the Brother (which is actually a really nice printer and okay scanner) I grabbed the USB Digital Microscope on my desk and actually used that to capture the small type. The microscope can (supposedly) magnify 1000 times. I’m not sure that’s accurate, but that’s what it says on the tin. I did end up using this one. I brought the image into Affinity Photo and messed with the levels and made it monochrome as you can see in the stark black & white image further up the page.

After I made the plates and the prints I remembered I got a nice scanner for Dana’s desk. It’s a Canon CanoScan LiDE400 that can do 4800 dpi resolution. Much higher than the 600 dpi my Brother does. You can even see the grain of the paper!

The other method I probably could have used to magnify the type would be to photograph it with my Nikon DSLR. I didn’t think about that until later.

So as I said, it’s a journey. I now have a number of methods to try next time, and have some idea how they will turn out. I can also do the copy and enlarge thing multiple times. The “copy” feature of the Brother allows for 200% enlargement which is… okay I guess. The idea is that with each copy things degrade a bit, and you get type you cannot get by using a digitally created font. You can see that attempt in the image above. Maybe I should have started with that method… (Note: The Brother can do 400% enlargement. It’s in a submenu.)

Lots more to explore here, and I look forward to it!

Categories
Uncategorized

Provisional Press

Last year I bought a printing press kit from Provisional Press. I used to have access to a press when I worked at the museum, and I’ve also borrowed a press from a friend of mine in the past, but most of my “home made” prints have been done with a baren. (I even 3D printed one.) Can you do prints with a baren? Totally, but using a press does make things much easier and more consistent.

I got the base kit with no extras (more on that later) so that’s what you see in these photos. Once you do the assembly, which consists of gluing and screwing things together, you can add in the metal plate as the base. If you use letterpress the metal base comes in handy, and you can grab some galley magnets but honestly I’ll probably just make my own plates like I normally do.

It comes with two “galley high” blocks, which you use to square things up properly so the roller height is consistent across the press. There is a process involving adding tape under the inside rails before you screw them in place.

Here’s what the bottom looks like. You’ll see that some things are not jammed tightly together. Maybe because wood can expand and contract over time and based on temperature and humidity? I’m not sure…

Here you can see some (blue) tape sticking out a bit. You basically add strips of tape to get things level with the roller. It didn’t take long, but it’s one of those things you should take your time with and get right, since once you screw things together you probably don’t want to unscrew them.

The roller is a large piece of PVC or “Charlotte” pipe. I used a bit of acetone to remove the red “Charlotte” lettering on it. It’s still slightly visible though, which is fine.

My plates are typically made from 3mm (1/8″) Baltic Birch plywood. I have a pretty good supply of scrap due to the fact we use a ton of it at work and often get strips left over that are around 4″ tall by 24″ long. I tend to cut them into smaller pieces to fit in my laser cutter. Making 3″ x 5″ plates is quick and easy and I can probably make 50 more with the scrap I have on hand right now.

To get the plate to the right height I dropped in a piece of 3/4″ plywood I had lying around, with some old cereal box board and sheets of paper underneath to get just the right height. It works well and if I consistently use the same wood I shouldn’t have to adjust things too much.

Hey, I made a print! You can see I added two pieces of soft felt as my “press blankets” which seemed to work well. The one upgrade I’ve already added is the 9″x17″ Grid Base which I should have grabbed when I ordered but for some reason did not. It makes it much easier to line things up and to clean things up.

About the assembly… It went well, but it did take some time. I think part of it was that since there was gluing involved I really wanted to get things right. The other issue (for me) is that the last few things I’ve built have been CNC machines, where getting things exact and precise is extremely important. This press is… a bit less so in that regard. It’s all wood, but you end up shimming things to get stuff aligned, and it just feels like there’s some wiggle room. Having built one I’m pretty sure I could build another in half the time.

I will recommend this: Watch all the videos and read everything completely before you start the assembly. Some of the parts do not match up exactly, which was confusing for a bit. The videos are not professionally produced, but hey, it’s a DIY kit, so that’s fine. Watch them all before starting. (And, read the FAQ!)

For the pins that keep the top roller from coming off, I did not glue them in place, as I wanted them to be removable in case I take the top roller part off for some reason. (Maybe for transport.) I just wrapped some tape around them to press fit into place. I did stain the side parts of the top roller section, and thought about staining more of the press, but you should do all that before assembly, and I didn’t want to spend the time doing that. I think it looks pretty good as it is. I mainly stained the side parts because they are 1/4″ laser cut pieces and I just wanted them to look a little nicer.

Oh, if you want to see a bunch of fun stuff from the Provisional Press crew, check out their Instagram account. Also, you can totally build your own! The plans for this press are open source.

I’ll probably do a follow-up post once I’ve got a bit more time into using it. So Stay Tuned!

Categories
Uncategorized

3D Printed Print Baren

In the world of printmaking (of which I am far from an expert) there are many ways to print, including a printing press. I no longer have easy access to a press, so I’ve been using alternate methods of getting ink on paper. One method is to use a baren. The baren is a thing you hold in your hand to rub the paper against the printing plate, thus causing the ink to be transferred.

I bought a cheap Speedball baren years ago, and I never liked it, so I started looking at other barens. Now, printmakers tend to appreciate fine things and aesthetics, and there are a lot of different barens out there. Some are made of glass, some are bamboo, some have rope or ball bearings or pads, etc. So I finally asked the wisest of printmakers I know, and Jessica told me she just uses a wooden spoon.

Well, I decided to just make my own baren. So I quickly modeled something really ugly, and I 3D printed it. After I printed it I thought of a better way to model it, and I still haven’t made a new one. This one works, so I’ll just keep using it for now. It’s functional. It’s good enough.

I did sand the bottom of it… quite a bit! Working my way up to high grit sandpaper until the bottom was smooth. Really smooth. It’s smooth. Yeah. Smooooooth. I also sprayed it with Liquid Wrench and rubbed that in real good. It glides across the paper really nice. I’ve done a few prints with it and I’m pretty happy. 3D Printing. It’s handy!

Categories
Uncategorized

House Illustration & Print

Right before Christmas Dana mentioned that she still needed one more gift for her sister, and told me she tried to get a house illustration done because she had seen some through a local company. (I think it was Bay View Printing Co. but I am not sure.) She asked if I could figure something out, so I volunteered.

She got me a nice photo of her sister’s house, which I then used as the basis for a line drawing. After a few rounds of revisions with the client (ha ha) she was satisfied. I originally wanted to try an intaglio print for this, so I attempted to etch an acrylic plate with the laser cutter and did some test prints. (Oh, an amazing printmaker friend of mine who lives about a mile away offered to loan me her small press.) I tried my intaglio, which I’ve not done before, and just wasn’t satisfied with the results, so I resorted to a quick ‘n dirty laser cut wood plate, which I’ve made plenty of before…

This was just one of the first test prints, and I had planned to make a better plate and print more, but ran out of time, and Dana thought this one looked good. (Sidenote: I’ve been having these issues where I feel like my work could be better, which I guess is the opposite of just settling, but it’s been sort of annoying to my process lately.)

Anyway, in the end I did an illustration, and I made some prints, and I did try a few new techniques, and I guess it’s all good.

Categories
Uncategorized

Little Printing Press

printmaking-0999

I came across this DIY Printmaking Press from the Open Press Project and since I’ve always been a fan of printmaking I thought I should 3D print a printing press on my 3D printer so I could print paper on a 3D printed printing press.

printmaking-1007

The (3D) printing went well, and all the pieces turned out good. I did add support to the rollers, to ensure they’d print well without sags. The one piece that is weird is the roller pin, which seems too small. It falls out a lot and doesn’t fit tight in the roller or the roller wrench. I may design a new one that fits snug.

printmaking-1009

I also did not have any 5mm bolts of the right length, so I used 6-32″ bolts. I’ll have to glue in the nuts so they don’t fall out, but that’s pretty minor. I’d also consider using hex head bolts and 3D printing little knobs to put on the heads so you can adjust the pressure without needing a screwdriver.

press-assembly

I did not have any press blankets, so I used some foam rubber sheets I had on hand. It seems to work okay. I may ask my printmaking friends for some scrap blankets.

printmaking-lc

For my first printing plate I grabbed a vector image of Makey and laser etched it using 3mm Baltic Birch. (Sidenote: LightBurn is awesome.) I did not seal the wood as I was anxious to make some prints!

printmaking-1010

This is a small press, and my plate was 57.5mm x 65mm. This might be a good press for making business cards or maybe printing stickers. The nice thing is that since it is so small, it’s portable, and you can make a lot of tiny prints for pretty cheap.

printmaking-1011

printmaking-1012

This was a fun little project and I’m guessing the cost of making this printing press was maybe a few dollars worth of filament and hardware. The press blanket is probably the more difficult thing to get cheap, though perhaps an alternative like some thick felt (or layered up thin felt) could be used.

Happy Printing!