Categories
Uncategorized

Wooden Knuckles

Wooden Knuckles

I made some wooden knuckles. Why wood? Well, brass knuckles are usually made out of brass, which is a hard metal, and may hurt someone. Wooden knuckles use wood instead, and shouldn’t be as harmful, or dangerous, or heavy. Also, I may have a history of making safe/odd weapons.

I also published this on Thingiverse, which means if you’ve got access to a laser cutter or are really handy saw, you can make your own. It’s derived from 3D printable “brass” knuckles which would look lovely in glow-in-the-dark ABS plastic.

These may or may not be something you want to take through security. I mean, they are definitely not metal, so they won’t set off any metal detectors, and really, they are more “art” than “weapon” in my opinion. (I have no idea what the TSA might think about these…)

If you want to make your own laser-cut wooden knuckles, you could probably do so at the Milwaukee Makerspace if you were a member, and had some 3mm Baltic Birch plywood and a bit of glue.

Categories
Uncategorized

Laser. Cut. Wood. (Part II)

Laser Cut Box

In our last adventure cutting wood we had success! And it was good… So I decided to try the awesome BoxMaker again and I’m pleased with the result as compared to the previous attempt.

Above you’ll see the template I created from BoxMaker with a light bulb on one of the faces. I got the original bulb from OpenClipArt and tweaked the SVG file in Inkscape until I was pleased with it. (I may still need to adjust a few of the thinner areas, but I definitely like it.)

Bulb Box

In the next image you can see the results of the cut. This is using 3mm Baltic Birch plywood, which I highly recommend for the 25 Watt Laser Cutter that Milwaukee Makerspace has.

There’s actually one extra piece in the lower center which you’ll notice has straight lines, and is not part of the box, but this is the interesting part…

One thing about using the laser cutter is determining what settings to use. For this cut I used 100% power with 3.2% speed. It takes a few passes to complete the cut (maybe 4 or 5) but it works. I found that at slower speeds there is a higher risk of flames (which are bad!) and you can char the wood a bit too much. I actually didn’t care about the charring as I will be painting this box, but if you want less charring, up the speed a little bit, and know that you will need more passes.

Burninator

Oh yeah, the interesting part! In the image above, I’ve highlighted two areas. In the bottom red rectangle you’ll see a lot more charring. This is due to the long straight line that the laser cutter follows when cutting. I noticed that the notched areas, with lots of small short lines, had much less flame, while the long continuous lines had a lot more flame. (It was still within an acceptable amount of flame, but this is why I didn’t want to go lower than 3.2% for the speed.)

So I’m definitely calling this one a success, if only due to the fact that I’m pretty certain I’ve got good settings to use when cutting 3mm Baltic Birch plywood.

Also, lasers are awesome!

Categories
Uncategorized

Laser. Cut. Wood.

Milwaukee Makerspace Medallion

Since the dawn of time, man has battled against wood… no, that’s not right. What I mean is, since we got the Laser Cutter at the Milwaukee Makerspace, I’ve wanted to cut things out of wood with that powerful beam of light.

And now I have… mostly. Sort of. Yeah.

Boxy

My first (failed) attempt was when I cut a box, and tried to use whatever scrap piece of 1/4″ plywood I had lying around the house. (For you metric folks, that’s just over 6mm thick.) Since it was typical crappy plywood with layers and glue and stuff, it made some nice burns, but couldn’t cut through it.

Milwaukee Makerspace Medallion

Well, here we are, with a nice piece of wood cut by the laser. This piece of wood is 3mm thick. (For you non-metric folks, that’s about 0.118110236 inches thick.) The Milwaukee Makerspace logo is etched into the wood, which makes this piece of laser cut wood at least 125% more awesome.

Craft Plywood

And what kind of wood is this? It’s not crappy plywood I found in the basement. I ended up going to the hobby store and buying a nice piece of wood, which you can see on the label, says it’s 1/8″x4″x12″ craft plywood. It wasn’t too expensive at $1.25, but I can’t really get larger pieces than that at the hobby store, so I’ll need to look elsewhere. (Oh, the receipt listed it as “Baltic Birch Plywood” which is what I want. (Baltic Birch is what they use for MakerBot frames. If you’ve got a recommendation on where to get it, especially local to Milwaukee, let me know!)

As my previous post mentioned, the laser cutter is just 25 watts, not super-powerful, and it may need a good cleaning, but if you’re willing to make a few passes, or a few passes plus a dozen, you should be able to cut the right type of wood, if it’s not too thick.

In my next post I’ll talk about preparing the file, as well as some tricks for multiple passes with the laser cutter.

Stay Tuned!

Categories
Uncategorized

Lasers and Boxes

Since we’ve got a laser cutter at Milwaukee Makerspace, I wanted to test out the BoxMaker and cut a box out of wood.

BoxMaker

BoxMaker is a sweet little web app that lets you put in the dimensions and spits out a PDF file with what you need. I wanted a box 3″ x 5″ by 2″ and for the material thickness, I got out the digital calipers and took a measurement. (Take note of this! The material thickness is important later on…)

BoxMaker

So here’s the PDF file I got. Depending on the size of your material (or how much you want to waste) it may make sense to move the pieces around. Since I imported the PDF file into CorewDraw (which is what the laser uses to cut things) it was fairly easy to rearrange the pieces. I also deleted the text that describes the box. I could have just made it a color the laser cutter ignores, but I figured I had the info in the original PDF file.

Wood

Now, our laser cutter is 25 watts, but since it’s old and may need some cleaning, it might not be outputting 25 watts, so when I put my thin piece of wood into the laser cutter, MattN mentioned that it wouldn’t cut it. I figured I’d give it a try, and yeah, even though I did multiple passes and tried to refocus the laser, it just couldn’t do it. I kept checking the depth of the cut, but it just wasn’t “cutting” it. (Pun intended!)

At this point I was fine with the failure to cut wood, and I knew the laser cutter could handle acrylic, so I grabbed a piece of that…

Cut Acrylic

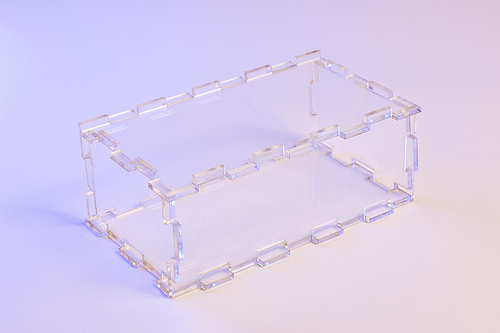
The laser got through the acrylic just fine, as it’s done before… but wait, what did I say about the material thickness before? I said you needed to measure it! Since the acrylic was thinner than the wood, I should have generated a new file, but I didn’t. So this is what I got…
Finished Box

Here’s my box, with the tabs way too big, which gives it an interesting look I suppose. Not exactly what I was after, but at least I know that it works… mostly.

I also want to try a box with the T-joints like the MakerBot uses. Box-o-tron looks like it will work, if I can get it running. (Any other suggestions?)

Also, I had a fun time trying to photograph clear acrylic, so it wasn’t a total loss. :)

Categories
Uncategorized

Dana is right.

Dana is right.

This year for Christmas I got my wife the one thing every wife wants… an admission that she is right.

But not just any admission that she is right, but a wooden plaque with the words “Dana is right” laser etched into it.

I made it a few weeks ago at Milwaukee Makerspace on the Laser Cutter we have there.

So whether it’s an argument discussion about the name of some actor, what we should have for dinner, or whose car we should take, she can just tell me, and point to the sign. What could be easier!

(I’ve already been told I may need to make one that says “Doctor Prodoehl is right” that she can take to school and put on her desk. It should make dealing with students easier. Also, I may be able to go into business making these for all my friend’s wives. Although doing so could negatively affect the number of friends I have.)