Categories
Uncategorized

FND Improvements v3.75

FND v3.75

A few weeks ago I designed what I like to call “version 3.5” of my main drawbot platform. The improvements were still mainly a two dimensional design, with horizontal plates sandwiching things together. I found two main faults with this design, so I started working on improvements.

The first improvement was in the tool holder. The one with rubber bands proved to not be strong enough to hold tools in place easily. The rubber bands were a pain to work with. (They did work well enough to hold clay carving tools though, and we ran the drawbot across some slabs of clay.)

I wanted to move to a new design where a screw could be used to hold the tool. I know that the Egg-Bot uses a screw, and for the unfamiliar, it looks like this.

Egg-Bot Pen Holder

This is a great design, but for various reasons I chose not to attempt to copy it. Instead I borrowed some ideas…

FND Pen Holder

The screw I’m using is a standard 8-32 screw with a wing-nut threaded on backwards to the head, and then a hex nut is added and tightened against the wing-nut. On the other end is another square nut to push against the tool, and again there’s a hex nut tightened against it.

In the above image showing the parts for the tool holder you’ll see the first and third pieces have holes for the screw to go through, while the second plate has a square hole to hold the square nut between them. So far it’s working quite well, and holds things without any slipping or wobbling.

Most of the rest of the plate is similar to the previous version, with the exception that now there is no bottom plate, as this mounts directly to the body.

The previous version relied on four screws and eight hex nuts to hold the motors between two plates. This was less than ideal for a number of reasons. First, there was no good way to align the motors and tighten things up. Alignment isn’t a crucial element of the drawbot, but it’s nice to have. The second issue was structural, as the 3mm wood was flexing quite a bit. I didn’t even try acrylic, but it probably would have been worse.

FND Servo Mount

The new version of the motor mount is much improved! I’m sure I’ll have an issue with some of the other servos I’m using, as they aren’t all the same size, but it should be as simple as printing two new parts with the properly sized and spaced holes. Again, there’s only three parts because this mounts to… the body!

FND Body

Here’s the new body platform. It’s got all sorts of mounting slots and such. The tool holder gets assembled and then attached to the body. (The “assembly” involves a lot of wood glue at this point.) The motor mounts are glued into place on the body as well. It’s nice finally having things rigid and not held together with hot glue and rubber bands. (Well, some things.)

At this point I’ve basically got a (semi-) generic platform with no specifics on electronics or components. You can fit any number of controllers and battery packs on it. That will probably change in the future as I choose the parts I plan to use.

FND 3.75 Plate

The whole plate fits in a 280mm x 100mm area. That’s just under 12″ x 4″, which means you could fit three of them on a 12″ x 12″ sheet of Baltic Birch.

On to the next revision!

Categories
Uncategorized

Garage Fix (At Last!)

Beam Emitter

Since we move into our house nearly 18 months ago we’ve been dealing with the super-annoying “sometimes it works” garage door opener. Or perhaps “garage door closer” is more accurate. In the olden days garage doors just closed, and if you got crushed it was your own damn fault. Somewhere along the way (in the name of “safety”) manufacturers added “External Entrapment Protection Systems”, which are typically an infrared emitter and an electric eye that sees the beam from the emitter. When the beam is interrupted (like when a stupid child runs under the closing garage door) the door reverses and does not close. No child crushed, no harsh lessons in being careless learned.

Look, I’m not in favor of crushing children, but with the sun shining directly at our garage opening, 75% of the morning we’d leave the house we couldn’t use the remote to close the garage door. I didn’t want to completely disable the sensors, as it would probably get us sued if a child did get crushed. Also, I’m all for safety. (Really. I am. Tell the insurance company that.)

My first attempt at a fix was adding a gaff tape flag to the electric eye. This did almost nothing. I did find that blocking the sun with my car and/or body sometimes worked. So imagine that when I pulled the car out of the garage I had to get out and stand in front of the door (very close to it, in fact, almost close enough to be hit by the door) and try to block the sun. Sometimes it worked, and often it did not. When it didn’t work we’d have to go into the garage, use the manual release to shut the door, lock it, and then reverse the whole procedure when returning home. #PITA

Eventually I added a button (duh!) to attempt to manually override the sensor. Sometimes it worked, other times it did not. Occasionally it would get 90% closed, then open again. Argh! Reflecting light? I don’t know…

Electric Eye

Supposedly you can added some tubes, but I never got around to that. The garage not closing when you leave is just annoying enough to aggravate you, but not annoying enough to spend real time trying to fix it.

The new solution (which is working well so far) involves extending the electric eye a bit further in from the door, and angling it to point at the emitter. Some scrap wood and zip ties pulls it all together quite nicely.

New Garage Beam Layout

Here’s our new set-up. Granted, there is a bit more room where something could get crushed, but it probably won’t be me, because now I don’t need to stand centimeters from the door as it’s closing.

Categories
Uncategorized

Teensy: First Time

In case you’re wondering, this is what you see the first time a computer running Mac OX sees a Teensy (or other controller) acting as a USB HID device. (You know, like a keyboard.)

Mac OS X Keyboard

No worries, just hit the “Continue” button…

Mac OS X Keyboard

And then hit the little red dot in the upper left to close the window. Hopefully you’ll only see this the first time.

That’s it!

Categories
Uncategorized

Mixing Imperial and Metric

Converting Imperial to Metric

In an ideal world, we’d all be using the Metric system, but the world is far from ideal, and math is confusing, so we’re sort of stuck.

Most of the design work I do for objects (laser cut or 3D printed things) is done in millimeters. This makes sense, and is oh so easy compared to trying to use those damn inches! Sadly, I grew up with Imperial Units, and while I can roughly estimate what 12 inches is, I still have problems visualizing something like 100 millimeters. I can usually remember that it’s about 4 inches, but it’s still difficult to put my hands in space 100 millimeters apart without first converting it in my mind to 4 inches.. Dammit!

Converting Imperial to Metric

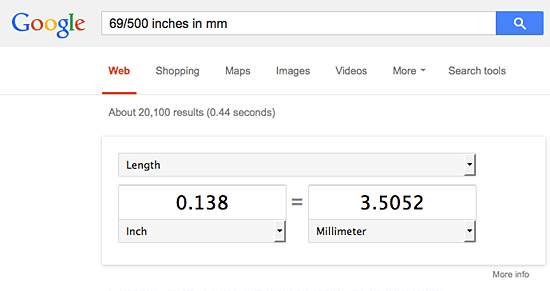
So I end up converting values. Typically using Google’s conversion utility (because I’m in front of a computer 98% of the time I’m designing something.)

So if I wanted to find the Metric equivalent of 69/500″ (also known as 0.1380″) which is the diameter of a 6-32 bolt, I can find out. Oddly enough, when it comes to the small numbers, visualizing things is the opposite! It’s easy to visualize 3.5mm but impossible for me to imagine what 69/500″ looks like. Whatever!

Here’s a simple chart of bolt sizes I’m posting just for my own use.

5-40 0.1250″ 1/8″ 3.175mm
6-32 0.1380″ 69/500″ 3.5052mm
8-32 0.1640 41/250″ 4.1656mm

Update: A larger chart!

While I would love to use Metric hardware more often, it’s expensive! I usually just buy random bits from the local hardware stores, and the Metric stuff is in short supply, and cost more. I find it quite annoying. I don’t know if prices online are any better, a quick search seemed to suggest not.

(And don’t even get me started on pixels!)

Categories
Uncategorized

Robot Builder

Robot Builder

Hey, it’s a new book! Robot Builder: The Beginner’s Guide to Building Robots is now available!

Last year after I served as Technical Editor for John Baichtal’s Arduino for Beginners I was fortunate enough to be asked to again fulfill the role for Robot Builder. (Obviously I said “Yes!”)

Books take a long time, and there’s a lot of reading involved, and for my part, a lot of research and checking on technical data. It’s definitely enjoyable though, and there’s a lot to learn along the way.

(I’m not currently working on any books, but if you’re in need of Technical Editor that’s near one of my areas of expertise, I may be available.)