Categories
Uncategorized

Photo Booth Set-up Tips

Photo Booth Tips

The fine folks over at Sparkbooth have this great Setup Checklist, and if you plan on setting up a photo booth at an event, it’s required reading…

I’m going to comment on a few items, as well as add a few things to the list, based on my personal experience.

Place a computer, webcam, and keyboard on a table in a well-lighted area. Don’t forget a chair or stool.

For my photo booth I ended up building a stand that puts the business end up about the height for a “typical adult human being” which happens to be my height! Since I use an iMac you can actually just tilt the monitor (and camera) up or down a bit if needed. This may not be clear to everyone, so a sign might also be helpful.

The part about a chair or stool is good advice if you want people to sit when they use the booth, which is a good idea because it puts people of different size close to the same height, which doesn’t happen as much when standing.

When considering location, don’t forget about extension cords! You never know how far you might be from an outlet. I actually have a power strip hidden in the back of my stand, which allows me to plug in the computer and light(s) and also gives me a place to hide the keyboard. From the power strip I can then run one extension cord to the nearest (or most out of the way) outlet. I bought a new extension cord since most of my old ones are filthy. Clean is better when it comes to appearance. You can also get white, or black, or something besides orange if desired.

For you computer… turn off instant messaging, email, and other applications, etc.

Do everything listed there. I actually go a few step beyond that, and on the Mac I use I created a completely separate account. I keep the account very minimal. It’s set to log into that user automatically, and launch Sparkbooth on startup. I’ve also got just Sparkbooth and Safari in the dock, as well as a shortcut for the folder where the images get saved. The idea is that when I turn it on, it’ll be completely ready to go in just a few minutes. I’ve also partitioned the drive into two halves, and once Sparkbooth was fully operational, I cloned the main partition to the second partition. This way if some update to the system breaks things, I can always revert to the last good working combo. (Between Mac OS X, Adobe AIR, etc. you never know what might go wrong.)

A few other things worth mentioning include signage. I also include instructions that tell people to push the button, and then get ready for 4 photos. (You be surprised how many people walk away after the first photo.) Lights, you should have them. Don’t depend on existing lighting, bring your own. As for a background, I don’t always use one myself, but I’d still recommend one if you can do it easily enough. (I’ve had my booth in some places that didn’t really allow for a background.)

As for the get a USB button suggestion, I’m obviously in favor of that one… and hey, you can even get one from my store or from Etsy. :)

Categories
Uncategorized

DokuWiki Yak Shaving

DokuWiki

Yak Shaving is described as “any seemingly pointless activity which is actually necessary to solve a problem which solves a problem which, several levels of recursion later, solves the real problem you’re working on” or something like that.

I’m not 100% sure this would be considered yak shaving, but I’m working on something that requires random pages to be served from DokuWiki, just like the built-in function that MediaWiki has. (I used to use MediaWiki, but switched to DokuWiki, and like it much better. We also use it for the Milwaukee Makerspace wiki.)

There is a random page plugin for DokuWiki, which did not work. So I took the existing code, poked at it a bit, mainly by comparing to other plugins that did work and making simple edits, and got it working. (YMMV obviously.)

Because I’m a believer in “doing the right thing” and helping other people in their quest to not reinvent the wheel and stay DRY, I figured there was more to do…

So I emailed the original author of the plugin. I’ve not gotten an email back yet. Also, they appears to be French, and I’m a stupid American who can’t read French. (I’m not even sure why I mentioned that part.)

Anyway, I was happy that I fixed something so I figured I’d toss it on the old GitHub in case someone else was looking for a random page plugin for DokuWiki that (seems to) work.

Oh, and not content to not mention something I did, I posted the link on Google+, which was picked up by Nils Hitze who mentioned it to Andreas Gohr, who happens to be the author of DokuWiki (who I follow anyway, because he’s a RepRapper too) and he suggested I adopt the (possibly orphaned) plugin.

tl;dr → I fixed the Random Page plugin for DokuWiki. You can grab it from GitHub.

Also, this is how the f’ing Internet works!

Categories
Uncategorized

Beam me up!

Beam me up!

Beam systems make construction of thing easy, or precise, or both. I keep seeing more of these systems, so I figured I’d write-up the ones I’ve seen.

MakerBeam
Back in 2009 MakerBeam, a Mini-T open-source building system, showed up (on Kickstarter) and while makerbeam.com is empty, makerbeam.eu has lots of good stuff. You can also get them from our pals at SparkFun. There’s some bits and pieces on Thingiverse as well. (And, MakerBeam is open source hardware.)

MakerSlide
Bart from buildlog.net launched MakerSlide, which is an “Open Source Linear Bearing System” geared towards DIY CNC machines like laser cutters, CNC routers, and (now) 3D printers. MakerSlide launched as a Kickstarter project, and did quite well. It seemed to be continually out-of-stock, but Inventibles is now kicking in to fill the gap. There’s a whole system of parts that go with MakerSlide, and from what I can tell it’s a pretty solid system.

OpenBeam
There’s a new one, called OpenBeam, which is running on Kickstarter as of my writing this. It’s an open source miniature construction system. (See a trend here?) OpenBeam seems to cite that the fasteners and connecting plates used by other systems are what causes things to get costly. Their solution is to use standard sizes and common hardware to make the whole system easier and cheaper to work with. There doesn’t seem to be a web site yet, but you can check out the developers blog.

Bitbeam
A bit different is how I’d describe Bitbeam. Instead of extruded aluminum like the other systems, it’s typically made of wood, and describe as just “holes in poles.” :) In fact, Bitbeam is based on another system, Grid Beam. And hey, both are open source! Bitbeam is Lego Technic compatible, and you can make your own with a (powerful) laser cutter. Bitbeam is also on Thingiverse. Sweet!

Grid Beam
As previously mentioned, Grid Beam is sort of the older big-brother of Bitbeam. While Bitbeam is for smaller things, Grid Beam is for larger things. You can actually build things like vehicles and furniture with Grid Beams. It also appears to be the oldest of these beam systems, dating back to 2008. Check out more at gridbeamnation.com

Are there any other beam building systems I’ve missed?

Categories
Uncategorized

More Killbots!

America Needs More Killbots!

RasterWeb! diffusing and confusing complex issues since 1997…

robot courtesy of OpenClipArt.org

Categories
Uncategorized

Vivitar Foot Repair

Vivitar

So I got this Vivitar 285 flash last year, and it’s been working great, except for one thing… the little plastic foot is no match for the weight of this thing. Eventually, it broke. Argh… To be expected though.

I found a replacement metal foot on ebay for $6.99, and I watched some YouTube video that explained replacing it. Here’s the thing though… after I watched a damn advertisement, and then a 9 minute video showing how to do the replacement, I decided that I’d help people of the future by presenting the same info in a good old no-nonsense way, with words and pictures!

Broken Foot

So here is our broken foot. Thin, old, cheap plastic. No good! Grab a tiny screwdriver and remove the foot. Don’t lose the screws, they are tiny! (Also, you will need them later!)

Remove Foot

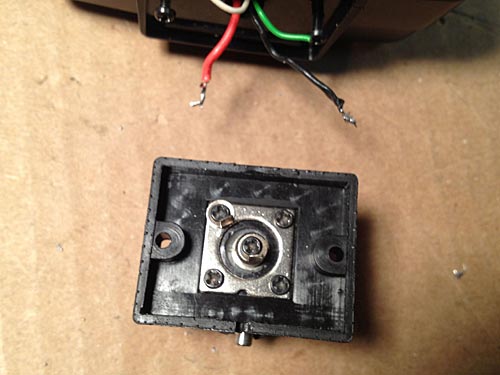
Here is the broken one still attached, next to the new one. On the original unit, there are 4 wires. Two of them (white and green) go to the test button. You don’t need these! You just need the black and red wires. The button on the new one will work just fine with only the black and red attached.

New Foot

The black and red wires are short, so don’t cut them, you need to desolder them. If you don’t have a good soldering iron, and some soldering wick and a solder sucker, find someone who does. (Maybe your local hackerspace?) I did cut the white and green ones, and put a tiny amount of tape over the ends, just to be totally safe.

Soldered

Solder the black and red wires in place securely. It appears I put the black on in the center. I’m not sure that it matters, but YMMV and I make no guarantees. (See where I put the screws? Right where they belong, because they are so damn small I was afraid of losing them!) Also, don’t put the foot on backwards, as that would be stupid. (Disclaimer: I’m not even sure you can put it on backwards. I just like disclaimers.)

New Foot

With the soldering done, put the foot in place, put the screws in, and put the batteries back in (you did take them out before you started, right!?) and test it!

OK, there’s your short guide to replacing the hotshoe foot for a Vivitar 285 camera flash. Hopefully you read this in less time than it took me to watch that 9 minute long YouTube video.

(And yeah, the fact that this is a post about photography that has terrible photos is not lost on me. Apologies…)