Categories
Uncategorized

Seeeduino Nano

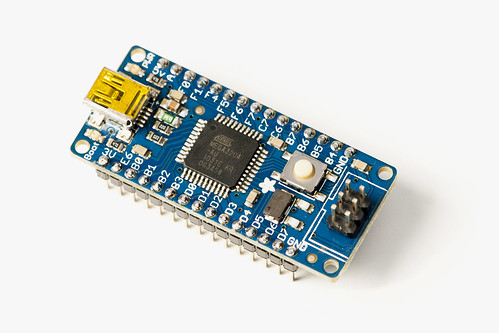
The folks over at Seeed Studio sent me a Seeeduino Nano to check out. I’ve used a lot of Arduino boards over the years, including plenty of cheap Arduino Nano clones. Most of the clones have worked fine but every now and then I’ve seen a bad one come through. The Seeeduino Nano is a nice quality board with a little extra to make it useful for beginners or people more interested in making things quickly/easily than they are soldering wires.

One interesting thing about the Seeeduino Nano is that it used USB-C to connect to your computer. While most of the Arduino UNO boards I’ve used still use USB type B, and lots of other boards use Mini-USB or Micro-USB, the Seeeduino required a USB-C cable. Luckily, I had one on hand. If you don’t already have a USB-C cable, you’ll need one for the Seeeduino Nano.

My favorite part about the packaging of the Seeeduino Nano is the warning on the back that says “Best to keep away from fire”, mainly because I’ve worked on multiple Arduino projects that specifically involved fire… But I digress… for most people keeping away from fire is probably a good idea.

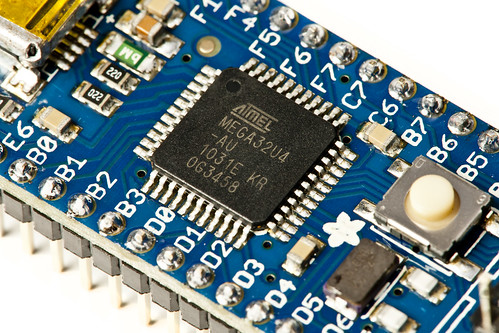
Here’s the top view of the Seeeduino Nano next to a ELEGOO Nano board. You can see the difference in the USB connector and a few other features. One difference with the ELEGOO boards is that they come with the header pins included but not soldered in place. (Here I’ve soldered them to the board.) There are times when you don’t want header pins solder into place. My guess is that for the target market of the Seeeduino Nano, the pins already installed makes sense.

Another thing about the ELEGOO boards is that I can’t easily find them listed on the web site. Here’s a post about them, but in the past if I’ve purchased them I’ve found them on Amazon for a price close to the Seeeduino Nano, though I’ve only seen them as a 3-pack.

(Note in the photo above the boards are the same dimensions, the Seeeduino is just on an angle due to the extra connectors on the top.)

Since I had a project already done with a Nano in place (via my Anrduino Nano Breakout Board) I just swapped in the Seeeduino Nano, uploaded the code, and it worked great.

Where the Seeeduino Nano really shines is the capabilities it has with the Grove system from Seeed Studios. If you don’t want to solder, and also don’t want to stick a lot of wires and components into breadboards, the Grove system might be what you are looking for. Again, I see this is a match for those who are more interested in the code than the wiring of electronics, or for workshops where soldering might be a concern (with kids or those not able to solder for other reasons).

In the photo above you’ll see the Seeeduino Nano along with the Grove Shield, a Temperature & Humidity Sensor, and a connector wire.

It’s also worth noting that the Seeeduino hardware and Grove system are open source, and others have embraced Grove. Adafruit has a Grove Shield for Particle Mesh and Feather Boards.

Above you’ll see the Seeeduino Nano plugged into the Grove Shield which has a Temperature & Humidity sensor attached. This takes seconds to connect versus soldering things or plugging things into a breadboard. When I taught basic Arduino classes I always told students to unplug their Arduino when they wired up the breadboard, and then to double-check the wiring for errors before plugging in the board again. The Grove plug-in system eliminates much of that guesswork. You can’t really plug things in backwards.

Here’s the Temperature & Humidity Sensor. I’ve worked with logging temperature and humidity before, so I’m not really new to this. The new part is the simplicity of just plugging things in.

I grabbed the example code Seeed Studio provided and had a few issues. Nothing I couldn’t fix, and I did open an issue about it. In the end I grabbed Adafruit’s library for the DHT Sensor as well as the Adafruit Sensor library (which is required by the DHT library) and got things up and running. If you’re not interested in downloading zip files from Github you can also install these libraries right from the Arduino IDE.

Overall the Seeeduino Nano is a good quality Arduino board, and the Grove system makes it very easy to get up and running. In this specific test I did run into some trouble with their example code, but in most cases those issues are solvable, and there’s probably an alternative example or library out there that will do what you want or need.

Finally, here’s a short video of the game scoring system I mentioned above. The Seeeduino Nano is taking input from a number of pins (that will eventually be triggered by switches or buttons) to keep score, where each pin is a different point value, and then using the piezo speaker to play a sound for each point value as well as displaying the points on a small LED display.

Categories
Uncategorized

Beam me up!

Beam me up!

Beam systems make construction of thing easy, or precise, or both. I keep seeing more of these systems, so I figured I’d write-up the ones I’ve seen.

MakerBeam
Back in 2009 MakerBeam, a Mini-T open-source building system, showed up (on Kickstarter) and while makerbeam.com is empty, makerbeam.eu has lots of good stuff. You can also get them from our pals at SparkFun. There’s some bits and pieces on Thingiverse as well. (And, MakerBeam is open source hardware.)

MakerSlide
Bart from buildlog.net launched MakerSlide, which is an “Open Source Linear Bearing System” geared towards DIY CNC machines like laser cutters, CNC routers, and (now) 3D printers. MakerSlide launched as a Kickstarter project, and did quite well. It seemed to be continually out-of-stock, but Inventibles is now kicking in to fill the gap. There’s a whole system of parts that go with MakerSlide, and from what I can tell it’s a pretty solid system.

OpenBeam
There’s a new one, called OpenBeam, which is running on Kickstarter as of my writing this. It’s an open source miniature construction system. (See a trend here?) OpenBeam seems to cite that the fasteners and connecting plates used by other systems are what causes things to get costly. Their solution is to use standard sizes and common hardware to make the whole system easier and cheaper to work with. There doesn’t seem to be a web site yet, but you can check out the developers blog.

Bitbeam
A bit different is how I’d describe Bitbeam. Instead of extruded aluminum like the other systems, it’s typically made of wood, and describe as just “holes in poles.” :) In fact, Bitbeam is based on another system, Grid Beam. And hey, both are open source! Bitbeam is Lego Technic compatible, and you can make your own with a (powerful) laser cutter. Bitbeam is also on Thingiverse. Sweet!

Grid Beam
As previously mentioned, Grid Beam is sort of the older big-brother of Bitbeam. While Bitbeam is for smaller things, Grid Beam is for larger things. You can actually build things like vehicles and furniture with Grid Beams. It also appears to be the oldest of these beam systems, dating back to 2008. Check out more at gridbeamnation.com

Are there any other beam building systems I’ve missed?

Categories
Uncategorized

Getting Started with the Atmega32u4 Breakout Board+

Atmega32u4 Breakout Board+

I’ve talked about Adafruit’s Atmega32u4 Breakout Board+ before, first in my post Teensy vs. Atmega32u4 Breakout Board+ and then in the post The Future of Open Source (Part II), so I figured I should actually get a Atmega32u4 Breakout Board+. (Also, I’m just going to call it the Atmega32u4 from now on.)

Now as far as AVR development, I’m a guy who doesn’t like to stray too far from the Arduino world, partly because I find it fun and comfortable, and it does most of what I’ve needed so far. That said, I did end up dabbling with the Teensy for The Button.

Don’t get me wrong, the Teensy is awesome for what it does, and what it is, but occasionally my open source bias takes hold and it bothers me (just a little bit) that the Teensy is not open source. Of course, Adafruit’s Atmega32u4 is open source, which gives it a few more points in it’s favor. Price-wise, the Teensy is $16.00 and the Atmega32u4 is $20.00. Consider it the “open source tax” if you will. (Or buy 100 of them and they’re only $16.00 each then!) (Update: Actually, the Teensy with pins is $19.00 and the Atmega32u4 Breakout Board+ with pins is $20.00, which is even closer in price. You can buy the Teensy without pins at $16.00 but you can’t buy the Atmega32u4 Breakout Board+ without pins.)

So with an Atmega32u4 in hand, and from the perspective of someone who used a Teensy successfully, here’s my review.

Atmega32u4 Breakout Board+ (Close-Up)

You’ll want to start with the Atmega32u4 product page. Without that, I’d still be watching a pulsating LED and swearing.

Read the section titled “Why not use a Teensy” and decide if you really want to use the Atmega32u4 instead. Done? Good. If you still want to use the Atmega32u4, continue reading!

The next section I’d call your attention to is the Using Teensyduino section. As I said, I’m an Arduino guy, so I wanted to give Teensyduino a try. Teensyduino is a software add-on for the Arduino IDE. It adds the ability to build and run sketches on the Teensy. If you don’t want to install avrdude or deal with command line stuff, this is another option. I’m not against using avrdude, but I wanted to try to parallel my Teensy experience, so Teensyduino was part of the toolchain.

I had already installed Teensyduino for use with the Teensy, so the section on that topic was where I jumped in. I walked through the changes, from editing boards.txt to restarting the Arduino IDE. It didn’t work.

But wait! There’s a line that says “Download the Arduino IDE from arduino.cc – as of this tutorial, IDE v21 works best – its not the latest one so scroll down to find it.” And yes, I’m running IDE v22. I’m not sure if that’s what broke things, but rather than download version v21 and try the edits again, I just grabbed the “ready to go” dmg that Adafruit supplied. Since I already had the Arduino IDE in my applications folder, I just renamed it to “ArduinoAtmega32u4” and ran it. It worked!

So the software installation/configuration part was a bit more difficult for the Atmega32u4 than for the Teensy, at first, but not much of an issue in the end.

Atmega32u4

So here’s a simple blink sketch, slightly modified from one that worked with the Teensy. The one issue with the Atmega32u4 is that you need to press the reset button on the board before you upload a sketch. Each time. Adafruit mentions this, so it’s not a surprise, but you just need to remember to do it. If you use a Teensy or an Arduino all the time, you might forget.

Atmega32u4

So the next test was to make the Atmega32u4 emulate a USB keyboard, just like the Teensy can do. You’ll need to change the menu options, but besides that, it worked well. At this point, with everything working, the differences between the Teensy and the Atmega32u4 seem pretty minimal. Granted, I’m not doing anything complex here, but it’s good to know that I could easily swap out the Teensy for the Atmega32u4 in some situations.

Here’s the code I used, which prints a space, similar to what the Teensy does for The Photo Booth:


void setup() {
  Serial.begin(9600);
  delay(4000);
}

void loop() {
  // Your computer will receive these characters from a USB keyboard.
  Keyboard.print(" "); 

  // typing too rapidly can overwhelm a PC
  delay(2000);
}

So now that I’ve got an Atmega32u4, and know what it can do, the only thing left is to let the hacking begin! :)

Categories
Uncategorized

The Future of Open Source (Part II)

Open Source

In our first piece, The Future of Open Source, I talked a bit about hardware, and touched on community, as well as mentioned a few specific companies. This time I’ll talk about specific pieces of hardware.

Let’s start with the Arduino. The Arduino is probably the most successful piece of open hardware. There’s an estimate of 300,000 Arduinos “in the wild” as it were, and if that does not count “official” Arduinos, I can see that number easily being double.

Recently Phillip Torrone published an article titled: Why the Arduino Won and Why It’s Here to Stay:

While it’s nice that Arduino is open source, and commercial use is allowed if you make a clone, it’s not the biggest reason, which is why it’s down near the end of the list. However, that isn’t to say it doesn’t matter at all. Specialized derivatives can be made without paying someone or asking anyone. It’s open source hardware so a company or school can use it without any per-seat licensing. There’s no risk that it will be discontinued and the software gone forever. If you want a new feature, you can spend the time and get it added. When thousands of people have a small stake in something, or ownership, they care more. Does anyone even debate if open source software is a good idea any more?

I think part of the reason the Arduino (and its clones) have flourished is due to the community built around it. Thanks goes out to the people who are really into doing things with Arduinos, and sharing their work with others, and helping out on the forums, and teaching classes, and basically connecting with others and evangelizing the Arduino platform.

The first Arduino I purchased was the “official” Arduino Uno, which I acquired from Adafruit Industries. I remember finding out about Adafruit from the web site ladyada.net, run by Limor Fried (Lady Ada) who runs Adafruit. The fact that she had shared so many project details online led me to her business, and I became a customer. My Uno is what I consider my “top of the line” Arduino, and I feel pretty confident that it will work with any shield I get, not have any weird quirks to work around, and that buying it supported the Arduino project. Chances are when a new “official” version of the Arduino comes out, I’ll but that one as well.

I do have other Arduinos, like the Boarduino, also purchased from Adafruit. I wanted another Arduino, at a lower cost, that I could dedicate to a project. It fit the bill, and supporting Adafruit was something I felt good about doing. I’ve also got a Diavolino, from the folks at Evil Mad Scientist Laboratories. As I mentioned in my blog post, The Diavolino comes in at about $13—less than half the cost of an Uno—though there are some compromises with the Diavolino. If these compromises don’t affect you, it’s a nice little Arduino board. And as for the folks at Evil Mad Scientist Laboratories, they’re pretty awesome, just like Adafruit, and I feel good supporting them.

Now we move away from the US and over to China. I’ve got two “Seeeduinos” from Seeed Studio. I know some people would prefer not to buy from China, and if these were cheap knock-off products from a questionable company, I’d agree, but Seeed Studio seems to be a pretty well respected member of the open hardware community. They were a sponsor of Maker Faire, they helped with the radiation detection project after Japan’s Fukushima incident, and they actually develop a number of innovative products. If all they did was make a cheaper Arduino, I probably wouldn’t be as supportive of their efforts. As it is, I think they provide some friendly competition for others in the Arduino space, and do plenty of other things to be a good citizen of the open hardware community.

I’ve already mentioned the Evil Mad Scientist Laboratories gang, and their Diavolino, but I’ll also talk about the Egg-Bot. I bought the Egg-Bot kit because I think it’s awesome. Here’s the description of it: “The Eggbot is an open-source art robot that can draw on spherical or egg-shaped objects.” See? Awesome! (I’m sort of a fan of art robots.) Now, the Egg-Bot is awesome, but it’s an open & shared kind of awesome. Every time I demo it, I explain to people that it’s an open source device, and you can download the software for free, and you can download the plans to build your own for free. I’ve see a SphereBot, a Completely printable Eggbot, a Fischer Technik Eggbot, and an EggBot Makerbot Attachment over on Thingiverse, as well as many Egg-Bot design files. (Heck, you could even make an Egg-Bot out of LEGOs.)

The point of all this is, the Evil Mad Scientist guys aren’t out to crush anyone who tries to make an Egg-Bot… they encourage it. They’ve grown a community of users who help each other out, sharing what they’ve learned along the way. This helps make people fans of Evil Mad Scientist Laboratories, and the Egg-Bot, and be more willing to support their future endeavors.

But hardware, just like software, and life itself, is often a compromise, consisting of grey areas, like the Teensy. While I used a Teensy for The Button, and it was perfect for it, I still hope to move to an open source alternative if possible. I covered most of this in my Teensy vs. Atmega32u4 Breakout Board+ post. I’ll get my hands on an Atmega32u4 Breakout Board+ and see how it stacks up against the Teensy for future projects.

So where does that leave us, and the future of open source? Personally, I see open hardware as a choice sort of like buying food. You can choose to support companies you know, like, and trust, and you can even go to the local farmer’s market and talk to the people who make the food. I hate to use the word “sustainability” (only because I think it gets overused) but I think it fits. A sustainable future through open source. Works for me…