Categories
Uncategorized

PCBWay Prototyping Service

pcbway-attiny85-pcb-01

The crew at PCBWay got in touch with me to see if I’d like to try out their service. I’ve used other PCB manufacturers in the past, so I figured I’d give PCBWay a try to see how they worked. The ordering process was not the smoothest, but the boards turned out well, were very affordable, and they got to me pretty quickly.

pcbway-attiny85-pcb-03

I designed this PCB years ago and I’ve used them a lot in my noisemakers and while I might modify them in the future, they are still pretty useful, so I figured I’d make more.

pcbway-001

I had my Gerber files ZIP’d up and ready for upload, so I started the process with PCBWay, which I assumed would be similar to other PCB manufacturers I’ve used. Yup, pretty close. Note that for color you can choose green, red, yellow, blue, white, black, or “none” at the same cost, but choosing purple, matte green or matte black cost bit more. (Not quite double, but more than just a few bucks.) I’m not sure what “none” looks like, but I am curious.

pcbway-003

So I added the boards to my cart, and I first noticed that I could not change the quantity. This was a little annoying, as I wanted to try different quantities to see how it affected the price. You can do that, but only at the first step in the process, at the “Online Quote” step, not once it’s in your cart, so make sure you know how many you want before your add them to your cart!

When I went to checkout I then found out I could not check out. Right, seems my boards were “Subject to audit.” Yes, they had to be approved by someone (a human I guess) before I could order them, which seemed weird. (Notice the yellow highlighting I added to the cart image above.)

pcbway-002

Now, this is partially my fault, as I didn’t see this the first time I uploaded files. There is a little bit of text on the upload form that shows it could take “10min to 1 hours” for approval. I’m not sure exactly how long it took, as I did this late one night and didn’t get an email about approval until the next day. This was the most annoying part of the ordering process. When I want to order something I don’t want to have to wait hours, or even one hour between putting it in my cart and being able to order it. Perhaps they could make it so that you can place your order, and then if not approved for some reason (?) they could refund the order. Or who knows, maybe this whole “approval” thing is due to some new tariff laws. I have no idea.

pcbway-006

Like I said, pricing is good. I got 75 boards for $32. That’s about 43 cents per PCB. These are tiny boards though, so obviously the price per board goes up when you get larger boards. With approval completed (by some human, I guess) I was able to move on to shipping options.

pcbway-007

I went with shipping via DHL, which came in at $21, so the order total for 75 boards ended up being $53, making each board cost approximately 71 cents. (Obviously ordering more would probably bring that price down, but I really doubt I need more than 75 of these right now.)

I uploaded the PCB files on July 21st, and they were approved and ordered by July 22nd. Manufacturing was completed by July 25th and they were then shipped via DHL July 27th and I got them by July 30th. That’s about an 8 day turnaround for these printed circuit boards. (With some weekend days in there.) Not bad! For US shipping DHL is probably the best option for getting them fast. There were two cheap shipping options, one being an ePacket (which seems to be how I get most of my eBay electronics delivered) which was $8 but had a 10 to 15 day delivery time frame. There was also “China Post” option which was $7 but showed 25 to 40 days for delivery. Wow. So the ePacket is not too bad if you do not need your boards in a hurry.
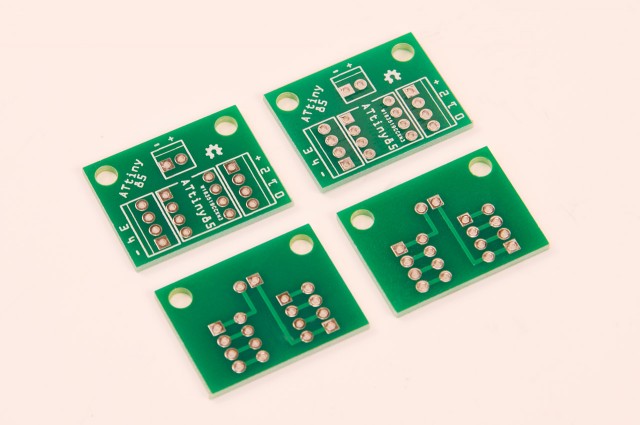
pcbway-attiny85-pcb-02

The boards from PCBWay look good and got to me fast. They were also very affordable. Overall it was a good experience except for the issue of having to wait until files were approved before ordering and not being able to change quantities once the item is in your cart.

Categories
Uncategorized

LinkDump 2018-08-17

link-dump-3

What time is it? It’s time for another LinkDump post. Not familiar with link dumps? They’re blog posts that link to other things on the World Wide Web, and often have little to no commentary. Every now and then I’ll just post some links to things I’ve read or looked at or need to check out in the future, or just want to share.

Categories
Uncategorized

A Concrete Bolt

concrete-bolt-2844

When last you saw my cast bolt it was made from plaster and an ABS 3D print which served as a mold. It sort of worked. As mentioned, it was more “art object” than “functional thing” and that was what I was going for…

Well, I made another ABS mold from the first experiment and even though I had worked with a flexible filament mold I thought I would give the ABS version one more try, this time with concrete instead of plaster.

concrete-bolt-2845

I really liked the way this one turned out. Yes, I had to destroy the mold again, and in the process the part got damaged and broken, and then I pulled out the hot glue gun and put it back together, and now I like it even more!

concrete-bolt-2846

It’s one of those situations where things go wrong so you just do something and it turns out (possibly) better than you thought it would. I joked that this was the modern maker equivalent to Kintsugi, using hot glue instead of gold.

concrete-bolt-2847

concrete-bolt-2842

concrete-bolt-2843

concrete-bolt-2852

concrete-bolt-2856

concrete-bolt-2850

concrete-bolt-2859

concrete-bolt-2860

I really like how it has this feel of being an ancient relic. In a strange twist of fate, I was at first annoyed with all the tiny pebbles in the concrete, so much so that I made a sifter to remove them, but now I’m thinking up a list of things I can mix into the concrete besides pebbles (and, probably pebbles too.)

Categories
Uncategorized

Water Bottle Repair

3d-printed-mold

I bought a water bottle about two years ago after my old one was stolen (I know, who steals a water bottle!?) While the new bottle was much better, since it was insulated and could keep water cold for more than a day (with ice added in) one of the things I didn’t like about it was a small rubber ring used to seal the cap. The rubber ring had a split in it (maybe to assist with the seal?) and it was difficult to clean, and eventually it broke from attempts to vigorously clean it.

smooth-on

I replaced the sealing ring by 3D printing a small mold and then casting a replacement using Smooth-Sil™ 940 silicone. The silicone is a two part mold, with a volume of 100:1 for part B to part A, which is why you get a giant tub of silicone along with a small bottle of whatever the red stuff is.

ring-and-mold

This was my first silicone casting at home for a personal project. I’ve done casting at work for prop making, but this time I didn’t have a vacuum chamber, and I was doing a tiny part all by myself.

silicone-ring

So how did it turn out? Pretty good! I used a digital scale and filled a cup with 10 grams of part B, then added 1 gram of part A and mixed it all up with a popsicle stick and smeared it into the cavity of the 3D printed PLA mold. I let it sit overnight then used a sharp knife tip to pry it out. There was a thin skin around the piece but it peeled right off.

cap-with-ring

So how does it fit? It’s good but not perfect. If I make another one I may decrease both the inside diameter and outside diameter. It could fit a bit more snug, and it could have just a wee bit more clearance when inserting into the bottle. (I’m guessing between 0.1mm and 0.2mm, maybe)

I’ve got plenty more silicone, and it is food-safe, so I want to experiment with making some food molds, and yeah, I’ll probably 3D print the objects to create the molds from, taking a page from Anna Kaziunas France.

Categories
Uncategorized

3D Printing a Sifter

sifter-3d-printed

I needed a sifter to remove some small pebbles from concrete mix, so I designed and 3D printed one. Now, like many things that get 3D printed, you don’t always get it right the first time. After testing the sifter I decided it needed larger holes, so. I started on version 2.

inkscape-drawing

For version 1 I used Inkscape to quickly create a grid of circles (using the clone feature) and then differenced them from a circle. Once I had this done I exported as a DXF file and used that within OpenSCAD to create the bottom of the sifter. I added a ring and Bob’s your uncle. I use this Inkscape/DXF/OpenSCAD/extrude method sometimes, because it seems like the right way to do things, or because it’s pretty fast. But it’s not always the best.

The problem with the Inkscape/DXF/OpenSCAD/extrude method is that you have to go back to Inkscape and redo your DXF file if you want to make changes or tweak the design. This may not be an issue for many designs, but for some, I want the flexibility to easily change things.

openscad-holes

So for the next version I redid the holes portion of the design in OpenSCAD. The great advantage here is that you can very easily tweak things like the size of the holes, and the hole spacing, and automagically see how it looks. (Note: in the image above you’re seeing the positive “solids” of the holes. In the final file I differenced them from another solid object to make them “holes” in the design.)

While the method of doing it all within OpenSCAD has advantages, the one way it suffers is when it comes to render time. I should note that in OpenSCAD you can choose how “smooth” circles are by applying a number between 1 and 200. It basically sets how many “sides” a circle has. You can typically use 100 and circles will look pretty circular, but you can also drop the number down to 6 for hexagons, 8 for octagons, etc. That said, at a setting of 100 rendering the sifter took nearly 15 minutes on my 6 year old MacBook Pro. Changing the circles to hexagons with just 6 sides took about one minute to render.

This is where The Cloud™ should save us, right? But while there are various versions of OpenSCAD running on public servers, no one is running a version that worked properly. And since OpenSCAD is a niche piece of open source software, I don’t know if this will change. But since there is a command line interface to OpenSCAD, maybe I can do complex renders on one of my more powerful computers. (Anyway, I’m getting off-topic, so let’s continue.)

openscad-sifter

Hey, it’s a sifter! Yes, I designed and 3D printed a sifter. I often design things and then print them overnight so I have them the next day. 3D printing is awesome, but it’s often not fast. I did consider trying to make a sifter plate with a drill press, and then I remembered I had a laser cutter, and considered using that, but ultimately I was not in a hurry and 3D printing one seemed like a good idea.

tinkercad

Speaking of good ideas, I’ve been looking at Tinkercad recently, and while I wanted to be convinced it wouldn’t be easy to do what I wanted, it actually was pretty easy to do what I wanted, so I redesigned my sifter using Tinkercad. The smart duplication feature made it fairly simple.

While I’m a bit more impressed with Tinkercad than I thought I would be, I still have the problem I had with Inkscape, that if I want to tweak some values, I need to redo work. In fact, I have to pretty much create a whole new model. For simple designs, this isn’t a huge deal, but it is a bit of a pain.

What’s a bigger pain is the fact that while I will always have copies of Inkscape and OpenSCAD to use, Tinkercad (and the files I create with it) may disappear. Tinkercad is own/run by Autodesk, and while it’s a great tool for beginners to get started with 3D modeling (without having to install any software) ultimately I’m concerned for its long-term existence (like any hosted/cloud service.)

I can easily edit the OpenSCAD files I created seven years ago, which is something that is important to me. That said, I do want to explore other software, because reasons, you know?