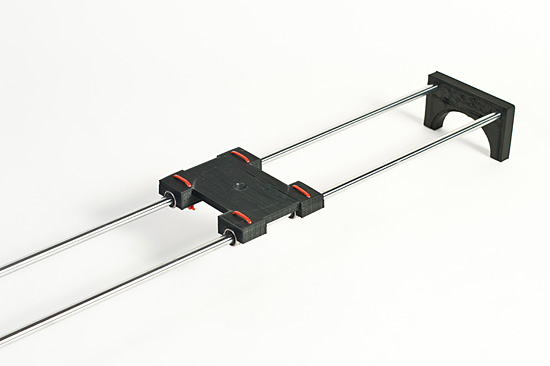
If you saw my post about a Motorized Camera Slider, this is a bit of an update, but it’s really more about the process than the end product, so if you’re interested in that, read on!

I was originally using the improved camera slider V2 from our pal Marcus, and it worked well enough, but I wanted something different, so I tweaked what he had.

Marcus created his original file (I think) with Alibre Design, and since I couldn’t open it, I just worked with the STL file he provided. I loaded that into OpenSCAD and grabbed a slice of it using this method.

Once I had a line drawing of the original slider end, I could use it to make my own. I imported the DXF File into Inkscape, my standard for 2D (and 2.5D) illustration.

In reality, the only parts I really used from the original were the approximate size of the piece, and the two holes for the rods. I could have measured things, but loading up a file as a template was easier. I guess I could have got all fancy at this point, but I just kept it simple.

Once I had my SVG done in Inkscape, and exported a DXF file, it was a matter of doing the old linear_extrude method, like I did for my snowflakes, etc. I saved out an STL file and I was ready to print.

Here’s what the final piece looks like. One of the issues I had with the design Marcus created was that the rods only went part way into the plastic. There were screw holes to tighten down some screws onto the rods to hold things in place, but I never put any in. They might have also helped with the twisting issue this design has, but I may explore the idea of a two-piece design that clamps tight with the plastic. Or not… the nice thing is, it’s easy to experiment.
If I wanted to, I could probably make these ends out of wood, which would require just a drill press, or maybe out of a nice heavy metal, which might require drilling, or maybe milling. Both processes are a little messy, potentially more expensive, and require equipment you might not have. The nice thing about 3D printing these is that I can iterate a design quickly, and at a very low cost. I can even make them mostly hollow to save on time and materials during testing, and then make stronger, more solid versions when desired.

You may notice the carriage has some zip ties on it. Those are holding the LM8UU linear bearings in place. My original carriage was way too stiff, and without exact alignment (which you may not get with DIY plastic parts) it didn’t slide without some binding. The bearings were 58 cents each (I got a 10-pack from an ebay seller.) The bearings are a little noisy, so if you plan to shoot video with sound, you might have some issues. (Maybe more expensive bearing would make less noise?) As for the rods, they were about $15 each (pricey compared to the other parts) from VXB.com. There are cheaper alternatives depending on length, size, quality, etc. I went with 8mm because those are standard RepRap sizes.
At some point I may play with carriage designs as well. I actually did an early version that used felt instead of linear bearings (another trick from the RepRap world) which makes things cheaper and quieter, which may be desirable in some cases. And of course, I need to revisit the whole “motorized” part of this thing.
Until next time!


