Categories
Uncategorized

Decagon Light (Part II)

DecaLight

When we last saw the Decagon Light the scale model wasn’t functional… Well, it is now functional!

I spent a bit of time at Kenilworth Open Studios getting things wired up and writing some code. I wrote a bunch of functions to run different patterns. Each function can be called with two parameters, the delay (which specifies how long the light is on) and the number of loops the pattern should run. Right now there are just four functions, but they can be called differently, and put into iterative loops. (I’m sure I’ll write more as this project progresses.)

DecaLight

For this test I’ve got the DecaLight powered by a Teensy with one of my Teensy BOBs. There’s also a USB battery pack from Brown Dog Gadgets supplying portable power. The final version will probably use the Teensy but use an AC adapter for power.

Back of DecaLight

I reused a bunch of JST connectors that were chopped off some other wires to plug the LEDs into. There’s also plenty of pieces of wire and heat shrink holding it all together. At some point maybe I’ll build this into a much nicer looking unit.

Teensy + BOB

The combo of an OSH Park purple board with the SparkFun Pink Teensy 3.1 (Anouk Edition) makes this one of the most colorful PCB project I’ve worked on yet.

Here’s a quick video of the light in operation.

Categories
Uncategorized

The 911 Phone

911 Phone

What looks like an ordinary desk telephone is actually part of a museum exhibit at BBCM that lets kids practice dialing 911. When they pick up the receiver they hear a dial tone, and can then dial “911” (which plays the proper DTMF tones) they then hear the line ringing, and then an operator answers and says “911, what is your emergency?”

Phone

Inside the phone I’ve replaced the guts with a Teensy 3.2 and Teensy Audio Adaptor board. This combination handles the phone receiver being lifted, the keypad being pressed, and the playing of audio.

Teensy Pins

After consulting the docs for the Teensy Audio Adaptor board I knew which pins were used for the adaptor board, and which I could use for the receiver switch and the keypad. From what I could tell 11 pins were available (0, 1, 2, 3, 4, 5, 8, 16, 17, 20, 21) and I needed seven for the keypad and one more for the receiver switch. Plenty of pins!

I chose to go with a (perhaps slightly odd) method of having some pins point up instead of down so that I could attache female jumper wires to them. I’m not 100% happy with this solution, but it worked for this.

Teensy Wiring

The female jumper wire headers are nearly as tall as the Teeny + Audio board combined. You can also see a potentiometer used for controlling the volume, and a 1/8″ audio jack which goes to the speaker in the handset.

Receiver switch

I re-used the existing receiver switch and wired it into the Teensy. The switch is NC (Normally Closed) instead of NO (Normally Open) so I just reversed the logic in the code when looking for the switch to trigger. When the receiver is lifted the dial tone sound plays. (Also, if you leave it off the hook too long, it will play the annoying off-hook tone. (I aim for realism with this stuff!)

Keypad back

The keypad was also re-purposed (once I figured out the wiring) and wires were soldered onto the tiny thin wires, and the heat shrink tubing was added. The keypad runs to a small piece of perfboard which is used to connect to the Teensy, along with a few resistors in the mix.

Keypad Notes

Notes on how to wire up the keypad. I originally used a SparkFun Keypad for testing and development before I had a (broken) phone to tear apart.

Fritzing Diagram

Here’s a quick wiring diagram showing how it’s all put together. (I try to match wire colors in diagrams with the real-world wire colors, at least before any maintenance/repairs happen.)

Connection Board

The connector board allows for easily removing the Teensy if that’s ever required, or replacing the keypad if it goes bad. It also adds in the resistors necessary for the keypad to function properly.

Magnet Mount

For mounting the Teensy into the phone I opted to use an old hard drive magnet with a piece of wood attached. The Teensy is screwed to the wood (which is a good insulator) and the magnet is also screwed to the piece of wood, and then attaches strongly to the steel base of the phone. (There’s also gaff tape on the base of the phone, as extra protection between electricity and metal surface.)

RJ9 Wiring

I found this diagram for the speaker wiring from the handset, and wired the appropriate lines to a 1/8″ audio plug that goes into the adaptor board.

One other thing I did was add code that only accepts “properly dialed/formatted” phone numbers. So if you pick up the receiver and dial “4738911”, you didn’t dial “911”. You need to hang up and try again, with a proper “911”. There’s a buffer that looks for 3 digits (or 7 digits) and if you can’t get that right, it doesn’t work. As I said, I aim for realism with these things…

(Note: I may have left in a few numbers from testing. I’ll have to ask Jenny or Hannibal for the details.)

Categories
Uncategorized

Decagon Light

decagon

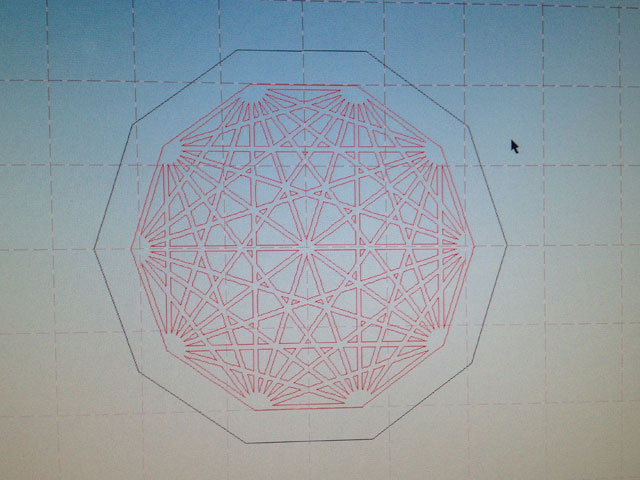
One of the projects I’m working on for Maker Faire Milwaukee is something I call the “DecaLight” which will (hopefully) consists of a decagon-shaped structure with ten light bulbs that are controlled by a set of relays and can turn on and off in pre-programmed sequences. For those unfamiliar with the Decagon, it’s a 10-sided polygon (sometimes called a “10-gon”) and this specific model is a 9-simplex.

Design

Etched Wood

While I started with building a quick and dirty prototype I also decided to build a scale mode. I used the laser cutter at Brown Dog Gadgets to etch and cut a piece of 3mm Baltic Birch plywood.

LED bulb

While the full-sized version will use light bulbs, the scale model will use 10mm LEDs. I just drilled holes for the LED leads since I never got around to adding holes to the laser cutting file.

Painted

Sometimes printmaking techniques come in useful when not making prints. I spray painted the wood and after it dried I rolled on some black ink to make a pure black and white version. For the full size version I’ll be using a CNC router to cut grooves (pockets) and then paint those white while the top surface will be black.

Wood

Here’s the bigger prototype I worked on, which just has a piece of plywood with lamp sockets attached. I got the sockets for cheap from ebay, but they’re terrible.

Sockets

I later spotted some nice ceramic (rather than plastic) lamp sockets at Menards that were just a bit more than the crappy plastic ones, so I’ll probably switch to those.

Hopefully I can get the prototype working in the next week or so. I’ve still got plenty of time to complete the full-scale version, but even with 174 days until Maker Faire Milwaukee, that time will go fast!

A video posted by Pete Prodoehl (@raster) on

Categories
Uncategorized

A Big Big Keyboard

Big Keyboard

If you happened to see a post titled 8 Crazy Keyboards That Will Trick Out Your Typing over on the Make Blog, you may have seen the big keyboard I worked on last year.

It was for a graphic design station we built for “Word Headquarters” at the Betty Brinn Children’s Museum. (I did this project as a contractor, before I worked at the Exhibits Shop.) Here’s a bunch of images that show the building of the keyboard.

Concept #1

This is the concept Mike came up with, which was to use lots of different sized pieces of wood, CNC’d to look like letterpress type (though obviously not reversed, as they would be unreadable.) This was definitely a fun design, but things always change along the development path…

Layout

Layout

While Mike was working on a design, I mocked up a drawing showing the spacing I thought would work using arcade buttons and how close together we could get them. This helped determine the overall size of the keyboard. Things could obviously get more spaced out, but this was the tightest we could go.

Teensy++ 2.0

I’ve built plenty of keyboards over the years using Teensy development boards so there wasn’t too much new happening on that front. Still, it’s always good to breadboard things up for testing.

Concept #2

We ended up going with a simpler and cleaner key layout than the original concept. As you’ll see later, we added variations elsewhere in the piece.

Teensy++ 2.0

Did I mention the keyboard would have 46 keys? Well, 46 is the number of digital inputs you can get on a Teensy++ 2.0 board. That’s every single input. (And yes, there was an issue using pin 6 which eventually got solved.)

Buttons!

Here’s a big piece of HDPE that’s been milled out for all of the buttons. Yes, that’s a lot of buttons! (There are 47 buttons because we used two for the spacebar.)

Wiring!

Here’s the back of the big piece of HDPE. That’s a lot of wires! We used slip-on connectors rather than soldering wires to the buttons (for ease of maintenance) and the other ends of the wires all go to screw terminals.

Teensy++ 2.0

All wires run to screw terminals on an Adafruit Perma-Proto board. It’s not the cleanest thing, but the deadline was tight on this, and the impending launch date meant we had to get it all done and working, even if it wasn’t the prettiest under the hood. (And yes, this is mid-wiring… not everything is connected yet!)

Wiring!

More wiring, more wiring, labels for everything… And testing as we go.

More Wires!

Here’s the piece of Alupanel attached to the top of the HDPE. It also serves to hold the wood keys in place. Each key has a lip at the bottom to hold it captive and is held up by the spring in the arcade button. (At some point I did weight tests to determine a safe weight for each key so that it wouldn’t press down on the button too much.)

Wood Keys

Since we went with a uniform size for the keys, we added some variety in the choice of woods used. You may notice there is no return key. We eventually replaced the exclamation point with a return key. (We honestly didn’t think we’d need one due to the way the application allowed the use of text, but like all exhibits you put on the museum floor, things change over time as you learn how they are used.)

Wood Keys

I think the nice, clean, readable type turned out great. I’d still like to see the really varied version that was the first concept some day, but this works for now!

Wood Keys

There’s about 650 lines of code running on the Teensy, including code for handling the shift key with every key, so even though you don’t see the exclamation point anymore, you can get one by holding down shift and typing the number “1” key. With the letters you get lower case and upper case, and with the numbers and other non-alpha keys you get whatever would normally show up with the shift key on a standard US keyboard.

In the end, this was an awesome project to be involved in. Thanks to Kathy, Mike, Sam, and Dom for contributing to the entire thing.

Categories
Uncategorized

Teensy LC BOB v1.2

Teensy LC BOB v1.2

Update: If you’d like one of these boards, there’s a newer version of this board, and you can purchase it on Tindie.

Woohoo! My new boards came in from OSH Park. The Teensy LC BOB v1.2 looks good! It’s purple, it has labels, it has places to put screw terminals and holes for mounting… There’s even a version number now.

Teensy LC on Perma-Proto Board

If you saw my previous post, I mentioned how I was doing things, which looked a bit like the photo above. There’s nothing wrong with this, but I wanted it a bit cleaner, hence the Teensy LC BOB PCB.

Teensy LC BOB v1.1

Here’s a photo of one of the v1.1 boards in an interactive museum exhibit. I had to drill the holes a bit larger to get it mounted, which is the reason the new version is v1.2.

I’m still not totally sure about the pin I labeled “17v” as it could be mistaken as “17 volts” but it’s really “pin 17 at Vin voltage”. This means the thing labeled “17v” will be whatever your input voltage is… and if you plan on using Neopixels, it should probably be 5 volts. I’ll assume users can read about the Teensy LC and figure it out.

OSH Park

And hey, you can order this PCB now! Get it from OSH Park. It’s shared publicly on the site. There doesn’t seem to be a way to set a license on OSH Park, but I’d consider it Open Source Hardware. If I had known how to add the OSHW logo, I would have. (Of course the Teensy itself is not open-source, but hey, not everything can be. It is a great piece of hardware, though!)

Note: The needed screw terminals are 2.54mm pitch, so these or these will work.