Categories
Uncategorized

Synth Setup for Maker Faire Milwaukee 2022

For Maker Faire Milwaukee this year I was not a producer, crew, volunteer, or even a Maker… I signed up as a “Performer” and asked to be placed in the Dark Room where I could make synth & drum noise as much as I wanted to. I signed up under the moniker NoiseMaster 3000 which I used (along with Maks and Dustin) back in 2017.

Now, originally MFMKE was supposed to be at State Fair Park again, and in the past the Dark Room was filled with all sorts of crazy things. Noisy things, light up things, weird things, etc. So I figured I would fit right in. (Note: Back when I was a producer I would get local modular synth people to come and make noise in the Dark Room. I figured this time it was my turn.)

Well, the venue changed to Discovery World, and I was told there would still be a Dark Room. And… there was. Sort of. It wad a theater, and the only other exhibit was Mark’s Sand Table, Arrakis. (And that was a last minute addition!) So it was really just me… in the Dark Room… alone.

It was fine. The second day Matt convinced me to bring Overhead Makey (one of my most successful exhibits) and I did, and it was grand. I also realized the Dark Room used to be full of stuff because I’d add at least a half dozen exhibits to it in the old days!

Anyway, I’m here today to talk about the setup, so let’s get to it!

I mentioned to someone that I’ve never taken all of this stuff out of my house before, and I’ve never actually connected it all together at once. Saturday was okay, but after screwing around with things all day I wanted to change a few things, so at the end of Saturday I ripped everything apart to reconnect it frsh Sunday morning.

What you see in the photo is what I had set up on Sunday when the Faire opened, and it pretty much remained that way all day. If Saturday was about figuring things out, then by Sunday I had things pretty well figured out.

In the photo above you’ll see the Behringer RD-6 Drum Machine, the Behringer TD-3 Bass Synthesizer, and the Behringer Crave Analog Synth. I sync’d these three together with the RD-6 setting the tempo. The RD-6 can very much be played/tweaked on the fly while it’s running, but the TD-3 not so much. I basically chose between patterns I had created and stored in the past. The Crave was connected to the TD-3 via MIDI so it was getting notes from the TD-3. That worked out fine since the Crave is all about twiddling those knobs to adjust the sounds coming out of it. And twiddle I did. I also invited others to twiddle.

Those three each had their own channel on the mixer. This made it easy to isolate then to explain to people which was making which sound, and I could set it to just output one of them, then show how that one worked.

Next up is the Korg Volca Sample 2, which was on mixer channel 4. (Note: The first day I did not have a cheat sheet to tell me what was on what channel, and mistakes were made.) Since the Sample is sort of a “budget groovebox” it can do quite a bit all on its own. I think on Saturday I had it sync’d to the RD-6for a bit, but honestly having it separate was a good idea because I could have a totally different thing going on with it, and it was my “Second Setup” after the Behringer Trio above. The Sample 2 is definitely a thing that you can play live and perform with. In fact, that’s pretty much the only way I use it now, to build up a beat over time, slowly adding to it, and playing live by knob twiddling and button pressing.

We’ve got the Korg NTS-1 which is a fine little digital synth and effects box. I connected up a small device I made that generates 16 step patterns and then sends them out via MIDI. So basically this was running spacey sounds and every now and then I would generate a new pattern. I tend to mess with the effects and add chorus, flanger, delay, and other weird stuff.Sometimes I would run this on top of other things, like the output of the Behringer Trio, other times I would just run it on its own.

I forgot to mention the Monotrons! The Korg Montron Delay and the Korg Monotron Duo fed into a splitter (in reverse, so a combiner I guess) and joined in with the NTS-1. To be honest I didn’t mess with the Monotrons too much. They are fun, and the Delay is a nice little effects box, but I guess I just focused on the NTS-1 more.

We’ve got the Pocket Operator Crew in the lower right corner. Those feed into a Bastl Dude mixer, which I love using with the PO gear so I can do punk-in/punch-out and adjust levels individually. I pretty much just ran four sixteen step patterns on the drums and then messed around with the bass, office, and factory live. (Note on the Factory, I need to make a 3.3v power supply because batteries suck in that thing and constantly die. Rechargeables do not work, and Alkalines do not last.)

All of the Pocket Operators use a Sync Splitter so I can plug each output into the Dude mixer. I’ve explained the Sync Splitter before

Here’s a Moukey 6 channel mixer that everything ran into. I then had a splitter coming out of it so I could run to the amp and to my headphones, and to the old Zoom recorder I had to record everything. (Yeah, I’ve got over 10 hours of audio!) I wasn’t able to lower the input to the Zoom on the Zoom so I set the output from the mixer to a good level and then adjusted the master output volume on the amp. (Note: There is an 8 channel Moukey mixer. I should consider getting one of those for the additional two channels.)

Speaking of the amp (if you can call it that!) I used an old car amplifier I had lying around, paired with some old stereo speakers that had been sitting in the basement for years. Everything is mono so stereo is a bit of a misnomer here. This setup worked pretty well. I didn’t need to be super-loud but could get plenty loud for the quiet theater I performed in. Oh, I managed to fit all of my gear into a suitcase and the speakers took up half the space!

You can’t run all this gear with a lot of POWER!!! Just kidding, I do have a lot of wall warts but I was probably pulling well under 5 amps, maybe under 3 amps. (And all the Pocket Operators and the Dude were battery powered. I did plug in the Volca, though it could have run find on batteries) It’s a bit of a mess, of course, and there’s another power strip out of view for the light, battery chargers, and one synth.

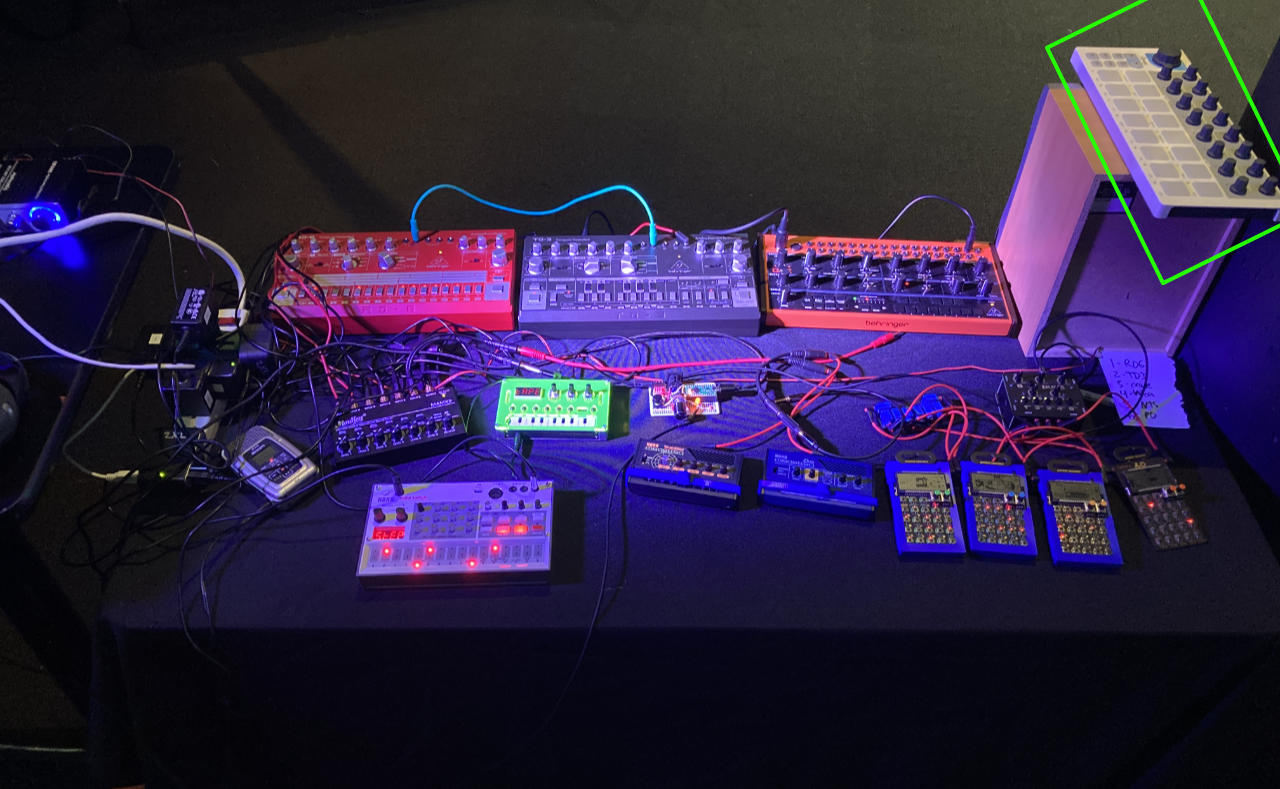
I did bring the Arturia BeatStep and tried to use it a bit on Saturday but by Sunday I just put it to the side. I sort of ran out of room and I didn’t get it connected in a way I liked. I may need to make note of how some things get connected for the future. I do like the BeatStep for screwing around, as demonstrated in this video.

Finally, there was a small scrap of paper to remind me what devices were on what channels of the mixer. With all this gear, I got confused a few times on Saturday, so the cheat sheet worked well. I basically had four sequences running at once and could switch between them which made things a lot of fun. If I ever do this again (?!?!?) I’d probably do something very similar.

Okay, I hope you enjoyed this (very) lengthy write-up about my set-up. As I mentioned this is my first time doing this, and overall I pleased with how it went. It was a super-low pressure gig where I could just have a good time. Cheers!

Categories
Uncategorized

Sync a Behringer TD-3 to a Pocket Operator

Last year I wrote up Syncing a Behringer RD-6 to a Pocket Operator via a Pi Pico which was more of a “wow, this works!” thing than a good explanation. I say that because a few people thought it was nice, but didn’t quite understand it, or wanted a diagram, so here’s a diagram…

The 1/8″ stereo jack on the left is where you plug in the Pocket Operator, and the 1/8″ stereo jack on the right goes to the device you want to sync up. (A Behringer RD-6 or TD-3 for example.) The ring/red is the audio side of things, the tip/orange is the click/sync signal put out by the PO, and sleeve/black is the common ground.

As previously mentioned, the Pocket Operators are awesome, and they can sync with each other, but can’t always sync with other devices. They put out a 1 volt signal for the sync track (the “click”) and most other electronic devices want something higher, like 2.5 volts, or 5 volts. The Behringer RD-6 wants over 2.5 volts, so you cannot sync it to a Pocket Operator, but now you can with this device!

This basically reads the 1 volt from the Pocket Operator, and then outputs 5 volts that the Behringer RD-6 can recognize as a sync in signal. While the RD-6 has a sync out port, there are reasons you may want to have the PO be the primary and the RD-6 be the secondary. There’s also the Behringer TD-3, which (oddly enough) does not have a sync out port.

A guy named Oscar got in touch and asked if this worked with the TD-3 and at the time I didn’t have one. Well, I have one now, and it works great. And since the TD-3 does not have a sync out port (!?!?) this is the only way (without additional hardware) to sync a TD-3 to a PO.

I built one (using a Nano, not an Uno) and I’m sending it to Oscar to test out. He’ll need to provide a USB power source and a splitter cable to get it working. (He’s got both already. Most Pocket Operator nerds probably do.)

I did make one mistake on this device… I actually incorporated labels into the enclosure. I for “In” and O for “Out” and when assembling it I didn’t notice I had it backwards until testing. Oops! So I just stuck some labels on the top, and now In is on the right and Out is on the left. If I make another, I’ll do it right next time. Oh, I also realized I could probably just build a splitter into it by adding another jack, so I may do that as well. (Though that will increase the size of the enclosure a bit.)

Categories
Uncategorized

Triple Trouble (à la Beastie Boys)

In case you didn’t know this, I’m a huge fan of The Beastie Boys and while listening to the song Triple Trouble from their album To the 5 Boroughs I heard this line:

I got kicks on the one, seven and eleven, snares on the five and thirteen

So I programmed it into the Behringer RD-6 Analog Drum Machine and… it sounded pretty good! Of course the RD-6 is based on the Roland TR-606 which isn’t quite the machine that the Roland TR-808 was. I mean, the 808 is famous for many reasons. (By the way, the “TR” stands for “Transistor Rhythm”.)

Hey, I’ve been in bands and heard a lot of music, and yeah, it’s pretty recognizable rhythm. After I posted the video a friend of mine said “Now do it on the Pocket Operator” so I did that, but I incorporated three Pocket Operators, which seemed appropriate. Here it is.

Want more drum patterns? Check out 808.pixll.de

Categories
Uncategorized

Battery Powered Behringer RD-6 Drum Machine

I’ve got a Behringer RD-6 Analog Drum Machine and it’s battery powered! I’ve seen a number of video reviews of this machine and the reviewer always seems to say “It’s not battery powered, so you can’t easily take it with you…” But I’m here to tell you that you can take it with you (just like Steve Albini did with his Roland TR-606) and below I’ll show you how.

Here’s what you need! A Behringer RD-6 Analog Drum Machine. Any color will do. Mine is red.

A battery pack that will hold 6 AA batteries. Each battery is 1.5 volts, so 6 of them is 9 volts. (And no, a standard 9 volt battery won’t work due to the low amperage it can put out.) I had some lying around that were like this but some have connectors on them like these. As long as they have bare wires at the end, you’re good. If they do have a connector on the end you may need to chop it off. (More on that later.)

You’ll need a 2.1mm Barrel Power Jack. I usually buy a pack of them. You only need one, so find one, or buy one, or buy a bunch and have spares. (You won’t need the matching receptacle plugs. At least not for this project.)

Important! All of the barrel jacks I’ve purchased have positive in the center and negative on the outside of the barrel/sleeve. In the world of musical things (well, guitar pedals at least) negative is on the center/tip, and positive is on the outside of the barrel/sleeve.

Here’s the back of the RD-6. You can see the symbol showing negative in the center/tip. Note that it also shows 300 milliamps. A 9 volt battery is 500 milliamps, so it will work for a while, but not long. The power supply Behringer gives you is 670 milliamps, but it’s not a battery, it plugs into a wall socket.

Right so we need to… reverse the polarity! Luckily it’s as simple as switching the wires around. Normally red is positive and black is negative, but we’re switching those. Make red negative and black positive.

Here’s mine. Now, it’s worth noting that I checked all of this with a multimeter. I’d advise you to do the same. Double check your work. If you don’t know what you’re doing, ask someone for help. This probably voids your warranty, and I cannot be held responsible for what you do. On with the show!

Oh, you’ll also need batteries! Any AA batteries will do, but rechargeable are preferred, at least by me. I’m a fan of the Eneloop rechargeable batteries. I’ve got some I bought ten years ago that still work. Grab a charger and 4 batteries and, um… 4 more because you need a total of 6 batteries.

Okay, stick it all together and you get a battery powered drum machine. Boom. Tsk. Boom. Tsk. I haven’t testing how long a set of batteries will last, but I’ll add that to the list of things to do.

Now, it’s not as nice as internal batteries that are built into the case, and if I actually use this on a regular basis I might think about adding in some hook & loop to attach the battery pack to the side. It might be better to use two 3 AA battery packs wires together, since those would have a flat back that could be attached to the RD-6.

Categories
Uncategorized

Syncing a Behringer RD-6 to a Pocket Operator via a Pi Pico

Hello! Check out the post Sync a Behringer TD-3 to a Pocket Operator for additional info, including a diagram.

The full title of this should be Syncing a Behringer RD-6 Analog Drum Machine to a Pocket Operator PO-14 Sub with a Raspberry Pi Pico Microcontroller. That’s a bit long, but it’s also descriptive. The RD-6 can be synced via MIDI, but the Pocket Operators do not do MIDI. The RD-6 does have an analog sync in which will trigger at over 2.5 volts, but the Pocket Operators output about 1 volt when they sync with each other.

I’d seen a few ideas and potential solutions online. One involved a DC boost converter, so I tried one but it didn’t work. Another involved using an overdrive guitar pedal, but I don’t have one…

What I do have are a bunch of Arduino boards of various types. I originally grabbed an Arduino Nano with the idea that I could capture the PO-14 output at 1 volt with an analog pin and then output a pulse on a digital pin as a trigger. The Arduino outputs at 5 volts though, and while I don’t mind making a voltage divider, I also had a Teensy LC on my desk, so I tested with that since it runs on 3 volts. And then, since my desk is fairly large, I grabbed a Raspberry Pi Pico microcontroller which also runs on 3 volts. I used the same Arduino code on the Pico as the Teensy (thanks to the work of Earle F. Philhower, III).

This is literally all there is to the code. I added an LED which blinks when a pulse is read, and then I just connected the signal wire to the same pin as the LED (and the other to ground) and plugged those into the sync in of the RD-6.

I’m new to all this syncing of musical devices, and this may be the wrong way to do it, but it worked for me. I did try to set the RD-6 as the master device and sync the PO-14 to it, but it didn’t seem to work quite right. The voltage may be a bit too high causing erratic behavior on the Pocket Operator.

Since this works, I’ll probably stick with it unless someone tells me it’s a terrible idea or tells me a better way to do it that is cheap, easy, or involves things I already have.

Enjoy the demo video below!