Categories
Uncategorized

Arduino Class Files

I finally got around to publishing the files for the Beginner Arduino Class I used to teach.

Here’s some text from the README:

In 2016 I taught a classed titled Electronics & Sculpture in the Peck School of the Arts at the University of Wisconsin Milwaukee. I often referred to the class as “Arduino for Artists”.

Basically, it was teaching art students, some of whom never programmed or wrote any code, how to activate their art using the Arduino platform.

We had five concepts we wanted to cover:

  1. Digital Input
  2. Digital Output
  3. Analog Input
  4. Analog Output (PWM)
  5. Serial Communications

In 2017 I moved on to teaching the class at Milwaukee Makerspace and I refined the curriculum a bit to resemble very closely what you’ll see in these files. I used components I had available. (Note: I should add a parts list at some point).

In 2018 I started teaching the class at Brinn Labs, usually with the help of Becky Yoshikane (friend, former coworker, former student, and former classmate). We taught the class all through 2018 and a few times in 2019.

I no longer teach the Beginner Arduino Class, but I wanted to share the files in case anyone else could find them useful.

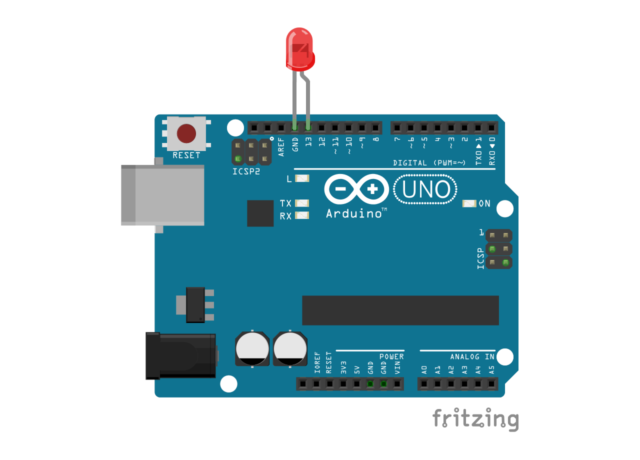
Each lesson contains an Arduino sketch and a wiring diagram (as a Fritzing file, and a PNG file). In some cases there are also images showing components, and most of the sketches should have links to the concepts/functions used in the sketch.

So there you go. If you find any of this useful, let me know. I wish I was in a position to keep teaching the class, as I really enjoyed doing so, but it’s not something I can do right now, but maybe you can. Let’s keep trying to teach electronics and prototyping to people and see what happens!

Categories
Uncategorized

Brinn Labs Hexalight

DSC32E_0643

I’ve been messing around with NeoPixels quite a bit lately, and I wanted a small portable light I could use to show off a few “makery” things. So the Brinn Labs Hexalight was created.

DSC32E_0630

It consists of a 3D printed base made from black PLA filament. It was close to a ten hour print, one of the longest I’ve done on my Monoprice Maker Select Plus 3D printer. It turned out well. There’s also a piece of laser cut Acrylic for the top…

DSC32E_0605

DSC32E_0617

DSC32E_0586

I only had clear Acrylic handy, and I experimented with a few ideas for light diffusion (including sanding the backside of the Acrylic, and using some HDPE from a milk jug) but in the end I just left the protective backing sheet that comes on the Acrylic in place. (There’s one small tear in it, though next time if I do this I’ll be more careful ahead of time since I’ll have a plan in place.)

DSC32E_0585

Some slotted pan head screws hold the top in place. I would have preferred some nice hex hardware (obviously!) but didn’t have any on hand, and wanted to complete this build quickly. (Maybe I’ll change it out in the future.)

DSC32E_0579

There’s a piece of scrap wood inside that holds the NeoPixels in place. The wood is not laser cut, but hacked up using a band saw. It’s “good enough” for a hidden piece. (Sometimes I work on projects in multiple places and have to use whatever tools are available at the time.)

The three strips of three NeoPixels each is about what I could fit inside. The strips run in parallel, so there’s not a lot pixels to work with. It also makes the transitions not super-smooth, though I still need to play with the code a bit more.

DSC32E_0583

Here’s a shot of the inside from the back/bottom. It’s messy. There’s an ATtiny85 on a board I’ve used before. This allows for the chip to be removed and reprogrammed. Yes, you can skip an Arduino and use an ATtiny85 for small simple NeoPixel projects. (And still program them with the Arduino IDE.)

DSC32E_0584

There’s a pair of wires that lead out a channel in the back/bottom and go to a barrel jack connector. I can then power it with a 5 volt power supply, either from a wall wart or a USB battery.

DSC32E_0646

BLHexalight v01C

I modeled the 3D printed part in OpenSCAD. It’s easy to make hexagons, and I just added a large squarish hole in the middle for the electronics.

BLHexalight v01B

The red piece is a block I used to do the boolean difference for the main piece. This allowed me to slice the hexagon at a specific angle so I could just end up with the part I wanted.

BLHexalight v01A

Here’s a view of the final piece viewed from the front. You can also see the little “shelf” I made for the piece of wood holding the NeoPixels to fit onto.

BLHexalight v01D

Here’s the model from the bottom. There’s the channel for the power wires to run out of. This was just another boolean difference with a cylinder this time to create a half circle channel.

bl-hex-vinyl

I used the Silhouette Cameo to cut a piece of black vinyl to put on the front so the logo could light up. Getting the vinyl perfectly aligned was a little tricky, so next time I might try another method. (Or just do a better job.)

DSC32E_0644

Categories
Uncategorized

Events on the Big Screen

brinn-labs-events

When you enter Brinn Labs you are greeted by digital signage that shows (among other things) a calendar of upcoming events. There’s a TV with a Raspberry Pi attached running Screenly OSE. This is somewhat similar to the MMPIS I created at Milwaukee Makerspace.

Compared to the MMPIS doing this upcoming events list was quite a bit easier! For Milwaukee Makerspace the data is pulled from a Google Calendar and uses a hacked-up version of PHP iCalendar to do the heavy lifting. It works, almost always, and only occasionally breaks. I’ve got a few emails from people asking how I did it, and I’ve sent them files with a small write-up. For dealing with a Google Calendar, it works fine…

On the Brinn Labs web site we’re using The Events Calendar WordPress plugin, which exposes the upcoming events as an RSS feed. Well that’s easy!

events-files

Sitting on the server I’ve got a few files. A Perl script, which fetches and parses the RSS file, and an HTML-Template file, which the Perl script uses to make things look pretty. Oh, there’s also a background image, and the whole thing outputs a simple HTML file that Screenly then displays on the TV. Between the script and template there’s probably less than 75 lines of code. The script is set to run with a cron job and updates a few times an hour.

brinn-labs-events-tv

I’m pleased with the results, and not including the time it took me to run CPAN it was probably less than an hour to actually get it all working and looking nice. If you haven’t checked out the Brinn Labs events yet, take a look! I’ll be teaching classes there, and we’ve got an Open House set for March 1st, 2018.