Categories
Uncategorized

DIY DSN with Screenly OSE

DIY DSN Screenly OSE

One of the nice things about doing an annual event year after year is that you can come up with ideas and even if you can’t really execute them in time you’ll hopefully have another chance a year later. So it was for my Do It Yourself Distributed Signage Network. (DIY DSN for short.)

Back in 2017 when one of the volunteers was building out the WiFi network for Maker Faire Milwaukee I came up with the idea of using a bunch of Raspberry Pi computers connected to TVs and other screens to provide real-time updatable digital signs around the venue. I’d used Screenly OSE in the past for MMPIS and other things so it seemed like the perfect solution.

If you’ve never used (or heard of) Screenly Open Source Edition before it’s a piece of software that runs on a Raspberry Pi and allows you to use a web browser to upload content to it (images and videos) and also have it load pages from the Internet.

Screenly also allows you to schedule start and stop times for content, so it’s easy to have something display between 9am and 1pm on Saturday, then disappear. For events this means you can have “live” signage for speakers or workshops as they are happening, then disappear and be replaced by a schedule or something else when done.

We managed to scrounge up eight TVs (or computer monitors with HDMI/DVI inputs) of various sizes along with eight Raspberry Pi boards. A few of the Pi boards did not have built-in WiFi so a cheap USB WiFi dongle was used to get them online. Each Pi got added to the WiFi network, got a unique IP address, and then a name so we knew where it was in the venue. Some were in front of stages, or at specific entrances, etc. Then it was a matter of creating targeted content. Most of the content was 1920×1080 graphics. (There’s a whole bunch below!)

Thanking sponsors is a great thing to do… You can schedule slides to show up for X number of seconds as well as during specific days/times or all the time.

You want to show what happens in a specific place on Saturday only on Saturday and not on Sunday? Easy!

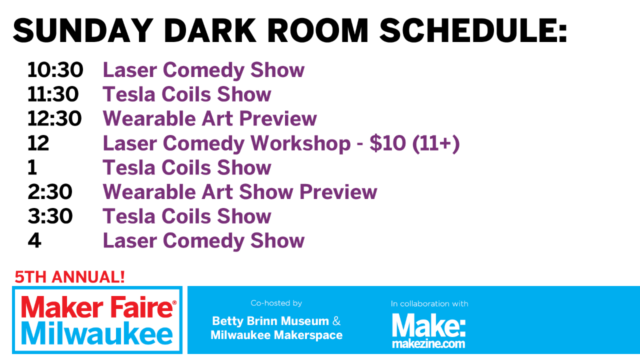
You want to show what happens in a specific place on Sunday only on Sunday and not on Saturday? Easy!

If you can design a PowerPoint or Keynote slide, you can probably figured out how to export it to a graphic image file suitable for loading into Screenly.

Yeah, thank those sponsors! You can have a different slide for each sponsorship level, and use logos or text or whatever your sponsorship commitment promises. (Also, let your sponsors know that they’ll also be recognized on digital signage at the event!)

Presenting Sponsor? They can have their own slide! Maybe it’s on the screen for 20 seconds instead of 10 seconds… Easy to do.

We’ve done this twice now, and while it was a bit of a scramble pulling together eight Raspberry Pi boards (and WiFi dongles for some of them), eight screens (TVs 27″ or larger work best), eight TV stands or table or whatever you’ll use to put them in places, eight HDMI cables, eight SD cards, eight power supplies, etc… If it’s for an event you might be able to borrow all the hardware you need, and since the software is open source it’s mainly a matter of learning how to use it and getting familiar with it. I’d recommend getting it up and running before your event starts just so you aren’t jumping in blind trying to figure it out while also running an event. :)

Categories
Uncategorized

Events on the Big Screen

brinn-labs-events

When you enter Brinn Labs you are greeted by digital signage that shows (among other things) a calendar of upcoming events. There’s a TV with a Raspberry Pi attached running Screenly OSE. This is somewhat similar to the MMPIS I created at Milwaukee Makerspace.

Compared to the MMPIS doing this upcoming events list was quite a bit easier! For Milwaukee Makerspace the data is pulled from a Google Calendar and uses a hacked-up version of PHP iCalendar to do the heavy lifting. It works, almost always, and only occasionally breaks. I’ve got a few emails from people asking how I did it, and I’ve sent them files with a small write-up. For dealing with a Google Calendar, it works fine…

On the Brinn Labs web site we’re using The Events Calendar WordPress plugin, which exposes the upcoming events as an RSS feed. Well that’s easy!

events-files

Sitting on the server I’ve got a few files. A Perl script, which fetches and parses the RSS file, and an HTML-Template file, which the Perl script uses to make things look pretty. Oh, there’s also a background image, and the whole thing outputs a simple HTML file that Screenly then displays on the TV. Between the script and template there’s probably less than 75 lines of code. The script is set to run with a cron job and updates a few times an hour.

brinn-labs-events-tv

I’m pleased with the results, and not including the time it took me to run CPAN it was probably less than an hour to actually get it all working and looking nice. If you haven’t checked out the Brinn Labs events yet, take a look! I’ll be teaching classes there, and we’ve got an Open House set for March 1st, 2018.

Categories
Uncategorized

Raspberry Pi Slide Show

Slideshow

I’ve been using Raspberry Pi single-board computers for video players for years now, and I’ve also used them as audio players, but I was missing a good way to use them as slide show devices… Until now.

I’ve used Screenly OSE for the MMPIS at Milwaukee Makerspace, and while Screenly is great for what it is (a network-connected, browser-controllable, digital signage device) sometimes you don’t want all the options and features and you don’t have a network. So I needed another solution.

I found fbi, “the Linux framebuffer imageviewer”, which can run at boot up and display a folder full of images at full screen with a configurable delay between changing images. Perfect!

Boot Volume

Now, there’s one more thing… If I’m going to put this somewhere that doesn’t have a network connection (like, in a museum) I want to be able to easily update the slides. The slides won’t be changing daily, but may be changing every month or so. For something like this it’s easy to store the images directly on the /boot volume, which is accessible on the SD card when you pop it in a Mac OS X or Windows computer.

You’ll notice a folder names “slides” and a file named “slideshow.sh”, which do the hard work here. It’s actually ridiculous to call it “hard work” because it’s dead simple. The slides folder contains images which will be displayed in alphabetical order. (Sadly, my screen shot does not reflect this!) In an ideal world you’d name your images 0001.jpg, 0002.png, 0003.jpg, etc. Just name them in order, and they’ll display in order. Easy.

Images

The SD card only has about 40MB of free space for you to put images on, but with JPG compression of photos, you can probably fit plenty of them. OK, so once you’ve got your folder full of images (which you can easily update on the SD card) you’ll need some way to run the slideshow.sh script.

Typically I do a sudo nano /etc/rc.local and add what’s needed to run my script. In this case it’s the /bin/bash /boot/slideshow.sh & you see on line 20. Oh, don’t forget to set the Pi to auto-login at boot. Since it’s been added to recent versions of Raspbian you don’t even have to muck around anymore.

#!/bin/sh -e
#
# rc.local
#
# This script is executed at the end of each multiuser runlevel.
# Make sure that the script will "exit 0" on success or any other
# value on error.
#
# In order to enable or disable this script just change the execution
# bits.
#
# By default this script does nothing.

# Print the IP address
_IP=$(hostname -I) || true
if [ "$_IP" ]; then
  printf "My IP address is %s\n" "$_IP"
fi

/bin/bash /boot/slideshow.sh &

exit 0

So yeah, we’re all set… but you probably want to see the code in slideshow.sh, right? This is it. Right here. Yes, it’s pretty much just two lines. Linux is like that sometimes… It’s not hard implementing something, it’s just hard finding out exactly how to implement something. It can be hard finding those two lines that you need! (The 200 may need adjustment. Longer may be better, but in my testing on a Raspberry Pi 2 Model B it worked well.)

#!/bin/sh

sleep 20

fbi -a -t 6 --blend 200 --readahead --noverbose -T 1 /boot/slides/* >/dev/null 2>&1

There’s some parameters you can set, like -t 6 which sets each slide to display for 6 seconds, and the blend thing, which sort of works. Hey, it’s a slide show, okay!?

I’ll probably work on this more, but I was pleased to find a solution so I thought it was worth sharing.

Categories
Uncategorized

MFMKE MMPIS Countdown

Countdown

So the President (of Milwaukee Makerspace) emails me and says “MMPIS countdown days to Maker Faire… can you make it happen?” Luckily, I can decipher this to mean he’d like to see a countdown screen on the MMPIS. Oh, the MMPIS is the Milwaukee Makerspace Pi-powered Informational System, and whipping up a new screen to do something simple is, well, simple. So I did.

It’s one image, about 20 lines of CSS, 20 lines of HTML, and a few lines of PHP. I hacked together some code, uploaded it, and sent Brant the instructions to load it into the kiosk via Screenly.

So the next time you’re at Milwaukee Makerspace, take a look at the countdown, and then freak out about how little time we have until Maker Faire Milwaukee!

Categories
Uncategorized

MMPIS (Part III)

Quote

See Also: MMPIS (Part I), MMPIS (Part II), and MMPIS (Part IV).

The MMPIS should also be somewhat whimsical. We like to be serious and safe at Milwaukee Makerspace, but we also like to have fun.

Buried in the deepest regions of the Milwaukee Makerspace wiki (actually it’s just in the ‘Miscellaneous’ section) is the quotes page. The quotes page is filled with insightful wisdom and… ok, many of the quotes are just amusing. At least to me, or other members.

Any member can get an account for the wiki, and therefore any member can add a quote to the page, and some have! I thought about scraping the page for quotes, but some are really long, and some I don’t find as amusing, so every now and I then I grab new ones I like and dump them into a text file. Then there’s a simple PHP page which reads in the text file, randomly grabs one, and outputs it. That’s what you see. (I’d share the code but to be honest if you’ve ever written any PHP at all, this should be a five minute exercise.)

Here’s a collection of some of my favorites. And yes, some of mine are in there, but they were added to the wiki by others, not me.

Quote

Quote

Quote

Quote

Quote

Quote

Quote

Quote