Categories
Uncategorized

Nerdy Derby – Poundin’ Sand

Poundin' Sand

If you saw my last post about the Nerdy Derby we are planning, you probably figured at some point you’d see a car. Well, here’s my progress so far.

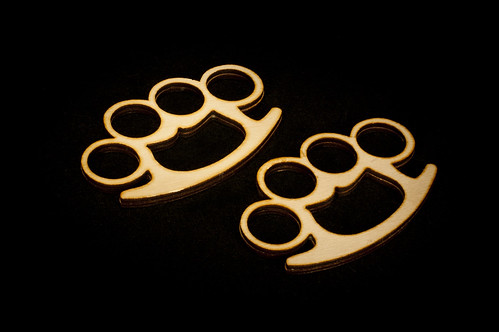
I cut the pieces from 3mm Baltic Birch plywood using the 60 watt laser cutter at Milwaukee Makerspace. Even the wheels are laser cut. I have no idea how well it will work, but I’m all for experimentation.

I’ve heard at least one person claim they will be building a car body completely out of lead, but I figured I already have plenty of sand around my house, so I plan to fill my car with sand, hence the name “Poundin’ Sand” (some of the runners-up included “Carl Sandburg”, “Sandoval”, “Sandy Bottom”, and “Adam Sandler”, but since “pound sand” sometimes means to engage in a futile activity, I thought it was fitting.

Besides, I’ve already awarded all the style points to Frankie for his belly tanker even though he’s not done yet, come on, just look at it!

Besides the glue to hold it together, the nails to hold the wheels on, and the sand, the rest of my car is 100% laser cut wood. I’m also planning another car that is (nearly) 100% 3D printed plastic. I’ve got some work to do on that yet, though the wheels should be done this week.

(Update: See the completed car.)

Categories
Uncategorized

Scrabble Coasters

Laser-etched coasters

I finally finished these Scrabble coasters I’ve been working on forever. There were so many issues with this project, I’m calling these beta and plan to completely redo them. This is all fine though, as I spent some time this weekend explaining to the kids that screwing up and doing things wrong is all part of learning. Fail faster and all that. I’m pretty sure that the next version of these coasters will not have all the problems that this version had.

Laser-cut coasters

So what were the problems? Well, for one thing, I’ve really got to remember to sand the wood first! Yeah, like, before I etch it. Not a huge deal, but I think they’d look better if I had sanded first. As for the backing, I first thought about using cork, but decided against it but then I had to use cork to cover up the mistake on the back of using the wrong wood stain. The cork was not easy to cut, and there are some rough edges. I used a lot of X-ACTO blades in the process, but I think this cork may have been aged a bit too long. As for the wood stain, the wrong stain nearly torpedoed this project. Lesson learned? Test the stain on scrap wood. Besides all that, I think they turned out pretty good.

Oh, while I was using the laser cutter at Milwaukee Makerspace Shane commented that the letters looked a little rough. I had to explain that I didn’t just type up the letters in CorelDraw, I actually scanned real Scrabble tiles, as I wanted these to be authentic replicas, only much larger. I probably didn’t get the color quite right, but again, I’d like to redo the whole project. A deeper/darker etch may be in order next time, and I’ve got another idea for the backing/feet.

Glass on coaster

But do they work? Yes! Surprisingly enough, the glass did not tip over or go flying off the coaster, though honestly I think gravity had a lot more to do with it than my skills at making things. Still, I’ll count it as a success. :)

Categories
Uncategorized

Wooden Knuckles

Wooden Knuckles

I made some wooden knuckles. Why wood? Well, brass knuckles are usually made out of brass, which is a hard metal, and may hurt someone. Wooden knuckles use wood instead, and shouldn’t be as harmful, or dangerous, or heavy. Also, I may have a history of making safe/odd weapons.

I also published this on Thingiverse, which means if you’ve got access to a laser cutter or are really handy saw, you can make your own. It’s derived from 3D printable “brass” knuckles which would look lovely in glow-in-the-dark ABS plastic.

These may or may not be something you want to take through security. I mean, they are definitely not metal, so they won’t set off any metal detectors, and really, they are more “art” than “weapon” in my opinion. (I have no idea what the TSA might think about these…)

If you want to make your own laser-cut wooden knuckles, you could probably do so at the Milwaukee Makerspace if you were a member, and had some 3mm Baltic Birch plywood and a bit of glue.

Categories
Uncategorized

Laser. Cut. Files. (Part III)

NOTE: See the latest post on this subject: Laser. Cut. Files. (Part IV)

SVG file in Inkscape

After my last post on the subject, Laser. Cut. Files. (Part II), I figured that I had something that worked… but then something came along that worked better!

Thanks to a comment from old pal Thomas Edwards on the Part II post:

Have you tried Inkscape Save as EPS, then Preview EPS to save PDF? (Inkscape Save as PDF might work as well, but I find Corel Draw gets messed up by fonts unless I start as EPS and then go to PDF)

I decided to give PDF files from Inkscape a try. They didn’t work. CorelDraw gets some crazy error trying to open PDF files I create in Inkscape on Mac OS X… but what did work was a two-step process!

Again, my goal is to do all of my design work on Mac OS X, typically using Inkscape, and then moving my files to the Laser Cutter PC running CorelDraw on Windows (yuk!)

PDF file in Preview
PDF file in Preview

So for now, my process is the following:

  1. Create vector art in Inkscape
  2. Save (original) file as an SVG
  3. Save (a copy of the file) as a PDF from Inkscape
  4. Open the PDF from Inkscape in Preview and Save as a PDF
  5. Copy the new PDF file to Laser Cutter PC
  6. Open a new document in CorelDraw and import PDF file

Save as a PDF (again!)

Windows and Linux users, your mileage may vary, and obviously you don’t have Preview.app, but on Mac OS X this process works for me. And as for the note in the comment from Thomas about fonts, I’d be sure to convert any fonts into outlines after I save my SVG file, but before I save my PDF file. (It’s an old print design trick.)

Categories
Uncategorized

Laser. Cut. Wood. (Part II)

Laser Cut Box

In our last adventure cutting wood we had success! And it was good… So I decided to try the awesome BoxMaker again and I’m pleased with the result as compared to the previous attempt.

Above you’ll see the template I created from BoxMaker with a light bulb on one of the faces. I got the original bulb from OpenClipArt and tweaked the SVG file in Inkscape until I was pleased with it. (I may still need to adjust a few of the thinner areas, but I definitely like it.)

Bulb Box

In the next image you can see the results of the cut. This is using 3mm Baltic Birch plywood, which I highly recommend for the 25 Watt Laser Cutter that Milwaukee Makerspace has.

There’s actually one extra piece in the lower center which you’ll notice has straight lines, and is not part of the box, but this is the interesting part…

One thing about using the laser cutter is determining what settings to use. For this cut I used 100% power with 3.2% speed. It takes a few passes to complete the cut (maybe 4 or 5) but it works. I found that at slower speeds there is a higher risk of flames (which are bad!) and you can char the wood a bit too much. I actually didn’t care about the charring as I will be painting this box, but if you want less charring, up the speed a little bit, and know that you will need more passes.

Burninator

Oh yeah, the interesting part! In the image above, I’ve highlighted two areas. In the bottom red rectangle you’ll see a lot more charring. This is due to the long straight line that the laser cutter follows when cutting. I noticed that the notched areas, with lots of small short lines, had much less flame, while the long continuous lines had a lot more flame. (It was still within an acceptable amount of flame, but this is why I didn’t want to go lower than 3.2% for the speed.)

So I’m definitely calling this one a success, if only due to the fact that I’m pretty certain I’ve got good settings to use when cutting 3mm Baltic Birch plywood.

Also, lasers are awesome!